Custom Migration
Custom migration of NoSQL database
When you migrate from LevelDB to MinioDB using LevelDbMinioMigration(2022-12-06).exe tool, you can perform custom migration with definition of the database configuration or configuration of the migration itself. The tool offers several options you can use.
To see additional details run command: .\LevelDbMinioMigration(2022-12-06).exe migrate --help.

It is possible to set the database configuration:
- S3 access key
- bucket name
- bucket region
- endpoint
- folder
- secret key
In case you do not specify this configuration, migration tool uses the default SmartFace Platform configuration.
It is possible to set the batch size option for improved performance of the migration. Batch-size option can be used to control how much key-value pairs are migrated at once.
Custom migration of face templates
There can be several reasons to migration face templates between different versions, including changing extraction algorithm.
Migration can be done in both Windows and Docker on Linux environments. Once you migrate the face templates, you need to use the new configuration for template extraction to use the new template version across the SmartFace. For more information about how to change the extraction algorithm please read here.
Before starting the migration ensure such services' configuration is updated, if you use them in your setup: SFExtractCpu, SFWatchlistMatcher, SFFaceMatcher, SFBase, SFCamX (ALL SFCam services), SFEdgeStreamProcessor, SFDbSynchronizationFollower. Also please note the SF_FACE_TEMPLATE_COMPATIBILITY_VERSION you are using.
Windows
When you migrate your face templates using sfadmin.exe tool, you can perform custom migration with definition of the database configuration or configuration of the migration itself. The tool offers several options you can use. You can use the --help option to get more information on options available.
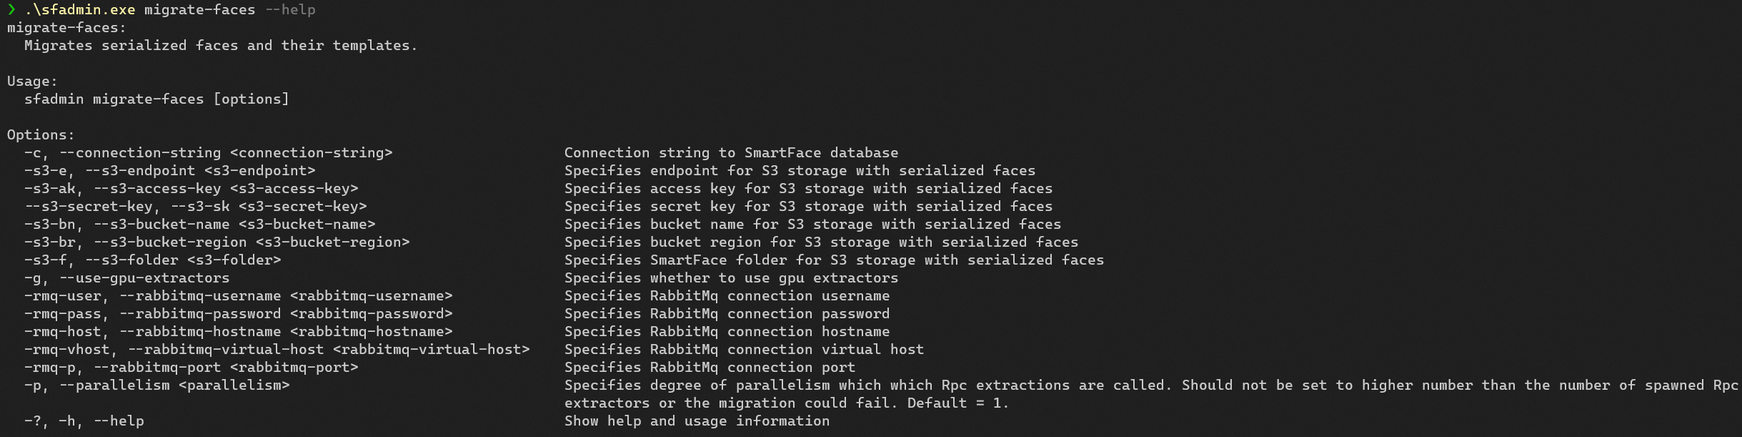
It is possible to set the database (minio) configuration:
- connection string
- S3 endpoint
- S3 access key
- S3 secret key
- S3 bucket name
- S3 bucket region
- S3 folder
It is possible to set the RabbitMQ configuration:
- RMQ user
- RMQ password
- RMQ host
- RMQ virtual host
- RMQ port
Run in Administrator Powershell (to use the default setup, credentials and to migrate the face templates into version 1.45) within the directory with the sfadmin.exe:
$env:SF_FACE_TEMPLATE_COMPATIBILITY_VERSION = "1.45"

./sfadmin.exe `
    migrate-faces `
    -c "Server=mssql;Database=SmartFace;User ID=sa;Password=Test1234;TrustServerCertificate=true;" `
    -dbe "MsSql" `
    -rmq-host "rmq" `
    -rmq-user "guest" `
    -rmq-pass "guest" `
    -rmq-vhost "/" `
    -rmq-p "5672" `
    -rmq-use-ssl "false" `
    -s3-e "http://minio:9000" `
    -s3-bn "inno-smartface" `
    -s3-ak "minioadmin" `
    -s3-sk "minioadmin" `
    -s3-f "sface"
To initiate the migration we are using the migrate-faces function. You can use the --help option to get more information on options available.
In case you do not specify this configuration, migration tool uses the default SmartFace Platform configuration.
If everything is set correctly, the command will tell you its progress every 100 faces.
If it says there is some face that could not be migrated or it errored our, we need to flag such faces, so they are not used. Use the command below, again using your credentials,
$env:SF_FACE_TEMPLATE_COMPATIBILITY_VERSION = "1.45"

./sfadmin.exe `
    set-state-error-non-migrated-faces `
    -c "Server=mssql;Database=SmartFace;User ID=sa;Password=Test1234;TrustServerCertificate=true;" `
    -dbe "MsSql" `
    -y
Docker
You can use the sf_admin image to do the migration within the Docker on Linux environment.
To initiate the migration we are using the migrate-faces function. The tool offers several options you can use. You can use the --help option to get more information on options available.
It is possible to set the database (minio) configuration:
- connection string
- S3 endpoint
- S3 access key
- S3 secret key
- S3 bucket name
- S3 bucket region
- S3 folder
It is possible to set the RabbitMQ configuration:
- RMQ user
- RMQ password
- RMQ host
- RMQ virtual host
- RMQ port
To initiate the migration run the command below, using your credentials, current platform version and the connection strings. The command below is using default setup and credentials migrating the face templates into version 1.45 (accurate_visa_wild).
	docker run --rm --name sf_admin \
	    --volume $(pwd)/iengine.lic:/etc/innovatrics/iengine.lic \
	    --network sf-network \
	    -e  SF_FACE_TEMPLATE_COMPATIBILITY_VERSION=1.45 \
	    registry.gitlab.com/innovatrics/smartface/sf-admin:v5_4.29.0 migrate-faces \
	    -c "Server=pgsql;Database=smartface;Username=postgres;Password=Test1234;Trust Server Certificate=true;" \
	    -dbe "PgSql" \
	    -rmq-host "rmq" \
	    -rmq-user "guest" \
	    -rmq-pass "guest" \
	    -rmq-vhost "/" \
	    -rmq-p "5672" \
	    -rmq-use-ssl "false" \
	    -s3-e "http://minio:9000" \
	    -s3-bn "inno-smartface" \
	    -s3-ak "minioadmin" \
	    --s3-sk "minioadmin" \
    -s3-f "sface"
If everything is set correctly, the command will tell you its progress every 100 faces.
If it says there is some face that could not be migrated or it errored our, we need to flag such faces, so they are not used. Use the command below, again using your credentials,
	docker run --rm --name sf_admin \
	    --volume $(pwd)/iengine.lic:/etc/innovatrics/iengine.lic \
	    --network sf-network \
	    -e  SF_FACE_TEMPLATE_COMPATIBILITY_VERSION=1.45 \
	    registry.gitlab.com/innovatrics/smartface/sf-admin:v5_4.29.0 set-state-error-non-migrated-faces \
	    -c "Server=pgsql;Database=smartface;Username=postgres;Password=Test1234;Trust Server Certificate=true;" \
	    -dbe "PgSql" \
	    -y
List ERROR Watchlist Members
The Watchlist Members in the ERROR state will not be used, however you can easily get a list of such Watchlist Members, so you can deal with such Members within your use case. This can be done using the GraphQL API. A sample of such query is below:
query
{
  faces(where:  {
     faceState:  {
        eq: ERROR
     }
  })
  {
    items{
      tracklet
      {
        watchlistMembers
        {
          id
          fullName
          displayName
        }
      }
      state
      templateVersion
    }
  }
}
Face templates migration performance
In case you have many data you can improve the performance and scale of the migration using your GPU or increase the parallelism by spawning more detection/extraction services.
The options --use-gpu-extrators and --parallelism can be used.
Spawning additional extractors
The process for spawning additional extractors differ in Windows and Docker installations.
In Windows
Locate the SmartFace installation folder C:\Program Files\Innovatrics\SmartFace, open Command Line from the folder and run command: start RpcExtractor.exe.
In case you would like to permanently register this service run command:sc create "servicename" binpath= "\"C:\Program Files\Innovatrics\SmartFace\RpcExtractor.exe\" --gpu=true" start= delayed-aut where you define unique servicename.
In Docker
To add new extractors you can scale them up extractors in the Docker environment you can “add replicas” using the additional configuration below:
    deploy:
      replicas: 3
You need to remove name for the service so it can assigned automatically for each instance, the sample CPU extractor would look like below:
extractor:
    image: ${REGISTRY}sf-extractor:${SF_VERSION}
    restart: unless-stopped
    deploy:
      replicas: 3
    environment:
      - RabbitMQ__Hostname
      - RabbitMQ__Username
      - RabbitMQ__Password
      - RabbitMQ__Port
      - AppSettings__Log_RollingFile_Enabled=false
      - AppSettings__Log_JsonConsole_Enabled
      - AppSettings__USE_JAEGER_APP_SETTINGS
      - JAEGER_AGENT_HOST
    volumes:
      - "./iengine.lic:/etc/innovatrics/iengine.lic"
To apply the changes, run the docker compose up -d command within the docker-compose.yml directory.