Cameras
The Cameras dashboard in the Video Processing Platform Station is your command center for registering cameras and edge streams, access a detailed list of your devices, and effortlessly configure and manage them to meet your surveillance requirements.
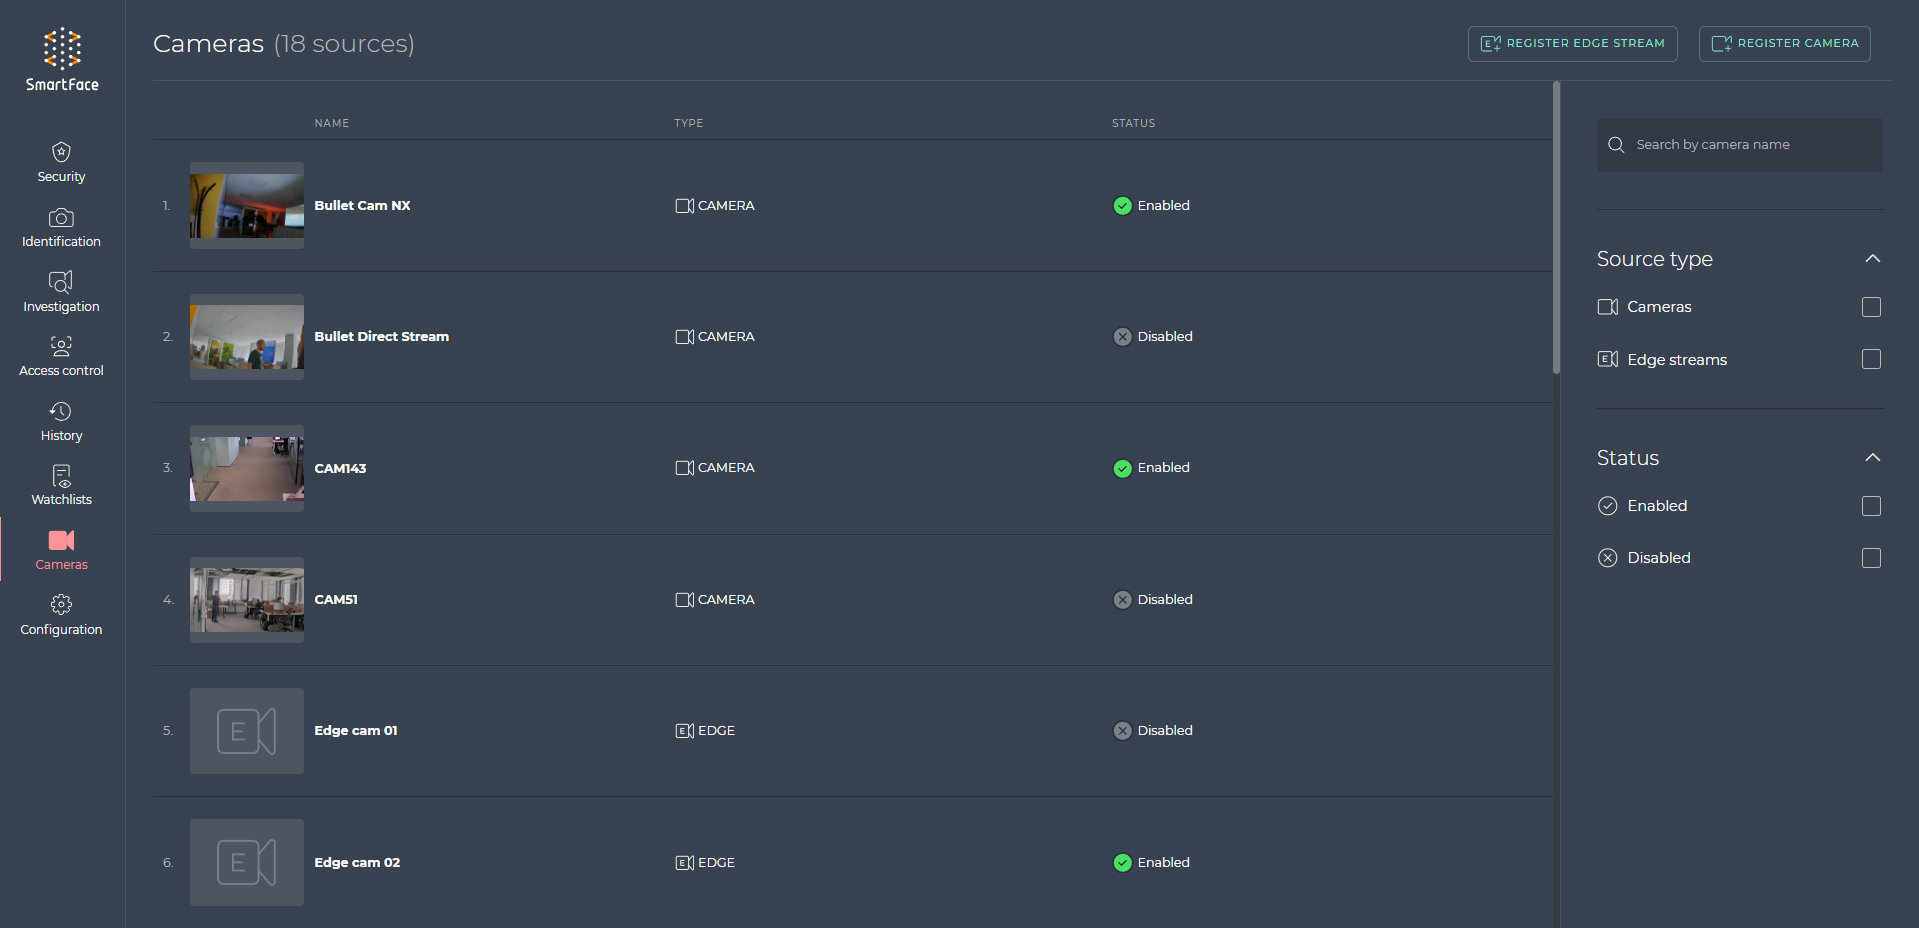
Cameras dashboard
Camera Dashboard Sections
The cameras dashboard contains several sections:

Cameras dashboard - section
Title bar
At the top of the page, you’ll find the Title Bar, which displays the name of the page - Cameras, helping you quickly identify your location within the Video Processing Platform Station interface. Next to the dashboard name, the number of registered cameras and edge streams is displayed.

Title bar of the Cameras page
Selected filter area
Directly below the Title Bar, you’ll encounter the Selected Filter Area, but it is only visible when a filter has been applied. This section allows you to refine the camera and edge stream list by applying specific filters, customizing the displayed content according to your preferences.

Selected filters
Camera and edge stream list
The central part of the dashboard is dedicated to listing all registered cameras and edge streams. This comprehensive list provides a visual overview of your surveillance devices, making it easy to identify and access each one.

Cameras and edge streams list
Fulltext search
To facilitate efficient device lookup, the Full-Text Search feature is available. This allows you to quickly search for specific cameras or edge streams by entering keywords or names.

Full-text search
Available filters
In addition to the Selected Filter Area, you’ll also have access to a list of Available Filters. These filters can help you further refine and categorize the devices in the camera and edge stream list based on source type and status.

Available filters
Camera management
In this part of the documentation you will explore how to effectively managing cameras within the Video Processing Platform Station. Camera management encompasses a range of essential activities, including:
This section is focused on RTSP enabled IP cameras. For information about the Edge cameras, please look here.
Set up new camera
The Video Processing Platform Station allows you to register a RTSP camera in the Video Processing Platform. When registering the camera, you can set its name and configure the video source. To do so, follow these steps:
- Click on Cameras in the left menu panel.
- Click on ADD CAMERA button on the right side of the dashboard.
- Enter the Name and RTSP / Video source.
- To register a new camera, click on ADD CAMERA button.

Enable/Disable camera
When you enable a camera in the Video Processing Platform Station, Video Processing Platform will start to process the video stream from the camera and the Video Processing Platform Station will start to display notifications and successful passages. For more information about the settings, see camera sonfiguration.
To enable or disable a registered camera in the Video Processing Platform Station:
- Click on Cameras in the left menu panel.
- Open Camera configuration by clicking on item in camera list.
- You may either:
- Enable the camera, by switching on the toggle button Enabled (appears green).
- Disable the camera, by switching off the toggle button Enabled (appears red).
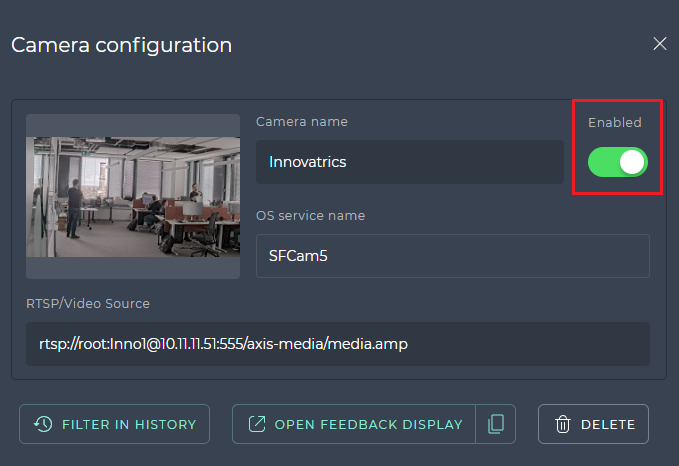
Enabled camera
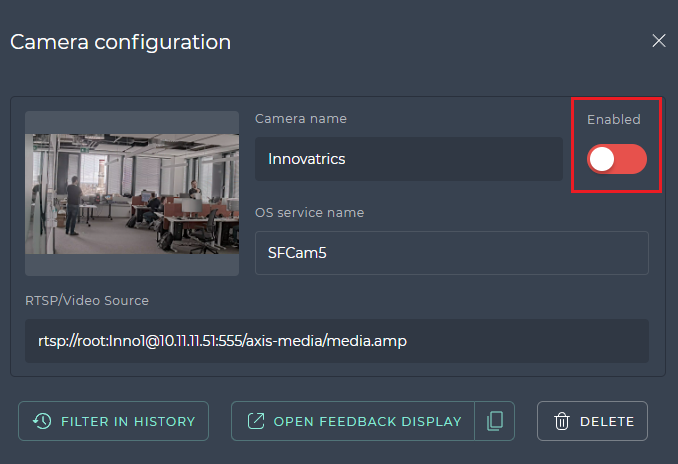
Disabled camera
Configure camera
The Video Processing Platform Station allows you to configure cameras. These settings directly impact the processing of video streams by the Video Processing Platform.
To modify the camera configuration:
- Click on Cameras in the left menu panel.
- Open Camera configuration by clicking on item in camera list.
- Now, you can modify camera name and camera configuration parameters.

Camera configuration detail
Camera configuration sections and parameters
The camera configuration contains several sections:
- General section
- Detection timing section
- Face processing section
- Spoof detection section
- Palm processing section
- Pedestrian processing section
- Object processing section
- Video preview section
When creating a camera, only the General, Detection Timing, Face processing and Video preview sections are allowed.
General section
The General section contains basic information about the camera and you can also see a preview there.This section is always displayed and cannot be turned off or on.
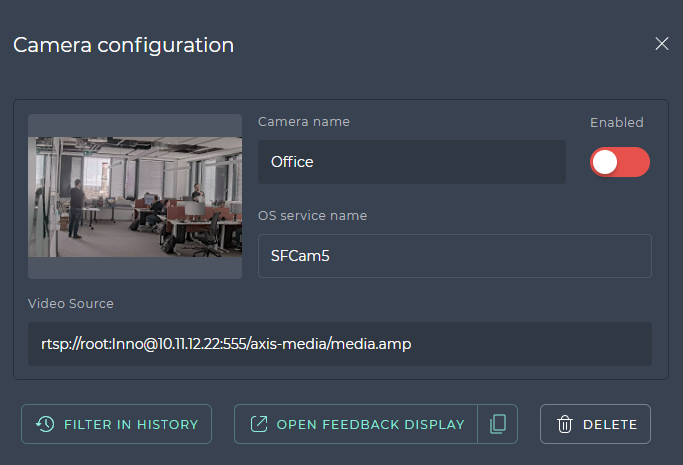
General section
| Parameter name | Description |
|---|---|
| Camera Name | The name of camera |
| OS Service Name | The camera service name. It is read only information, assigned by the system. |
| RTSP/Video Source | A RTSP URL to the camera stream or video file name with full path for file location |
This section contains action buttons:
- FILTER IN HISTORY - opens History events page that displays the results for this specific camera.
- FEEDBACK DISPLAY - opens/Copy the Feedback display link for selected camera.
- DELETE CAMERA - allows you to delete the camera.
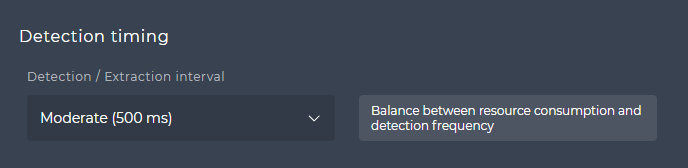
Detection timing section
The Detection timing section is intended for configuring time intervals for detection and extraction.This section is always displayed and it is not possible to enable/disable it
Detection timing section
| Parameter name | Description | Default value |
|---|---|---|
| Detection / Extraction interval | Balance between resource consumption and detection frequency in miliseconds. You can choose between these options:
| Moderate (500 ms) |
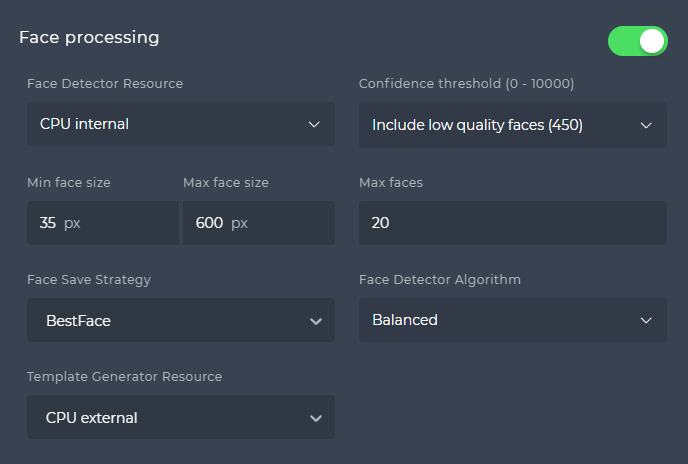
Face processing section
The Face processing section contains the necessary parameters for the configuration of both face detection and face extraction. The section would be enabled by default after creating the camera.
Face processing section
| Parameter name | Description | Default value | Value interval |
|---|---|---|---|
| Face detector resource | Choose between these resources for detection:
| CPU internal | |
| Confidence threshold | The confidence threshold for face detection.You can choose between these options:
| Only good faces (1500) | |
| Min face size | The minimum face size necessary for detection in pixels. | 35 | |
| Max face size | The maximum face size necessary for detection in pixels. | 600 | |
| Max faces | The maximum number of faces detected on one frame. ⚠️Setup this value according to your use-case. Lowering this number, you can significantly increase overall processing speed. | 20 | |
| Face save strategy | The strategy for saving data from all detections, you can choose from:
⚠️Set this wisely. Strategy to save all detected objects can generate huge amount of data. | BestFace | |
| Face detector algorithm | The algorithm for face detection. You can choose between these options:
| Balanced | |
| Template generator resource | Choose between these resources for template extraction:
| CPU external |
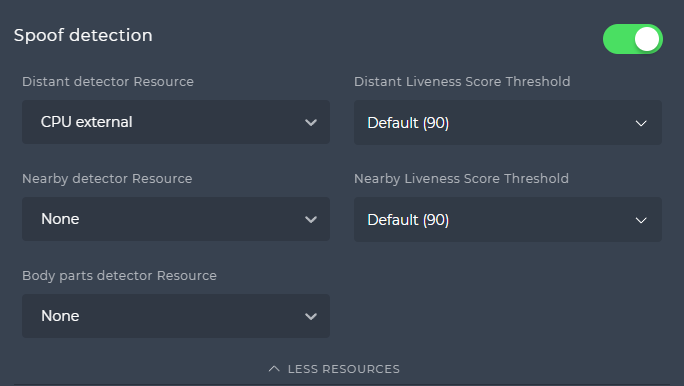
Spoof detection section
The spoof detection feature is initially deactivated upon the creation of the camera. The configuration for spoof detection enables the setting of various resource types at the same time. By selecting “More resources”, additional detector resources can be chosen to enhance the spoof detection capabilities.
Spoof detection section
| Parameter name | Description | Default value | Value interval |
|---|---|---|---|
| Distant detector resource | Choose liveness approach for spoof detector:
| None(CPU external is automatically set when you enable the spoof detection section) | |
| Distant Liveness Score Threshold | Anything below this value from distant liveness check will be considered as spoof. Available only for Distant CPU external and Distant GPU external spoof detector resource.You can choose from:
| Default (90) | 0 ↔︎ 100 |
| Nearby detector resource | Choose liveness approach for spoof detector:
| None | |
| Nearby liveness score threshold | Anything below this value from nearby liveness check will be considered as spoofAvailable only for Nearby CPU external and Nearby GPU external spoof detector resourceYou can choose from:
| Default (90) | 0 ↔︎ 100 |
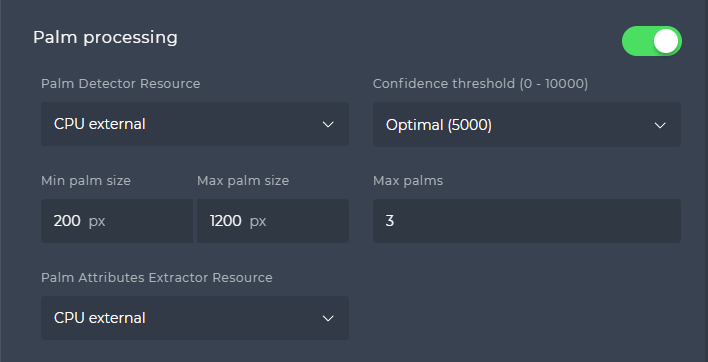
Palm processing section
The Palm processing section contains all the necessary parameters for the configuration of palm detection and identification.
Palm processing is disabled by default after creating a camera. You can turn it on easily by clicking on the toggle switch, which sets the default values of the parameters listed below in the table.
This section is available only if the Palm processing is enabled in the Video Processing Platform Station. For information about how to enable the Palm processing please click here.
Palm processing section
| Parameter name | Description | Default value | Value interval |
|---|---|---|---|
| Palm detector resource | Choose which detector will be used for palm detection.
| None | |
| Confidence threshold | The confidence threshold for palm detection. You can choose from:
| Optimal (5000) | 0 ↔︎ 10 000 |
| Min palm size | The minimum palm size necessary for detection in pixels. | 200 | 0 ↔︎ 10 000 |
| Max palm size | The maximum palm size necessary for detection in pixels. | 1 200 | 0 ↔︎ 10 000 |
| Max palms | The maximum number of palms detected on one frame. | 3 | 1 ↔︎ 1 000 |
| Palm Attributes Extractor Resource | Choose the resource for extracting the palm attributes. Currently there is only one value available:
| CPU external |
Pedestrian processing section
The Pedestrian processing section contains all the necessary parameters for the configuration of pedestrian detection and extraction of pedestrian attributes.Pedestrian processing is disabled by default after creating a camera. You can turn it on easily by clicking on the toggle switch, which sets the default values of the parameters listed below in the table. cam-pedestian-proc-on
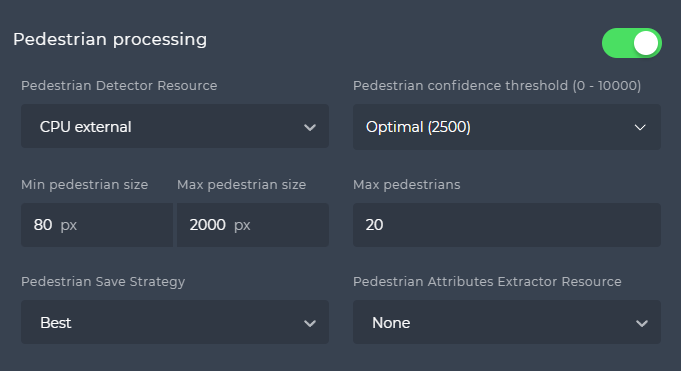
Pedestrian processing section
| Parameter name | Description | Default value | Value interval |
|---|---|---|---|
| Pedestrian detector resource | Choose which detector will be used for pedestrian detection.
| None | |
| Confidence threshold | The confidence threshold for pedestrian detection. You can choose from:
| Optimal (2 500) | 0 ↔︎ 10 000 |
| Min pedestrian size | The minimum pedestrian size necessary for detection in pixels. | 80 | 20 ↔︎ 10 000 |
| Max pedestrian size | The maximum pedestrian size necessary for detection in pixels. | 2 000 | 21 ↔︎ 10 000 |
| Max pedestrians | The maximum number of pedestrians detected on one frame. | 20 | 1 ↔︎ 1 000 |
| Pedestrian save strategy | The strategy for saving data from all detections, you can choose from:
⚠️Set this wisely. Strategy to save all detected objects can generate huge amount of data. | Best | |
| Pedestrian attributes extractor resource | Turn on enhanced pedestrian attributes on selected camera. Choose which extractor will be used for pedestrian attributes extraction:
| None |
Object processing section
The Object processing section contains all the necessary parameters for the configuration of object detection and possibility to choose which object types should be detected.Object processing is disabled by default after creating a camera. You can turn it on easily by clicking on the toggle switch, which sets the default values of the parameters listed below in the table.

Object processing section
| Parameter name | Description | Default value | Value interval |
|---|---|---|---|
| Object detector resource | Turn on object detection on selected camera. Choose which detector will be used for object detection:
⚠️To enable object detection, you must ensure that at least one object from the Object Type parameter is selected. | None | |
| Confidence threshold | The confidence threshold for object detection. You can choose from:
| Optimal (6000) | 0 ↔︎ 10 000 |
| Min object size | The minimum object size necessary for detection in pixels. | 80 | 20 ↔︎ 10 000 |
| Max object size | The maximum object size necessary for detection in pixels. | 2 000 | 21 ↔︎ 10 000 |
| Max objects | The maximum number of objects detected on one frame. | 20 | 1 ↔︎ 1 000 |
| Object save strategy | The strategy for saving data from all detections, you can choose from:
⚠️Set this wisely. Strategy to save all detected objects can generate huge amount of data. | Best | |
| Object type | You can choose which objects will be detected on the camera. You can choose from three categories:
|
Video preview section
In the Video preview section, you can set the quality of the preview from the camera on the security dashboard. It also allows you to set preview profiles for detected shapes that will be displayed on the preview from the camera.
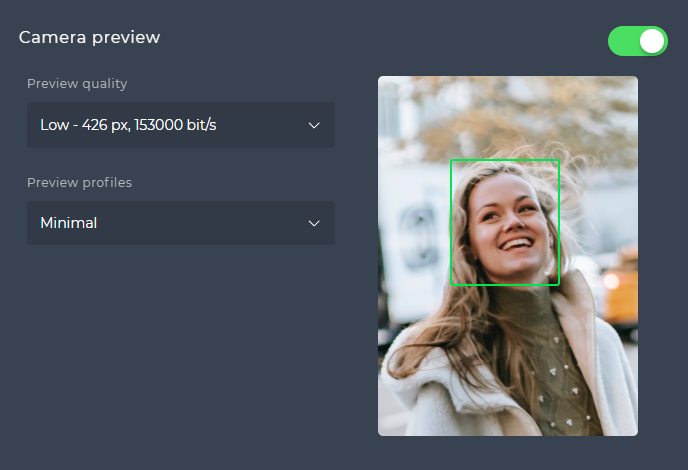
Video preview section
| Parameter name | Description | Default value | Value interval |
|---|---|---|---|
| Preview enabled | Enable preview generation with embedded graphics. The preview is generated as an MPEG1 stream. You can define the stream quality in the Preview quality setting. | Enabled | |
| Preview quality | Define the quality of generated stream.You can choose from:
| Low | |
| Preview profiles | Define predefined profile what attributes will be displayed near to the detected or identified object. Four predefined profiles are available and there also posiibility to set custom preview profile:
| Minimal |
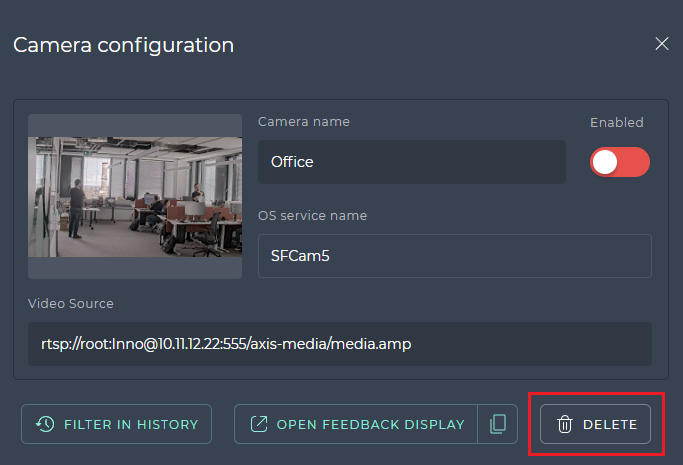
Delete camera
The Video Processing Platform Station allows you to delete camera that is processed by the Video Processing Platform. To delete a camera in Video Processing Platform Station, follow these steps:
- Click on Cameras in the left menu panel.
- Open Camera configuration by clicking on utem in camera list.
- Click on DELETE button and click on option OK in confirmation window.
Edge stream management
The Video Processing Platform Station allows you to set up and configure Edge Stream that will be processed by the Video Processing Platform. In the next chapters, you can find information how to:
This section is focused on Edge enabled Smart Cameras. For information about the RTSP cameras, please look here.
Set up new edge stream
The Video Processing Platform Station allows you to register an Edge Stream camera in the Video Processing Platform. When registering the camera, you can set its name and configure the video source. To do so, follow these steps:
- Click on Configuration in the left menu panel.
- Click on ADD EDGE STREAM button on the right side of the dashboard.
- Enter the Edge stream name and Client ID.
- To create a new edge stream, click on ADD EDGE STREAM button.

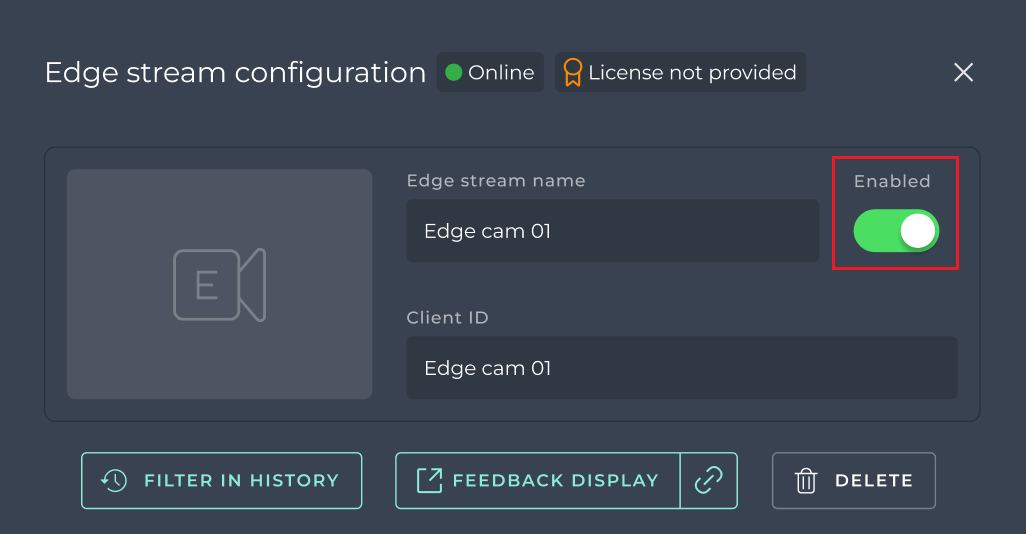
Enable/Disable edge stream
When you enable an edge stream in the Video Processing Platform Station, Video Processing Platform will start to process the video stream from the edge stream and Video Processing Platform Station will start to display notifications and successful passages. For more information about the edge stream configuration, see edge stream configuration.
To enable or disable a registered edge stream in the Video Processing Platform Station:
- Click on Cameras in the left menu panel.
- Open Edge stream configuration by clicking on item in camera list.
- You may either:
- Enable the Edge stream, by switching on the toggle button Enabled (appears green).
- Disable the Edge stream, by switching off the toggle button Enabled (appears red).
Enabled edge stream

Disabled edge stream
Configure Edge stream
The Video Processing Platform Station allows you to configure Edge streams. The Edges tream configuration directly impact the processing of video streams by the Video Processing Platform.
To modify the Edge stream configuration:
- Click on Cameras in the left menu panel.
- Open Edge stream configuration by clicking on item in camera list.
- Now, you can modify Edge stream name and Edge stream configuration parameters.

Edge stream configuration detail
Edge stream configuration sections and parameters
The Edge stream configuration contains several sections:
- General section
- Face processing section
- Visual Code detection section
- Palm detection section
- Spoof detection section
- Watchlists for matching and synchronisation
- Messaging
- Logging
- Send crop images
- Send frame images
- License
When creating an edge stream, only the General, Face processing, Messaging, Send crop images sections are enabled.
General section
The General section contains basic information about the edge stream.This section is always displayed and cannot be turned off or on.Health status is displayed at the top of the section. You can find more information in the chapter below.
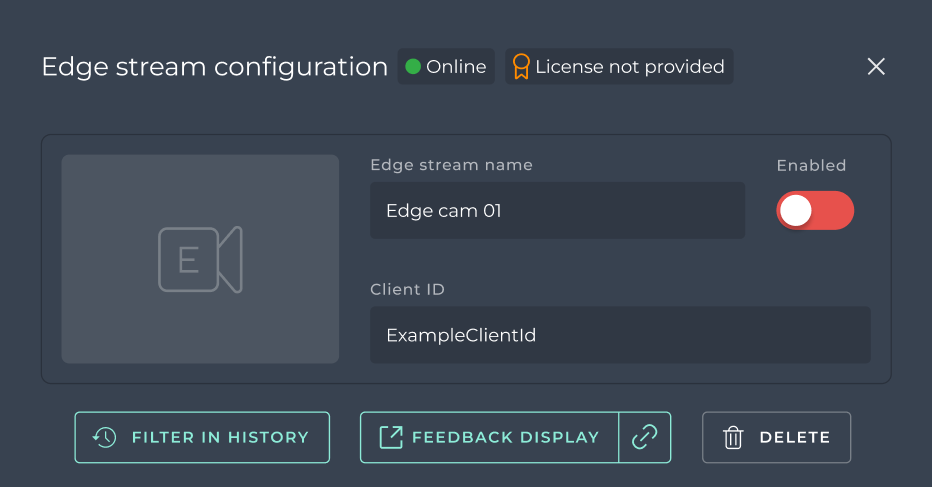
General section
| Parameter name | Description | Default value | |
|---|---|---|---|
| Edge stream name | The edge stream name. | Provided string | |
| Client ID | A direction to the edge stream. | Provided string |
This section contains action buttons:
- ENABLED - toggle switch to enable/disable edge stream.
- FILTER IN HISTORY - opens History events page that displays the results for this specific edge stream.
- FEEDBACK DISPLAY - opens/Copy the Feedback display link for selected edge stream.
- DELETE CAMERA - allows you to delete the edge stream.
Face processing section
The Face processing section contains the necessary parameters for the configuration of face detection, extraction and tracking. The section would be enabled by default after creating the edge stream.
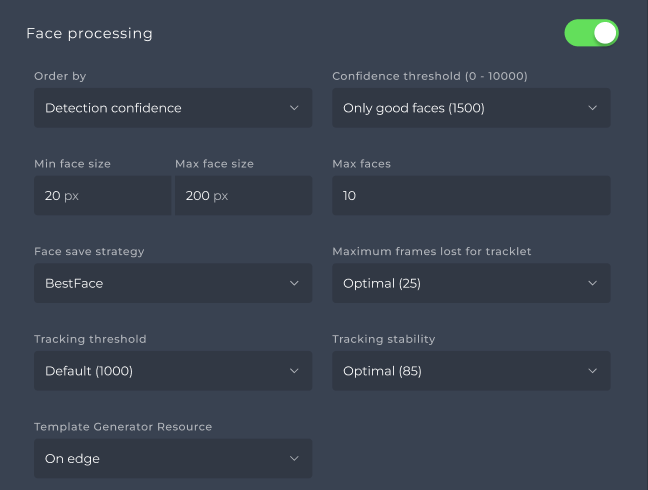
Face processing section
| Parameter name | Description | Default value | Value interval |
|---|---|---|---|
| Order by | It allows you to specify the criteria for processing detected faces. You can choose to order faces by:
| Detection confidence | |
| Confidence threshold | The confidence threshold for face detection.You can choose between these options:
| Only good faces (1500) | 0 ↔︎ 10 000 |
| Min face size | The minimum face size necessary for detection in pixels. | 20 | 1 ↔︎ custom positive value |
| Max face size | The maximum face size necessary for detection in pixels. | 200 | 1 ↔︎ custom positive value |
| Max faces | The maximum number of faces detected on one frame. ⚠️Setup this value according to your use-case. Lowering this number, you can significantly increase overall processing speed. | 10 | 0 ↔︎ 100 |
| Face save strategy | The strategy for saving data from all detections, you can choose from:
⚠️Set this wisely. Strategy to save all detected objects can generate huge amount of data. | BestFace | |
| Maximum frames lost for tracklet | Defines the maximum number of frames to keep lost faces in tracking. Choose between options:
| Optimal (25) | 1 ↔︎ 65535 |
| Tracking threshold | Minimal detection confidence threshold for tracked faces. Faces with detection confidence below this threshold are filtered out by tracking and not used for template extraction. Choose between these options:
⚠️Tracking threshold should be lower than Face confidence threshold. | Default (1000) | 0 ↔︎ 10 000 |
| Tracking stability | Stability is used to associate the tracklets with detections. Low stability may cause tracking to jump between detections. High stability may cause more tracklets to be created. Choose between these options:
| Optimal (85) | 0 ↔︎ 100 |
| Template generator resource | Choose between these resources for template extraction:
| CPU on server |
Visual Code detection section
The Visual Code detection section contains the necessary parameters for the configuration of QR code detection. Visual Code detection is disabled by default after creating an edge camera. You can turn it on easily by clicking on the toggle switch, which sets the default values of the parameters listed below in the table.
This generate Visual Codes (QR Codes) for Watchlist members, you need to enable this feature for both the Video Processing Platform and the Video Processing Platform Station.
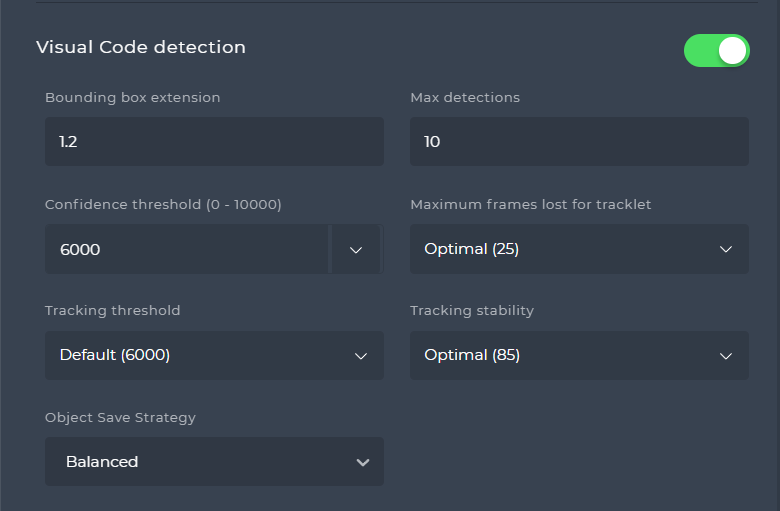
Visual Code detection section
| Parameter name | Description | Default value | Value interval |
|---|---|---|---|
| Bounding box extension | The additional extension of the bounding box on top of the visual object's size | 1.25 | 0 ↔︎ custom positive value |
| Max detections | The maximum amount of detections of the visual objects on one frame | 3 | 0 ↔︎ custom positive value |
| Confidence threshold | The confidence threshold for visual object detection.You can choose between these options:
| 6000 | 0 ↔︎ 10 000 |
| Maximum frames lost for tracklet | Defines the maximum number of frames to keep lost visual codes in tracking. Choose between options:
| Optimal (25) | 1 ↔︎ 65535 |
| Tracking threshold | Minimal detection confidence threshold for tracked visual codes. Visual codes with detection confidence below this threshold are filtered out by tracking and not used for template extraction. Choose between these options:
⚠️Tracking threshold should be lower than Face confidence threshold. | Default (6000) | 0 ↔︎ 10 000 |
| Tracking stability | Stability is used to associate the tracklets with detections. Low stability may cause tracking to jump between detections. High stability may cause more tracklets to be created. Choose between these options:
| Optimal (85) | 0 ↔︎ 100 |
| Object save strategy | The strategy for saving data from all object detections (visual codes and palms), you can choose from:
⚠️Set this wisely. Strategy to save all detected objects can generate huge amount of data. This applies also to palms. | Balanced |
Palm detection section
The Palm detection section contains the necessary parameters for the configuration of Palm detection. Palm processing is disabled by default after creating an edge camera. You can turn it on easily by clicking on the toggle switch, which sets the default values of the parameters listed below in the table.
This section is available only if the Palm processing is enabled in the Video Processing Platform Station. For information about how to enable the Palm processing please click here.
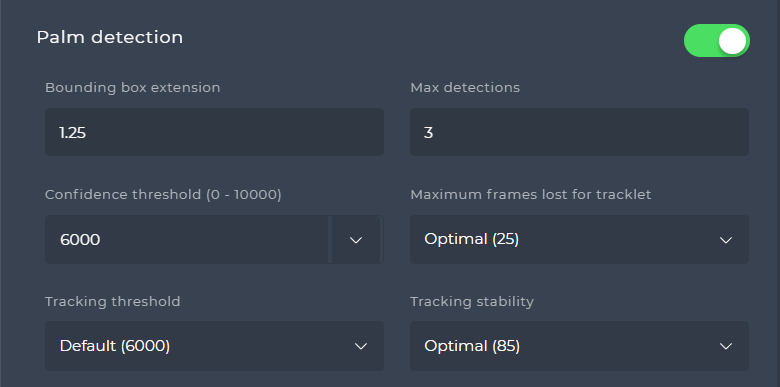
Palm detection section
| Parameter name | Description | Default value | Value interval |
|---|---|---|---|
| Bounding box extension | The additional extension of the bounding box on top of the palm's size | 1.25 | 0 ↔︎ custom positive value |
| Max detections | The maximum amount of detections of the palms on one frame | 3 | 0 ↔︎ custom positive value |
| Confidence threshold | The confidence threshold for palm detection.You can choose between these options:
| 6000 | 0 ↔︎ 10 000 |
| Maximum frames lost for tracklet | Defines the maximum number of frames to keep lost palms in tracking. Choose between options:
| Optimal (25) | 1 ↔︎ 65535 |
| Tracking threshold | Minimal detection confidence threshold for tracked palms. Palms with detection confidence below this threshold are filtered out by tracking and not used for template extraction. Choose between these options:
⚠️Tracking threshold should be lower than Face confidence threshold. | Default (6000) | 0 ↔︎ 10 000 |
| Tracking stability | Stability is used to associate the tracklets with detections. Low stability may cause tracking to jump between detections. High stability may cause more tracklets to be created. Choose between these options:
| Optimal (85) | 0 ↔︎ 100 |
Spoof detection section
The spoof detection feature is initially deactivated upon the creation of the edge stream. The configuration for spoof detection allows setting only one source type at a time.

Spoof detection section
| Parameter name | Description | Default value | Value interval |
|---|---|---|---|
| Distant detector resource | Choose liveness approach for spoof detector:
| None(On Edge is automatically set when you enable the spoof detection section) | |
| Distant liveness score threshold | Anything below this value from distant liveness check will be considered as spoof. Available only for Distant CPU on server and Distant GPU on server spoof detector resource.You can choose from:
| Default (90) | 0 ↔︎ 100 |
| Nearby detector resource | Choose liveness approach for spoof detector:
| None | |
| Nearby liveness score threshold | Anything below this value from nearby liveness check will be considered as spoofAvailable only for Nearby CPU on server and Nearby GPU on server spoof detector resourceYou can choose from:
| Default (90) | 0 ↔︎ 100 |
| Spoof execution on edge | Defines strategy for liveness detection. Choose from the following options:
| On each identified face |
Watchlists for matching and synchronisation
This section allows you to turn on watchlist synchronization on edge streams and choose specific watchlists for which matching will be performed. This section is disabled by default after creating an edge stream.
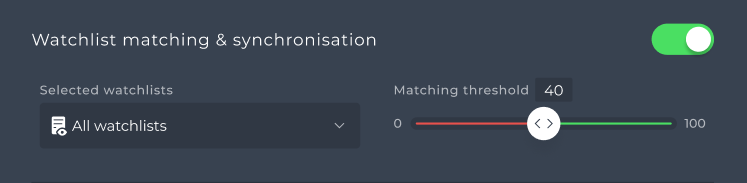
Watchlists for matching and synchronisation section
| Parameter name | Description | Default value | Value range |
|---|---|---|---|
| Selected watchlists | You can select watchlists which will be synchronised to the edge stream. You can choose from All, None or specific watchlists. | None (All - after enabling this section) | |
| Matching threshold | Defines the matching score threshold for identified candidates. Candidates with a matching score below this threshold are not considered positive matches | 40 | 0 ↔︎ 100 |
Messaging
In the Messaging section, you can enable and configure messaging functionality. This allows you to set up the sending of messages containing face recognition analytics from the edge stream.This section is enabled by default after creating an edge stream.

Messaging section
| Parameter name | Description | Default value | Value interval |
|---|---|---|---|
| Strategy | Defines the messaging strategy. Choose from the following options:
| On new and interval | |
| Interval | Defines the time interval in milliseconds for sending messages. The message is sent at least each
| Optimal (250) | 1 ↔︎ 65535 |
| Allow empty messages | Enables sending empty messages, for debugging purposes. An empty message indicates that no faces have been detected or tracked.⚠️This section is only visible if you have the Service info display turned on. | Disabled |
Logging
The Logging section allows you to configure logging settings for the system. Here, you can specify the level of detail for logging information. Logging is disabled by deafult.

Logging section
| Parameter name | Description | Default value |
|---|---|---|
| Log level | Specifies the log level. Supported values are:
| Info |
Send crop images
The Sending crop Images section allows you to enable the transmission of cropped images of detected faces. These cropped images can be utilized for various purposes such as post-processing or storage on the server or cloud infrastructure. This section is enabled by default.
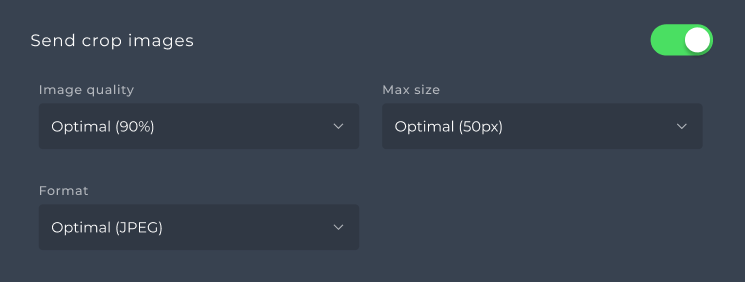
Send crop images section
| Parameter name | Description | Default value | Value range |
|---|---|---|---|
| Image quality | Image quality for image formats that support compression. Low quality corresponds to a high compression ratio, resulting in reduced image quality but smaller file sizes. Maximum quality refers to images with no compression applied, preserving the highest possible image quality but resulting in larger file sizes.
| Optimal (90%) | 0% ↔︎ 100% |
| Max size | Defines the maximum size of the face in the crop area in pixels. Choose from the following options:
| Optimal (50px) | 0px ↔︎ 500px |
| Format | Specifies the format of the cropped images. Choose from the following options:
| Optimal (JPEG) |
Send full frame images
This section enables users to choose whether to send full-frame images. You should consider that enabling this feature consumes a significant amount of bandwidth. Therefore, it’s advised to enable this section only for debugging purposes.

Send frame section
| Parameter name | Description | Default value | Value interval |
|---|---|---|---|
| Image quality | Image quality for image formats that support compression. Low quality corresponds to a high compression ratio, resulting in reduced image quality but smaller file sizes. Maximum quality refers to images with no compression applied, preserving the highest possible image quality but resulting in larger file sizes.
| Optimal (90%) | 0% ↔︎ 100% |
| Resolution | Defines the resolution of the face in the crop area. Choose from the following options:
| Source | Width in range 0 ↔︎ 5000Height in range 0 ↔︎ 5000 |
| Format | Specifies the format of the full-frame images. Choose from the following options:
| Optimal (JPEG) |
License
In the License section, you can upload your license file using the provided upload area. This section also displays information regarding the current state of the license and the Hardware ID (HWID) associated with the edge device.More information about how to upload license via REST API you can find here.
Upload license
Follow these steps to upload your license for Edge stream:
- Obtain your license in CRM.
- Open the Video Processing Platform Station.
- Click on Cameras in the left menu panel.
- Open Edge stream configuration by clicking on item in camera list.
- Go to License section and identify the designated upload area provided for uploading license file.

- Drag and drop your license file or click on “choose file” button to select the license file from your local system.
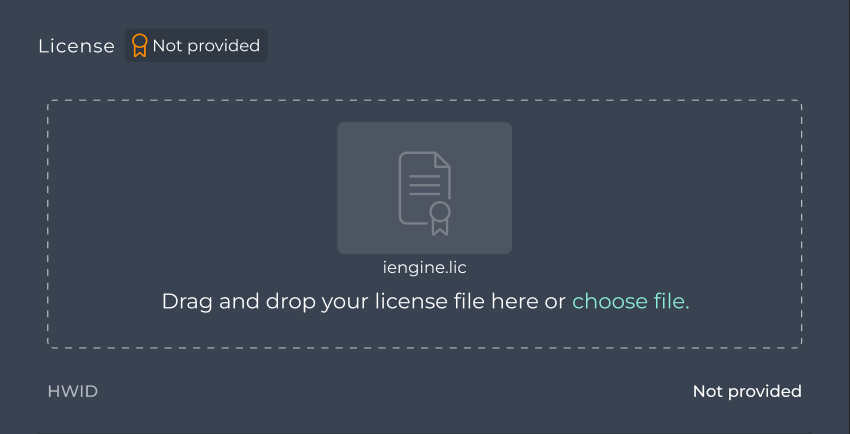
- After the upload process is complete, click on the Save button.After a few seconds, the license status and HWID will be updated. if everything is fine, the license status will be valid and the upload area will be hidden.

License Status
It reflects license validity for Edge stream:
- Valid - The uploaded license is verified and valid (green badge).
- Not valid - The uploaded license is found to be invalid (red badge).
- Not provided - No license has been uploaded (orange badge).
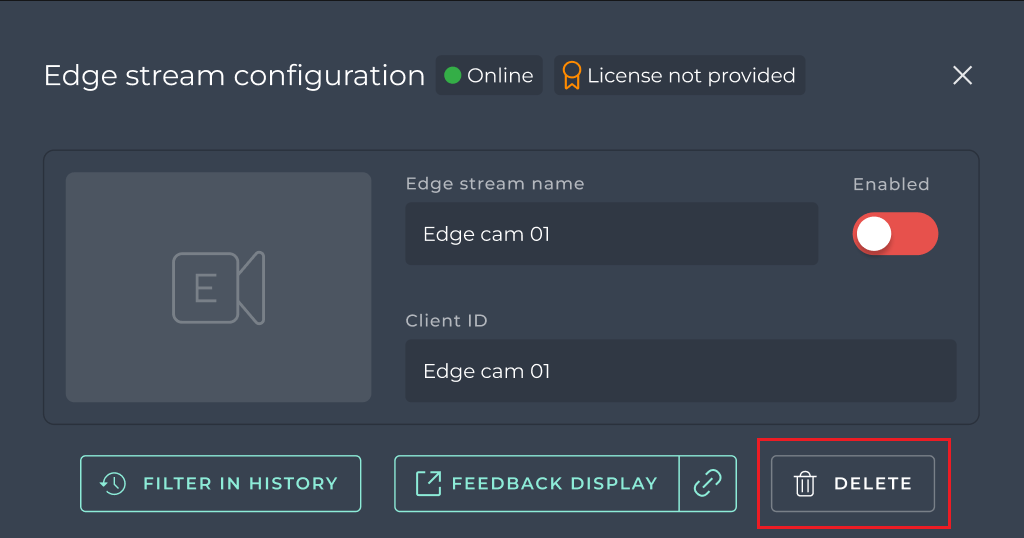
Health status of the Edge stream
The Edge Stream’s health status reflects its current operational state and license validity. It can be found at the top of the configuration detail section, next to the header.

Health status of Edge stream (Online & License not provided)
Operational state
- Online - The Edge stream is actively connected (green indicator).
- Offline - The Edge stream is disconnected (red indicator).
- Disconnected - The Edge stream is disconnected (orange indicator).
- Unknown - The connection status of the Edge stream is unknown (orange indicator).
License Status
- License valid - The uploaded license is verified and valid (green badge).
- License invalid - The uploaded license is found to be invalid (red badge).
- License not provided - No license has been uploaded (orange badge).
Healthy is displayed (green indicator), when Edge stream is online with valid license. In other cases, the relevant statuses are displayed for both the operational status and the license status.

Healthy status of Edge stream (Online & License valid)
Delete Edge stream
The Video Processing Platform Station allows you to delete edge stream that is processed by Video Processing Platform.
To delete an edge stream in Video Processing Platform Station:
- Click on Cameras in the left menu panel.
- Open Edge stream configuration by clicking on item in camera list.
- Click on DELETE button and click on option OK in confirmation window.
Feedback display
Video Processing Platform Station is designed to provide valuable information to both your security staff and the individuals passing through your access points. This includes notifications about successful passages and unsuccessful access attempts. To enhance the user experience, Video Processing Platform Station allows you to display this information directly to the person accessing the point through a feedback display. This feature can be enabled on a mobile device (tablet) positioned near your access points or on any other device capable of running the Chrome browser.
Example of the feedback display installed next to a speedgate.
Available notifications
The feedback display offers following screens with showing notifications about recognized events:
- Welcome screen - A person was identified and access was granted.
- Put on mask screen - A person was identified, but access was not granted due to missing face mask.
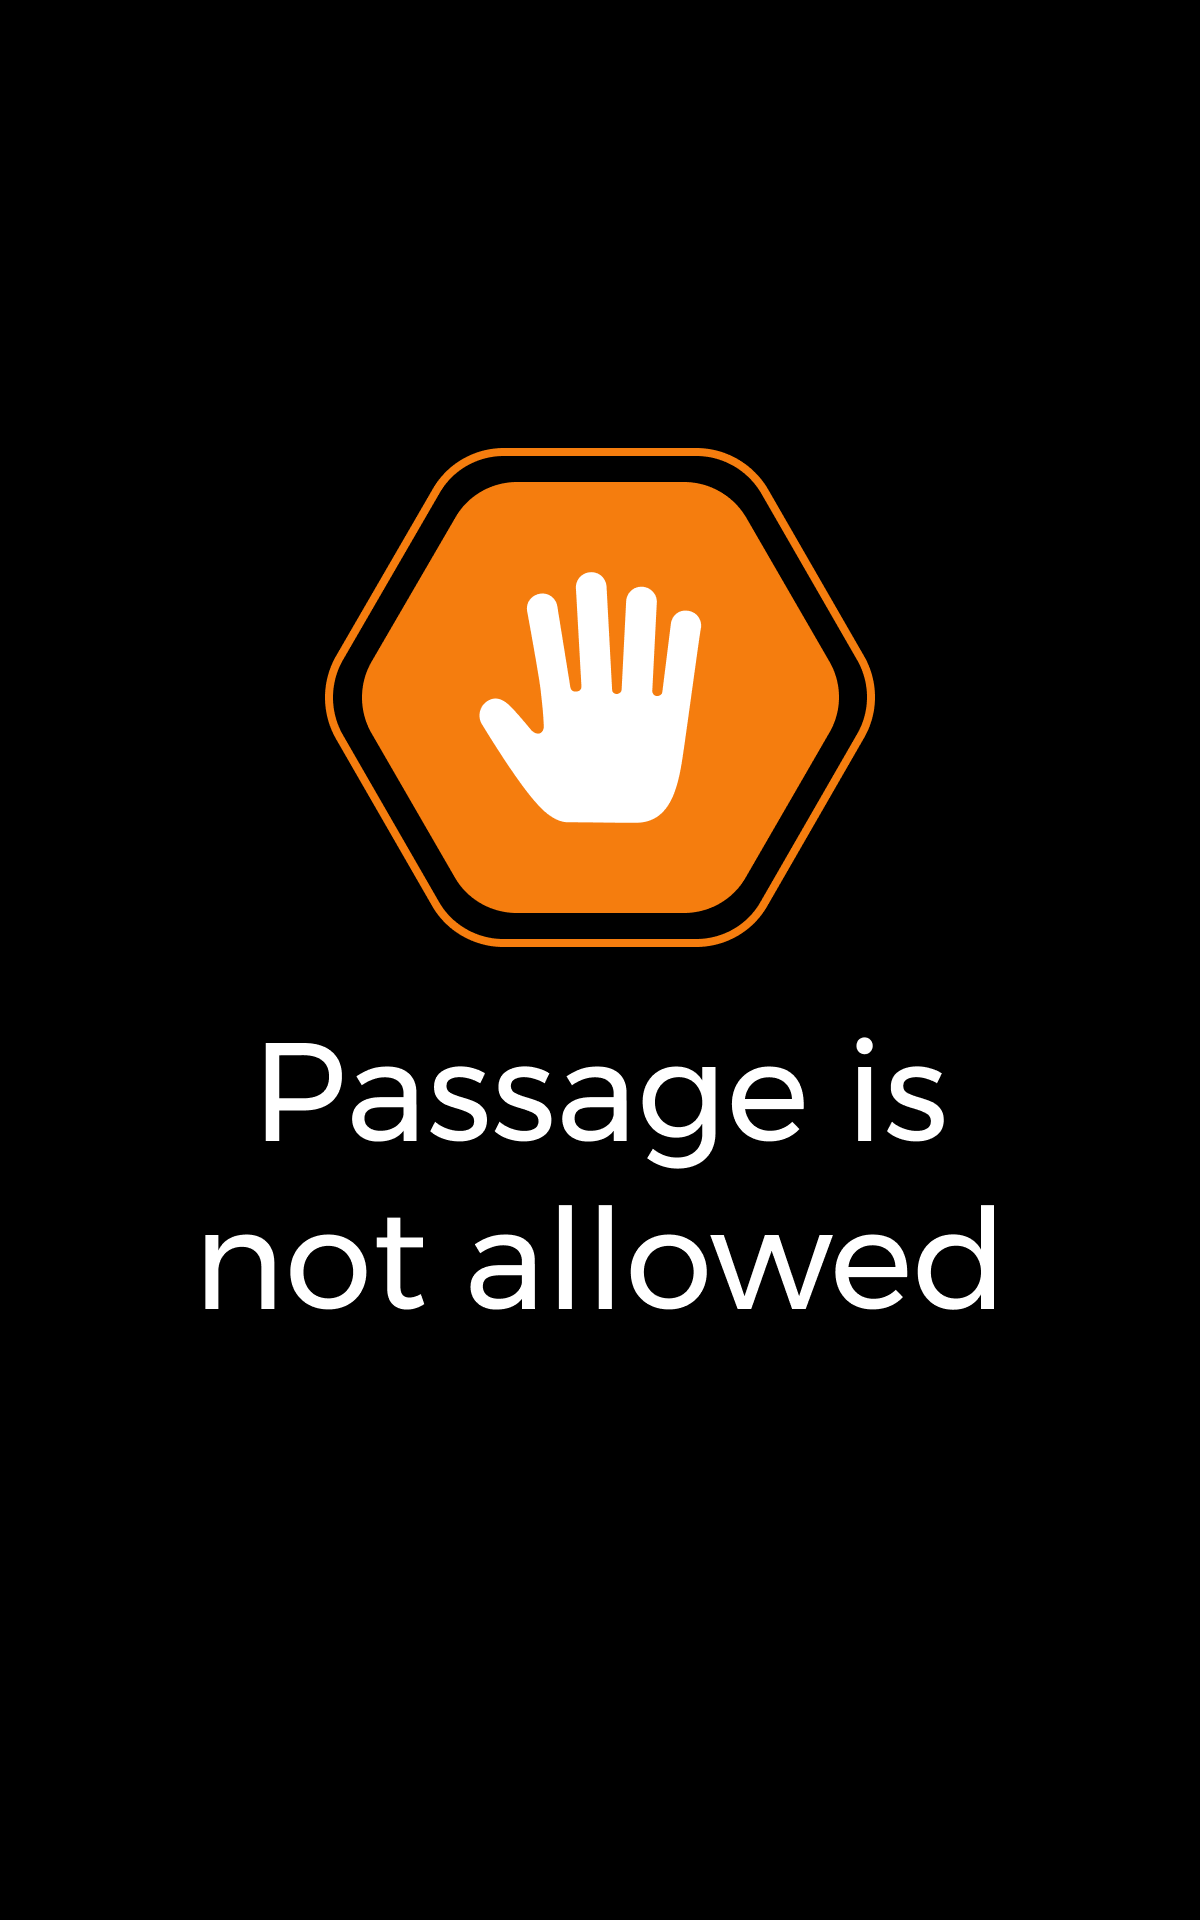
- Access not allowed screen - A person was not identified as a member of any watchlist and passage is not allowed.
- Access not granted screen: A person was identified as a member of a restricted watchlist or a spoof was detected and passage is not allowed.
- Video Processing Platform logo screen: The default screen shown after the notification was displayed.
- Error screen: The error screen is displayed when a problem occurs.

Welcome screen

Put on mask screen

Access not allowed screen

Access not granted screen
Video Processing Platform logo screen

Error screen
Enable feedback display
The feedback display is accessible through the web browser and is available per camera. To access the feedback display open camera details on Configuration screen:
- Open Video Processing Platform Station.
- Go to Cameras in the left menu.
- Click on the desired camera or edge stream.
- Click on the button OPEN or COPY LINK to open the feedback display screen in the new tab of your browser or copy the url link for the feedback display screen:

Using feedback display for several cameras at once
It is possible to use one feedback display for several cameras at once. This can be achieved by manually editing the URL address used by the feedback display. Using semicolon ; you can add several camera IDs into one URL. The camera IDs are in the GUID format, therefore to add 3 such guids, the result URL will look like this:
http://host/feedback/guid1-guid1-guid1-guid1;guid2-guid2-guid2-guid2;guid3-giuid3-guid3-guid3
Feedback display prerequisites
The feedback display feature is designed to be used on a mobile device. It is vital to the proper function of the feedback display that the Video Processing Platform and Access Controller is visible from the device where feedback display is running, ie. mentioned modules are accessible from the device. Please take in an account that feedback display URL and a port can be changed when KeyCloak authentication is deployed on your server. For more information about the KeyCloak see Authentication and user management chapter.
We also recommend to use a kiosk mode on your mobile device installed in the field to prevent people in front of your access points to interact with the mobile device.
Personalization of the Feedback display
The Feedback display can be updated to match your environment and use case. For more information about the Feedback display personalization, please read here.