Advanced Features
Face search
In addition to real-time matching of a detected face against faces stored in watchlists, Video Processing Platform is also capable to search in all detected faces stored by Video Processing Platform from all real-time camera streams or all offline video files processed by Rapid Video Processing.
The Video Processing Platform Face Search feature is provided by Video Processing Platform Face Matcher service. This service keeps all available face templates in the memory for the best search performance. The list of face templates is constantly updated with new face templates from camera streams and offline video processing.
For a guide with detail instructions how to proceed to do a face search, please read within the guides section.
Face search HW requirements
The Face Matcher service keeps all available face templates in the memory for the best search performance. If you have a long history of detected faces in the database from many high-traffic cameras, you need to consider allocating special HW resources just to run this service.
Memory footprint of Face Matcher
Reference measurements table is available below:
| Faces in DB | Memory usage |
|---|---|
| 1,151,554 | 1.9 GB |
| 2,403,044 | 3.5 GB |
Example: If your face database contains e.g. 10,000,000 faces, you have to count with 15 GB of memory for loaded templates and +20% increase in memory during search requests.
Initial loading time
It will take approximately 3.5 minutes to initially load 1 million face templates from the database into Face Matcher if the database is on the same server as the service itself. Increase of the loading time is linear with increasing number of faces.
Example: If your face database contains e.g. 10,000,000 faces, initial load time will be 35 minutes.
Search time
Final duration of the face search consist from two times:
matching time - in memory match of all loaded templates with uploaded face
results insert time - time of inserting SearchSessionObjects into the database
Matching time on 1 million face templates in memory is approximately 500 ms.
Results insert time depend on number of results what need to be inserted, database access speed and available HW.
Reference measurements is available below:
| Number of results | Insert time |
|---|---|
| 1,017,358 | 40s |
| 100,000 | 2s |
Example:
If your face database contains e.g. 10,000,000 faces, and you will have 1% matches (~ 100,000) you can calculate the search time:
Search Time = Matching time + Result Insert Time = 0.5s * 10 + 2s = approx. 7 seconds
Cleanup process time
Reference measurements table is available below:
| Session object count | Approx. cleanup time |
|---|---|
| 100,000 | 2s |
| 1,000,000 | 20s |
| 100 | Instant |
| 1,000 | Instant |
| 10,000 | Instant |
Grouping
Grouping is a process of organizing detected faces into groups based on their biometric similarity. In Video Processing Platform, each group of similar faces represents a unique individual. Therefore, this individual consists of a set of faces which are similar based on their matching score. The grouping functionality, the same as matching, is based on comparison of biometric templates extracted from detected faces. For more information about this topic, see Matching
The grouping process is limited by the number of faces which can be grouped. Because of this limitation, the grouping process behaves differently when performed on live video streams or uploaded video and image files. See the explanation below.
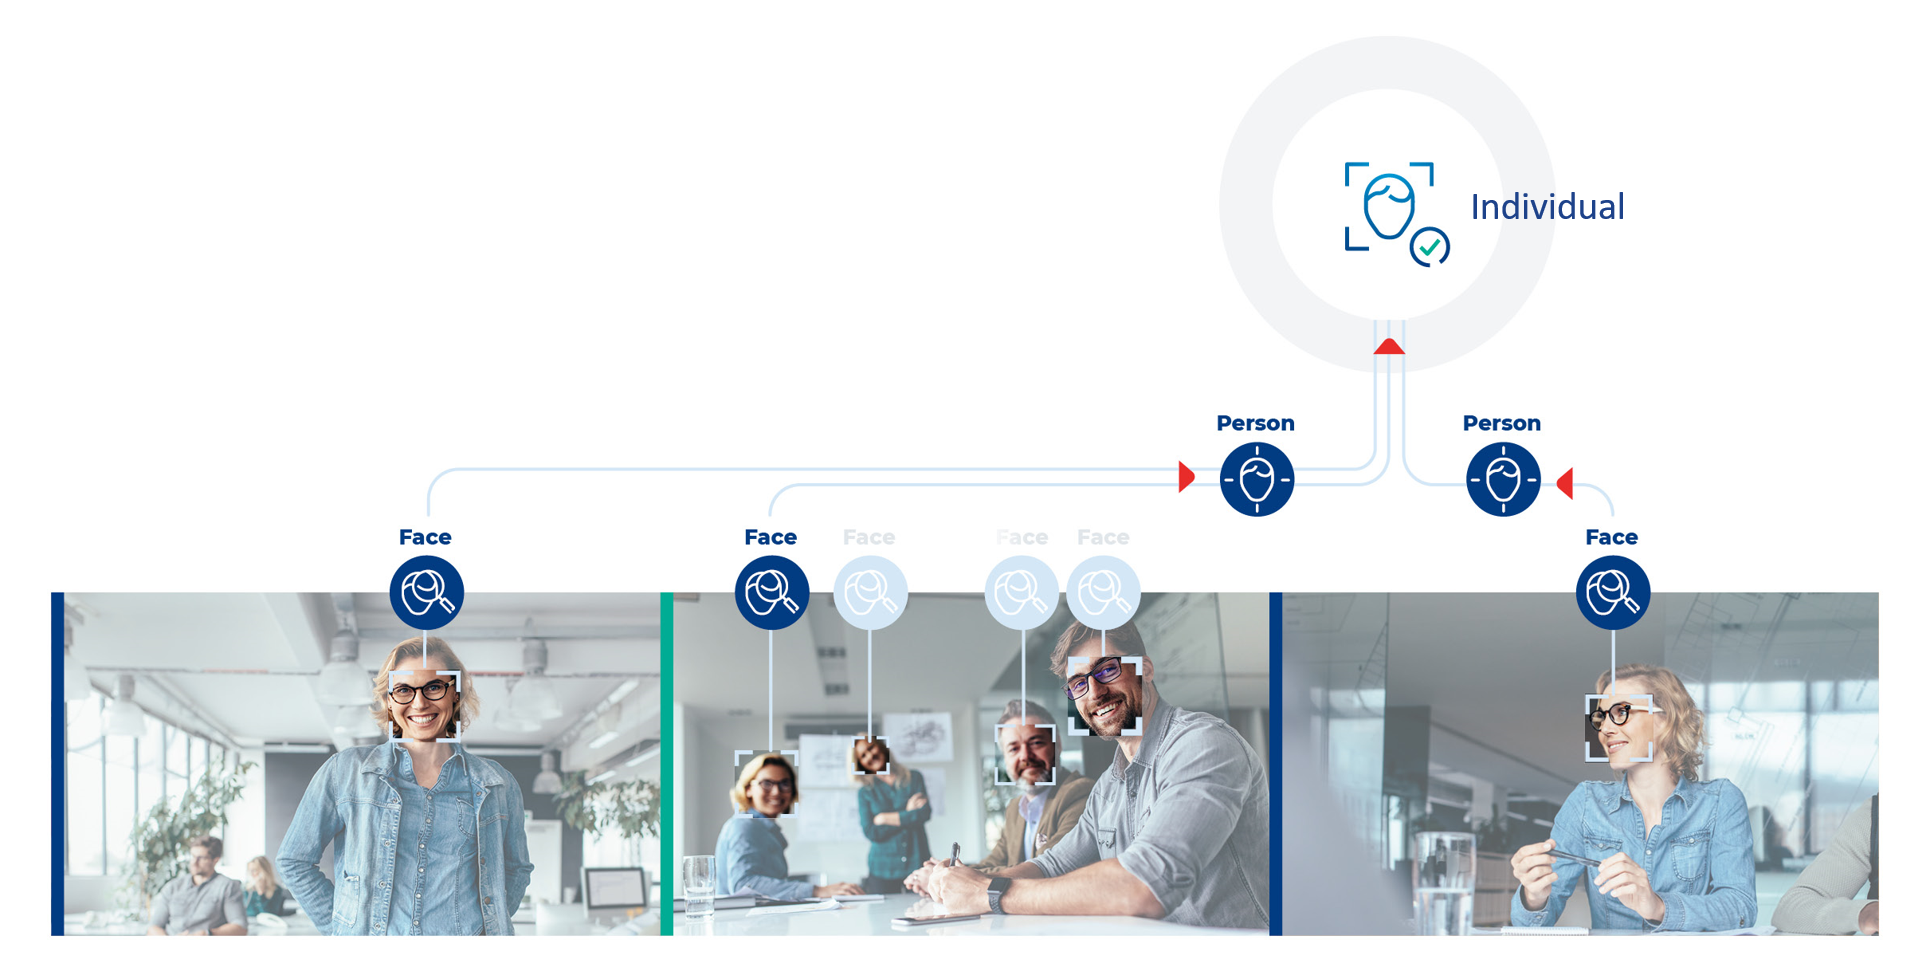
Images and video files
Images and video files contain a limited number of faces, therefore grouping may be performed on all the faces detected in the uploaded files. The faces are compared with each other and grouped into individuals based on their similarity.
For example, you may upload a gallery of photos from an event (team building, wedding, etc.). Video Processing Platform automatically detects faces and extracts templates. After that, grouping organizes all similar faces into individuals. If you later upload other photos into the same collection, Video Processing Platform will again compare the new detected faces with all faces in the specific collection and group similar ones into individuals.
Live video streams
A live video stream is a continuously incoming input and may contain a high number of detected faces without a limitation. Therefore, it is not possible to process all faces by grouping at once. It is necessary to limit their number by defining a time period over which Video Processing Platform groups faces continuously in time. Faces detected during the defined time period are compared with each other and grouped into individuals.
For example, you defined the time period of 8 hours for the grouping. Video Processing Platform groups faces of a person who reappears in front of the cameras within this time period into the same unique individual. If the time difference between the appearances of this person is greater than this time period, then Video Processing Platform assigns the newly detected faces of this person to a different individual.
Step by Step Guide to Grouping
For more information about how to set up the Grouping Feature, please read the guide.
Watchlist autolearn
Watchlist Autolearn is a feature developed to considerably increase the accuracy of identification of people registered in watchlists. This feature can be mostly used in the access control use case, where people registered in watchlists are recurring periodically, usually on a daily basis.
Watchlist Autolearn every day automatically selects a face image from all the matches of a person against a watchlist member and adds the image to the corresponding watchlist member.
The face images are collected over a user-defined time period. At the end of this time period (the default value is 30 days), the oldest image added to the watchlist member is replaced by a new image from the last day. This means that over this time period, watchlist members accumulate multiple images of themselves which are updated periodically and which represent their current appearance.
The feature ensures that Video Processing Platform can match a person with the corresponding watchlist member with a higher accuracy. In addition, matching isn’t influenced by changes in the face of a person, as the collected images reflect the current face of the matched person.
Selection of the face image added to the watchlist member is based on the selection threshold. Watchlist Autolearn adds only a face with a matching score equal or higher than the selection threshold to the watchlist.
Autolearn face clustering
To increase the positive impact of the Watchlist Autolearn, faces selected daily are added into the separate collections. These collections are called clusters. Currently two clusters are supported:
- No mask cluster
- Face mask cluster
Matched faces where a face mask is present are added to the face mask cluster. Matched faces where face mask is not present are added to the no-mask cluster. Due to having the autolearn faces added into multiple clusters Video Processing Platform can optimize the selection of the faces on a per-cluster basis and also optimize the face matching.
Configuration of Watchlist Autolearn
To use the Watchlist Autolearn functionality the faceMask feature of the Face Extractor must be enabled. It is enabled by default.
Via REST API
The Watchlist Autolearn feature can be set and configured with the REST API using the PUT /api/v1/Setup/Watchlists/AutoLearn endpoint.
By default, the autolearn feature is disabled and can be configured by WatchlistAutoLearnConfig configuration. The following table describes parameters of the configuration.
| Configuration property | Default Value | Description |
|---|---|---|
Enabled | false | A flag which indicates whether the Watchlist Autolearn features should be started at the defined ExecutionStartTime |
ExecutionStartTime | null | Time of day (UTC) when Watchlist Autolearn runs. The format is hour:minute:second. For example: 23:00:00. |
SelectionThreshold | 50 | The minimal threshold for the Selection strategy. A higher threshold can decrease the chance of adding an incorrect face image to the watchlist member. A lower threshold can cause watchlist poisoning, when a face image which doesn’t belong to the watchlist member might be added. We recommend setting the value higher than your matching threshold. The value is used for no mask cluster. |
MaskedSelectionThreshold | 70 | The minimal threshold for the Selection strategy. A higher threshold can decrease the chance of adding an incorrect face image to the watchlist member. A lower threshold can cause watchlist poisoning, when a face image which doesn’t belong to the watchlist member might be added. We recommend setting the value higher than your matching threshold. The value is used for face mask cluster. |
MaxAutoLearnFacesCount | 30 | The maximum number of Watchlist Autolearn faces that are stored for one watchlist member into one cluster. Only one autolearn face is added per day. |
NoFaceMaskConfidenceThreshold | -3000 | Required face mask confidence for the face to be selected into the No face mask cluster. The detected face needs to have a FaceMaskConfidence lower than this value. |
FaceMaskConfidenceThreshold | 3000 | Required face mask confidence for the face to be selected into the Face mask cluster. The detected face needs to have a FaceMaskConfidence higher than this value. |
Matched faces with FaceMaskConfidence value between configured NoFaceMaskConfidenceThreshold and FaceMaskConfidenceThreshold (default -3000 to 3000) are not added to the selection by the autolearn.
Via the Video Processing Platform Station
The Watchlist Autolearn can also be set using the Video Processing Platform Station. For more information please read the Video Processing Platform Station manual.
Face Validation
Starting with the version v5_4.28 a new validation feature has been added that allows you to set requirements for the faces you are adding to the system during the Watchlist Member Enrollment/Registration.
Configuration
The Face Validation is enabled by default. It can be configured using the .env file or configured directly for the SFApi container. The default implicit values (used if nothing is defined in the .env and nothing is propagated to the docker-compose.yml) look like this:
FaceValidation__Size__Min=30
FaceValidation__Size__Max=
FaceValidation__AreaOnFrame__Min=0.09
FaceValidation__AreaOnFrame__Max=
FaceValidation__TemplateQuality__Min=125
FaceValidation__TemplateQuality__Max=
FaceValidation__FaceQuality__Min=1000
FaceValidation__FaceQuality__Max=10000
FaceValidation__YawAngle__Min=-20
FaceValidation__YawAngle__Max=20
FaceValidation__PitchAngle__Min=-20
FaceValidation__PitchAngle__Max=20
FaceValidation__RollAngle__Min=-20
FaceValidation__RollAngle__Max=20
FaceValidation__Brightness__Min=
FaceValidation__Brightness__Max=
FaceValidation__Sharpness__Min=
FaceValidation__Sharpness__Max=
Each variable has Min and Max values. The values can be null, meaning they have no limit. Face quality and template quality are scores provided by the Face Detector and Face Extractor. Higher number means better results. For more information about additional variables and their usage, please read the Enrollment guide.
To use custom values for the SFApi container, add the configuration in the .env file and add(propagate) the environmental variables in the SFApi definition in the docker-compose.yml.
      - FaceValidation__Size__Min
      - FaceValidation__Size__Max
      - FaceValidation__AreaOnFrame__Min
      - FaceValidation__AreaOnFrame__Max
      - FaceValidation__TemplateQuality__Min
      - FaceValidation__TemplateQuality__Max
      - FaceValidation__FaceQuality__Min
      - FaceValidation__FaceQuality__Max
      - FaceValidation__YawAngle__Min
      - FaceValidation__YawAngle__Max
      - FaceValidation__PitchAngle__Min
      - FaceValidation__PitchAngle__Max
      - FaceValidation__RollAngle__Min
      - FaceValidation__RollAngle__Max
      - FaceValidation__Brightness__Min
      - FaceValidation__Brightness__Max
      - FaceValidation__Sharpness__Min
      - FaceValidation__Sharpness__Max
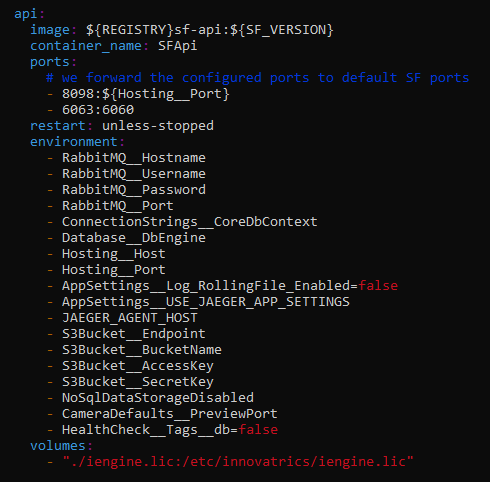
Then the default SFApi setup in the docker-compose.yml looks like this:
api:
    image: ${REGISTRY}sf-api:${SF_VERSION}
    container_name: SFApi
    ports:
      # we forward the configured ports to default SF ports
      - 8098:${Hosting__Port}
    restart: unless-stopped
    environment:
      - RabbitMQ__Hostname
      - RabbitMQ__Username
      - RabbitMQ__Password
      - RabbitMQ__Port
      - RabbitMQ__VirtualHost
      - RabbitMQ__UseSsl
      - MQTT__Hostname
      - MQTT__Username
      - MQTT__Password
      - MQTT__Port
      - MQTT__UseSsl
      - ConnectionStrings__CoreDbContext
      - Database__DbEngine
      - Hosting__Host
      - Hosting__Port
      - AppSettings__Log_RollingFile_Enabled=false
      - AppSettings__Log_JsonConsole_Enabled
      - AppSettings__USE_JAEGER_APP_SETTINGS
      - JAEGER_AGENT_HOST
      - S3Bucket__Endpoint
      - S3Bucket__BucketName
      - S3Bucket__AccessKey
      - S3Bucket__SecretKey
      - NoSqlDataStorageDisabled
      - CameraDefaults__PreviewPort
      - FaceValidation__Size__Min
      - FaceValidation__Size__Max
      - FaceValidation__AreaOnFrame__Min
      - FaceValidation__AreaOnFrame__Max
      - FaceValidation__TemplateQuality__Min
      - FaceValidation__TemplateQuality__Max
      - FaceValidation__FaceQuality__Min
      - FaceValidation__FaceQuality__Max
      - FaceValidation__YawAngle__Min
      - FaceValidation__YawAngle__Max
      - FaceValidation__PitchAngle__Min
      - FaceValidation__PitchAngle__Max
      - FaceValidation__RollAngle__Min
      - FaceValidation__RollAngle__Max
      - FaceValidation__Brightness__Min
      - FaceValidation__Brightness__Max
      - FaceValidation__Sharpness__Min
      - FaceValidation__Sharpness__Max
    volumes:
      - "./iengine.lic:/etc/innovatrics/iengine.lic"
Usage in API
When using the REST API, the Face Validation is used in some endpoints.
There are 2 possible values: none and predefined. The value none means that no Face Validation will be used. The value predefined will use the values configured for the SFApi container.
Endpoints using the Face Validation are:
POST /api/v1/Watchlists/Search with default value none
POST /api/v1/WatchlistMembers/Register with defaul value predefined
POST /api/v1/WatchlistMembers/{id}/AddNewFace with defaul value predefined
Health Checks
The Video Processing Platform platform offers a comprehensive Health check feature, designed to ensure the smooth operation and optimal performance of the system. The Health check feature empowers you to evaluate the performance and stability of the platform, guaranteeing its optimal functionality. Performing regular Health checks is vital to proactively identify potential issues and implement measures to uphold a resilient system.
By conducting Health checks, users can gain valuable insights into the overall health of various components within each Video Processing Platform service. This feature analyzes various components and metrics, providing a comprehensive assessment of the system’s performance. It offers an efficient way to monitor critical aspects and promptly address any concerns that may arise.
This document describes the configuration options and endpoints related to Health checks.
How to enable Health Checks
The Health Check functionality is available on the Video Processing Platform since version 5.4.20. For more information about available versions and how to update, please visit Video Processing Platform Release Packages.
The health checks are available for each service and they are per default running on the port 6060 for each service. Depending on your monitoring method it might be necessary to allow each service to be available at the custom port of the Video Processing Platform server. This can be easily done in the docker-compose.yml file where you need to add your own port mapping such as on the code sample below:
...
    ports:
      - 6062:6060
...
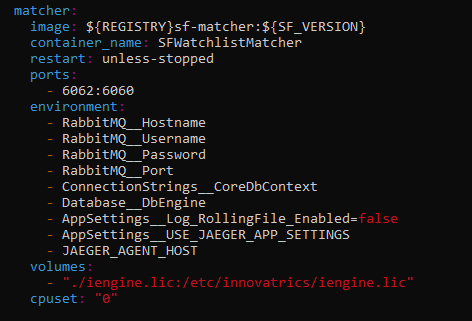
The above sample binds the service’s inner port 6060 to the public port 6062. You need to do this for each service where the port needs to be public. For example for the matcher service the whole setup might look like as on the image below.
Configuration
The health check configuration is managed through environment variables (or standard appsetting.json / console args). Please see the following table for the variables to control the behavior of the health checks.
Please note that the default setup should cover the most of the cases, the environment variables below are not suggested to be updated unless necessary.
| Environment variable | Description |
|---|---|
| HealthCheck__Host | The host on which the health check endpoint is available. The default value * indicates that the endpoint is accessible on all available network interfaces. |
| HealthCheck__Port | The port number on which the health check endpoint listens for incoming requests. The default port is set to 6060. |
| HealthCheck__Tags__db | It controls the evaluation of health checks. By default, all health checks are evaluated. However, in certain deployments where some Video Processing Platform services can run without a database (e.g., API), this setting can be used to turn off the evaluation of database health checks. Setting this environment variable to false will disable the evaluation of database health checks. |
| HealthCheck__Tags__rmq | It controls the evaluation of health checks for the RabbitMQ (RMQ) service. By default, all health checks are evaluated. Setting this value to false will disable the evaluation of RMQ health checks. |
In a specific case it is possible you would like to set HealthCheck__Tags__db or HealthCheck__Tags__rmq, such as the cases where you do not expect the service to communicate with the database or RabbitMq. In that case please add the variable with value false as per image below.
If you do such change, the service needs to be restarted. The easiest way to achieve this is to call the command below:
docker-compose up -d
How to listen to Health Checks
Once the health checks are enabled and the ports are available you can connect to an individual service’s health check via the port specified and on the defined endpoint.
Available Endpoints
The default health check server listens on port 6060 and accepts requests on the following paths:
| Path | Description | Response status codes |
|---|---|---|
| /healthz/ready | This endpoint is used to check the readiness of a service. A service that has not finished the initialization is not yet ready. | HTTP 200 status code - the service is healthy and available for handling requests.HTTP 503 status code - the service is unhealthy or not ready to handle requests. |
| /healthz/live | This endpoint is used to check the liveness of a service. A service that is not able to wake up from an issue is not considered live. | HTTP 200 status code - the service is running and healthy.HTTP 503 status code - the service is not alive or experiencing issues. |
The provided endpoints enable you to perform general health checks and obtain detailed information about the status of individual services.
For example to access the health check of the api service mentioned above you can visit http://your-smartface-ip:6063/healthz/ready or http://your-smartface-ip:6063/healthz/live.
The response JSON structure may vary depending on the specific service you are using. Example is below:
{
  "status": "Healthy",
  "results":
  {
    "RabbitMQHealthCheck":
    {
      "status": "Healthy",
      "description": null,
      "data": {},
      "tags":
      [
        "rmq"
      ]
    },
    "CoreDbContext":
    {
      "status": "Healthy",
      "description": null,
      "data": {},
      "tags":
      [
        "db"
      ]
    },
    "S3HealthCheck":
    {
      "status": "Healthy",
      "description": null,
      "data": {},
      "tags": []
    }
    "WatchlistMatcherLoadHealthCheck":
    {
      "status": "Healthy",
      "description": "The watchlist matcher database successfully initialized",
      "data":
      {
        "InitialMatcherLoadTimeMs": 629,
        "InitialMemberLoadCount": 15
      },
      "tags": []
    },
    "MatcherRpcServerHealthCheck":
    {
      "status": "Healthy",
      "description": "The matcher RPC server is ready",
      "data": {},
      "tags": []
    }
}
Each of the sub-results gather’s information about different aspects of the service:
RabbitMQHealthCheck - information whether the connection to the RabbitMQ is as expected
CoreDbContext - information whether the connection to the SQL Database is as expected
S3HealthCheck - information whether the connection to the MinIO Object Database is as expected
Some of the services have it’s own specific results, such as the results for the Matcher service:
WatchlistMatcherLoadHealthCheck - information about the Watchlists being loaded by the service
MatcherRpcServerHealthCheck - information about the Matcher’s communication with the Rpc server
A sample output of the live endpoint would look like this:
{
"status": "Healthy"
}
Centralized configuration for Smart cameras
The Video Processing Platform version 4.25 introduces an advanced functionality: Centralized Configuration for Smart cameras. This advancement represents a shift towards a more streamlined and secure approach of setting up and managing your Smart cameras (Edge streams).
Advantages:
- centralized configuration
- dedicated plugins for Smart Cameras
- real-time monitoring and maintenance
Centralized configuration
Once the initial manual setup of each Smart camera is completed — including the configuration of the IP address and MQTT broker - all further configuration tasks can be seamlessly managed from a single, centralized location using the Video Processing Platform. This can be done either via the REST API or the Video Processing Platform Station.
The centralized configuration includes several critical functionalities:
- Uploading Licenses: Managing and updating licenses for all cameras can be done centrally, eliminating the need to individually access each camera.
- Setting Face Recognition Parameters: Adjusting the parameters for face recognition across all cameras ensures consistency and improves overall system performance.
- Synchronizing Watchlists: Watchlists can be synchronized across all cameras, ensuring that every camera operates with the most up-to-date information.
- Enabling and setting up the Liveness Check: Configuration of the liveness check can be done for each camera from one centralized place.
- Messaging Configuration: Configuring communication between the plugin and the Video Processing Platform.
Dedicated plugins for Smart cameras
Supporting this centralized configuration are dedicated Video Processing Platform Embedded Stream Processor plugins developed specifically Smart cameras, such as for Hanwha and Axis cameras. These plugins simplify the initial setup process by supporting batch installations, allowing multiple cameras to be set up simultaneously. This is particularly advantageous in large-scale deployments, as it reduces the time and effort required for individual camera configuration and their maintenance.
For more information about how to setup Video Processing Platform Embedded Stream Processor, read here.
Real-Time monitoring and maintenance
To further enhance the operational efficiency of Smart cameras, the Health Status indicator has been integrated into the Video Processing Platform platform. This tool provides real-time updates on the operational status and license validity of each camera. By monitoring these parameters, the Health Status indicator ensures optimal performance and allows for the quick resolution of any issues. This proactive monitoring capability is essential for maintaining the reliability and effectiveness of Smart camera systems.
For more information about the options of the Centralized Edge Management, read the REST API or the Video Processing Platform Station guides.
Time-based One Time Password encoded in QR code (QR TOTP)
The QR TOTP brings new QR code modality to Video Processing Platform, allowing QR code based access control. The QR codes are time-based with limited validity.
To enable the functionality the Video Processing Platform and it’s components need to have minimal versions:
Video Processing Platform Station v5_1.27.0
Video Processing Platform v5_4.28.0
Access Controller v5_1.13.0
The functionality provided for the Video Processing Platform Station is a DEMO, this implementation is not meant for production due to possible security issues. An integration covering the topics of authentication is highly recommended as within the DEMO setup, as anyone can generate Access QR code for anyone.
Setup the QR TOTP
We need to change configuration for the Video Processing Platform and the Video Processing Platform Station. After changing the configuration files apply the changes using the command:
docker compose up -d
Setup TOTP for the Video Processing Platform
Add the below lines into the .env environmental variable file.
Totp__QrCodeImageEndpointEnabled=true
Propagate the newly created environmental variables into the docker-compose.yml file for the SFApi container:
- Totp__QrCodeImageEndpointEnabled
Sample SFApi container configuration will look like this:
  api:
    image: ${REGISTRY}sf-api:${SF_VERSION}
    container_name: SFApi
    ports:
      # we forward the configured ports to default SF ports
      - 8098:${Hosting__Port}
    restart: unless-stopped
    environment:
      - RabbitMQ__Hostname
      - RabbitMQ__Username
      - RabbitMQ__Password
      - RabbitMQ__Port
      - RabbitMQ__VirtualHost
      - RabbitMQ__UseSsl
      - MQTT__Hostname
      - MQTT__Username
      - MQTT__Password
      - MQTT__Port
      - ConnectionStrings__CoreDbContext
      - Database__DbEngine
      - Hosting__Host
      - Hosting__Port
      - AppSettings__Log_RollingFile_Enabled=false
      - AppSettings__Log_JsonConsole_Enabled
      - AppSettings__USE_JAEGER_APP_SETTINGS
      - JAEGER_AGENT_HOST
      - S3Bucket__Endpoint
      - S3Bucket__BucketName
      - S3Bucket__AccessKey
      - S3Bucket__SecretKey
      - NoSqlDataStorageDisabled
      - CameraDefaults__PreviewPort
      - Totp__QrCodeImageEndpointEnabled
    volumes:
      - "./iengine.lic:/etc/innovatrics/iengine.lic"
Setup TOTP for the Video Processing Platform Station
Add the below lines into the .env.sfstation environmental configuration files:
# Enabled and configure QR code generation
QR_CODE_ENABLED=true
QR_CODE_REFRESH_INTERVAL=1
QR_CODE_WITH_WHITE_ZONES=true
Enable QR TOTP for a Watchlist Member
To enable the QR TOTP functionality for a Watchlist Member use the POST /api/v1/WatchlistMembers/{id}/Totp/CreateAndStoreTotpSecret endpoint. The results can be used for developers to create the integration.
{
  "secret": "string",
  "digits": 0,
  "period": 0,
  "algorithm": "string",
  "watchlistMemberIdentifier": "string",
  "issuer": "string"
}
Receiving the current QR TOTP Code
After successful application a new endpoint in the REST API is available: GET /api/v1/WatchlistMembers/{id}/Totp/QrCode
Using this endpoint with a Watchlist Member ID of an enabled Watchlists Member will provide you the currently valid QR TOTP code.
The QR TOTP code can be configured by edditing the .env environmental file. You need to propagate the variables for the SFApi container.
## (Api) Totp configuration
Totp__Digits=6
Totp__PeriodSeconds=30
Totp__Algorithm=SHA1
Using the QR TOTP codes in the Video Processing Platform Station
After the QR TOTP has been enabled for the REST API and the Video Processing Platform Station the One-time password area appears with the GENERATE button. Click on the button to activate the QR TOTP for the Watchlist Member.

After a successful activation, the message “QR code functionality activated” appears.
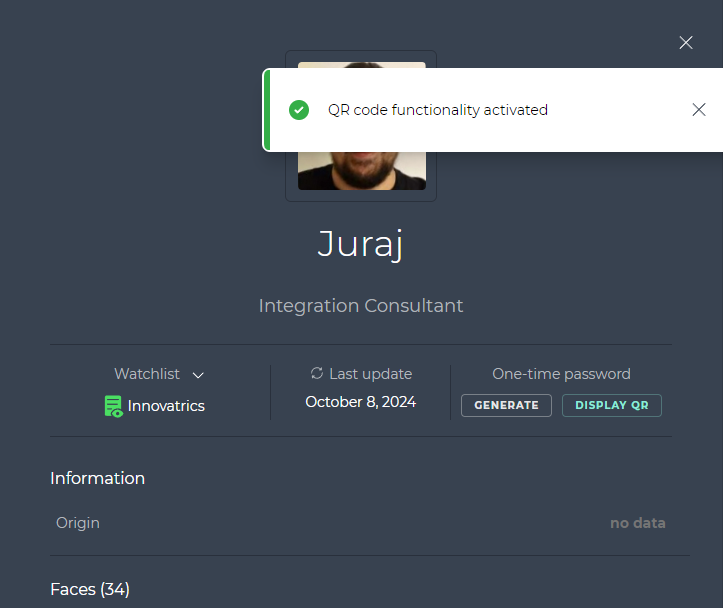
Click on the DISPLAY QR button to show the currenly valid QR code for the Watchlist Member. You can also see the remaining validity time. The image updates automatically once the validity runs out.

If you open the QR code on a mobile device, such as an Android or Apple phone or tablet, the view is scaled to match the device.