Set up Video Processing Platform
To set up Video Processing Platform on your Linux machine you need to enable the Docker environment, have access to the Customer Portal and the Github.
Docker Engine
The Video Processing Platform runs on the Docker engine and per default on the Docker Compose. Before you install Docker Engine for the first time on a new host machine, you need to set up the Docker repository. Afterward, you can install and update Docker from the repository. Run the specific commands below from you terminal.
Set up Docker’s apt repository
# Add Docker's official GPG key:
sudo apt-get update
sudo apt-get install ca-certificates curl
sudo install -m 0755 -d /etc/apt/keyrings
sudo curl -fsSL https://download.docker.com/linux/ubuntu/gpg -o /etc/apt/keyrings/docker.asc
sudo chmod a+r /etc/apt/keyrings/docker.asc

# Add the repository to Apt sources:
echo \
  "deb [arch=$(dpkg --print-architecture) signed-by=/etc/apt/keyrings/docker.asc] https://download.docker.com/linux/ubuntu \
  $(. /etc/os-release && echo "$VERSION_CODENAME") stable" | \
  sudo tee /etc/apt/sources.list.d/docker.list > /dev/null
sudo apt-get update
Install the Docker packages
sudo apt-get install docker-ce docker-ce-cli containerd.io docker-buildx-plugin docker-compose-plugin
Verify that the Docker Engine installation is successful by running the hello-world image
sudo docker run hello-world
If everything went successfully, you will see a message starting the lines such as below:
Hello from Docker!
This message shows that your installation appears to be working correctly.
...
Video Processing Platform Installation
We need to install Video Processing Platform the server device. For the server we need a license.
On your server open the Terminal. Navigate to location /srv/ using the command:cd /srv
Then clone the git repositorygit clone https://github.com/innovatrics/smartface.git
Apply License
Each instance of the Video Processing Platform needs a license. For more context and information about how to get and apply the license visit our Get Started documentation. Video guide is available.
Copy the license files into the folder package-nedap-access-control:/srv/smartface/special/package-nedap-access-control
Run the Video Processing Platform
Depending whether this is a local or central node, run the run.sh script located in the folder
/srv/smartface/special/package-nedap-access-control
For more context and infomation about installing read our Get Started documentation.
Once the installation successfully went through, the Video Processing Platform is running. Visit the installation’s Video Processing Platform Station using your own IP address, or localhost on the URL such as http://localhost:8000/ or http://your-ip-address:8000/. Endure each node is up and running before proceeding.
Video Processing Platform Configuration
Define and set up watchlists
You can define your own Watchlists and enroll your own WatchlistMembers. This can be done using the Video Processing Platform Station available at the port 8000 for each node, the manual is here or via the REST API. For more context, read about Watchlist Management and WatchlistMember Management.
Keep in mind the Watchlists can have their own colors to be easily distinguished and they can have their own biometric Matching Threshold. For a restricted Watchlists, such as “Blacklists” you can set the Watchlist color to be RED.
For the door opening use case you generally want to have the Threshold to be set generally higher to ensure only the correct Watchlist Members would be let in. Depending on size of your Watchlists a good starting value would be 60.
Consider what Watchlists should be able to open the doors as that is something we will setup in Watchlists matching & synchronisation for the cameras.
Choose data retention and saving strategy
To adjust the time for which data is retained, you can do the Data retention configuration for each node. The amount of days for storing data will limit the ability to investigate using the History Event. To avoid issues with using all the space on the server machine it is recommended to set a value. Due to a restricted amount of space available at the Raspberry Pi 5, we would suggest a low value, such as 5 days.
Default setup for the Raspberry Pi setup has saving the data disabled.
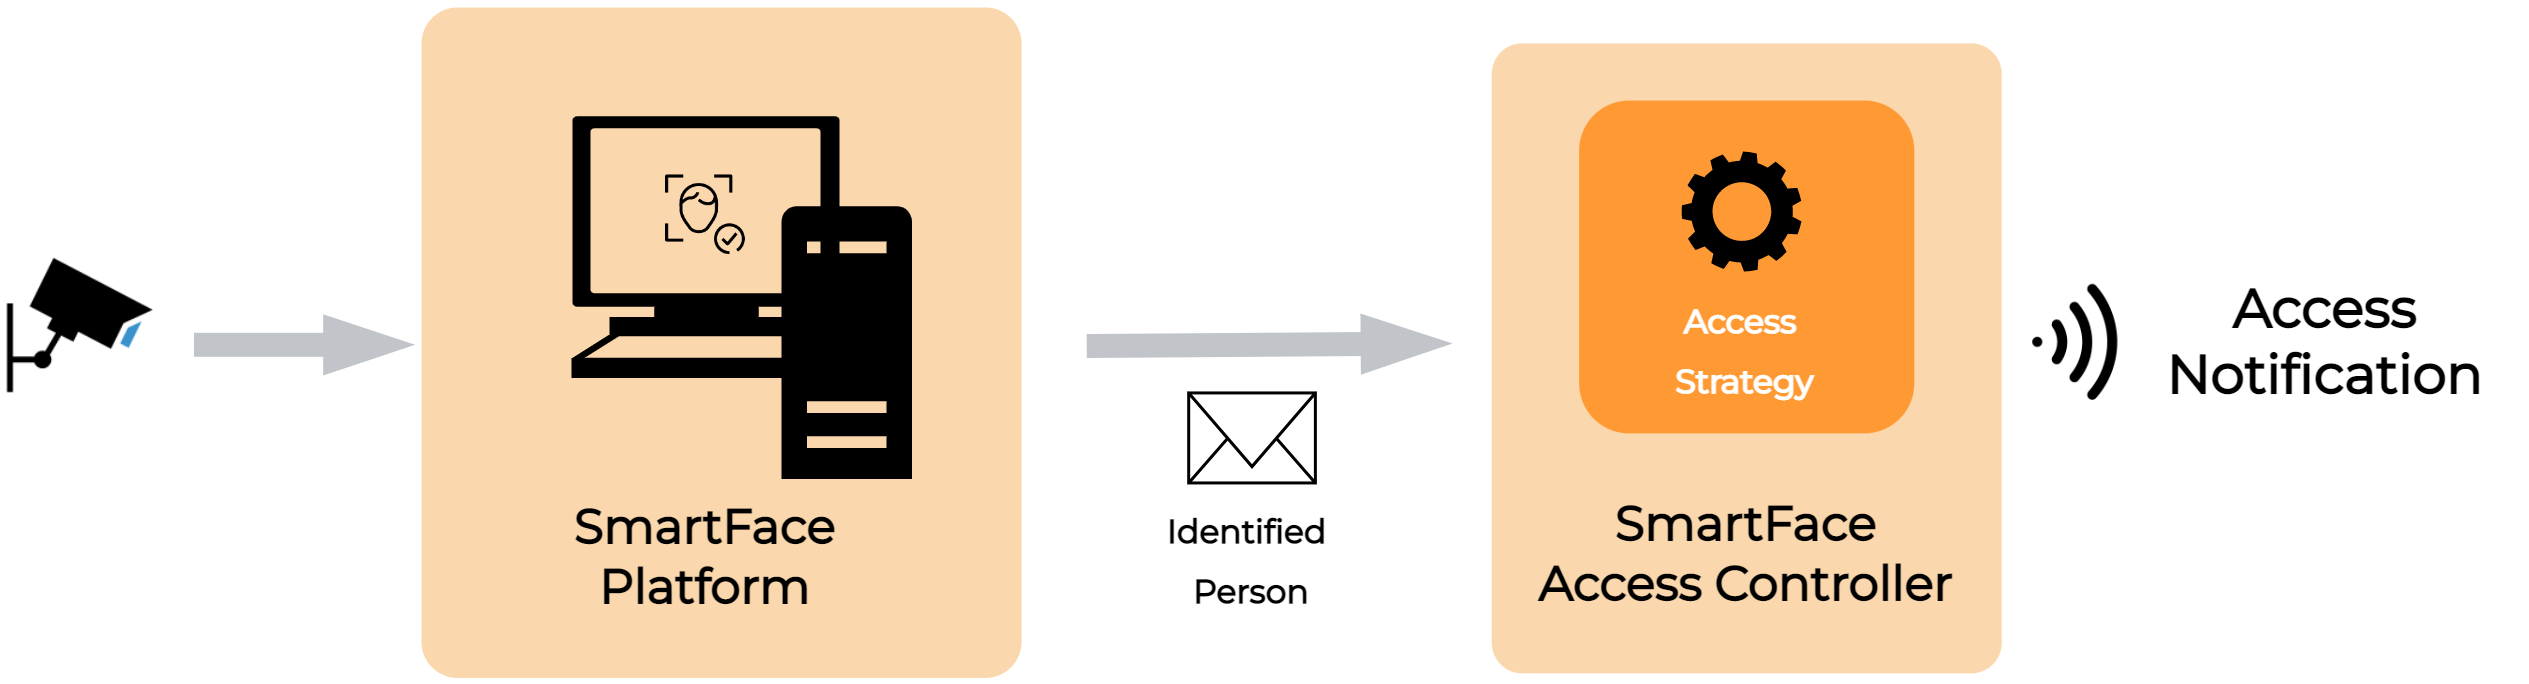
Access Control
The Video Processing Platform Access Controller is a standalone module that listens to notifications coming from the Video Processing Platform about people matched against watchlists.
The notifications are filtered by a predefined set of rules and access control strategies. Only the notifications that pass these rules are sent out from the Access Controller. This component is used for the access control use case, where seamless and friction-less opening of access points (turnstiles, doors, barriers, ramps, etc.) is required.
The rules cover many common elements of the access control, such as control whether only the closes person to the camera can open the door, whether to use liveness check, how often to send the opening signal to the relay etc.
Manual for setting up the Access Controller are available here. Default (available in the package) and recommended values are:
FilterConfiguration__FaceOrderConfiguration__Enabled=false
FilterConfiguration__FaceOrderConfiguration__Order=1
FilterConfiguration__OpeningDebounceConfiguration__OpeningDebounceEnabled=true
FilterConfiguration__OpeningDebounceConfiguration__OpeningDebounceMs=4000
FilterConfiguration__BlockingDebounceConfiguration__BlockingDebounceEnabled=true
FilterConfiguration__BlockingDebounceConfiguration__BlockingDebounceMs=4000
FilterConfiguration__ExclusiveCameraConfiguration__Enabled=true
FilterConfiguration__ExclusiveCameraConfiguration__ExclusivityMs=5000
FilterConfiguration__NotIdentifiedPersonConfiguration__Enabled=true
FilterConfiguration__NotIdentifiedPersonConfiguration__RoamingLimitTimeMs=3000
FilterConfiguration__FaceMaskConfiguration__Enabled=false
FilterConfiguration__FaceMaskConfiguration__DenyingDebounceMs=4000
FilterConfiguration__IntentionalAccessConfiguration__Enabled=false
FilterConfiguration__SpoofCheckConfiguration__Enabled=true
FilterConfiguration__SpoofCheckConfiguration__DenyingDebounceMs=4000
FilterConfiguration__SpoofCheckConfiguration__SpoofRateLimitingConfiguration__Enabled=true
FilterConfiguration__SpoofCheckConfiguration__SpoofRateLimitingConfiguration__SpoofAttemptsCount=5
FilterConfiguration__SpoofCheckConfiguration__SpoofRateLimitingConfiguration__SpoofAttemptsWindowMs=120000
FilterConfiguration__SpoofCheckConfiguration__SpoofRateLimitingConfiguration__BlockingTimeIncrementCooldownMs=10000
FilterConfiguration__SpoofCheckConfiguration__SpoofRateLimitingConfiguration__BlockingTimeIncrementMs=30000
FilterConfiguration__SpoofCheckConfiguration__SpoofRateLimitingConfiguration__MaxBlockingTimeMs=300000