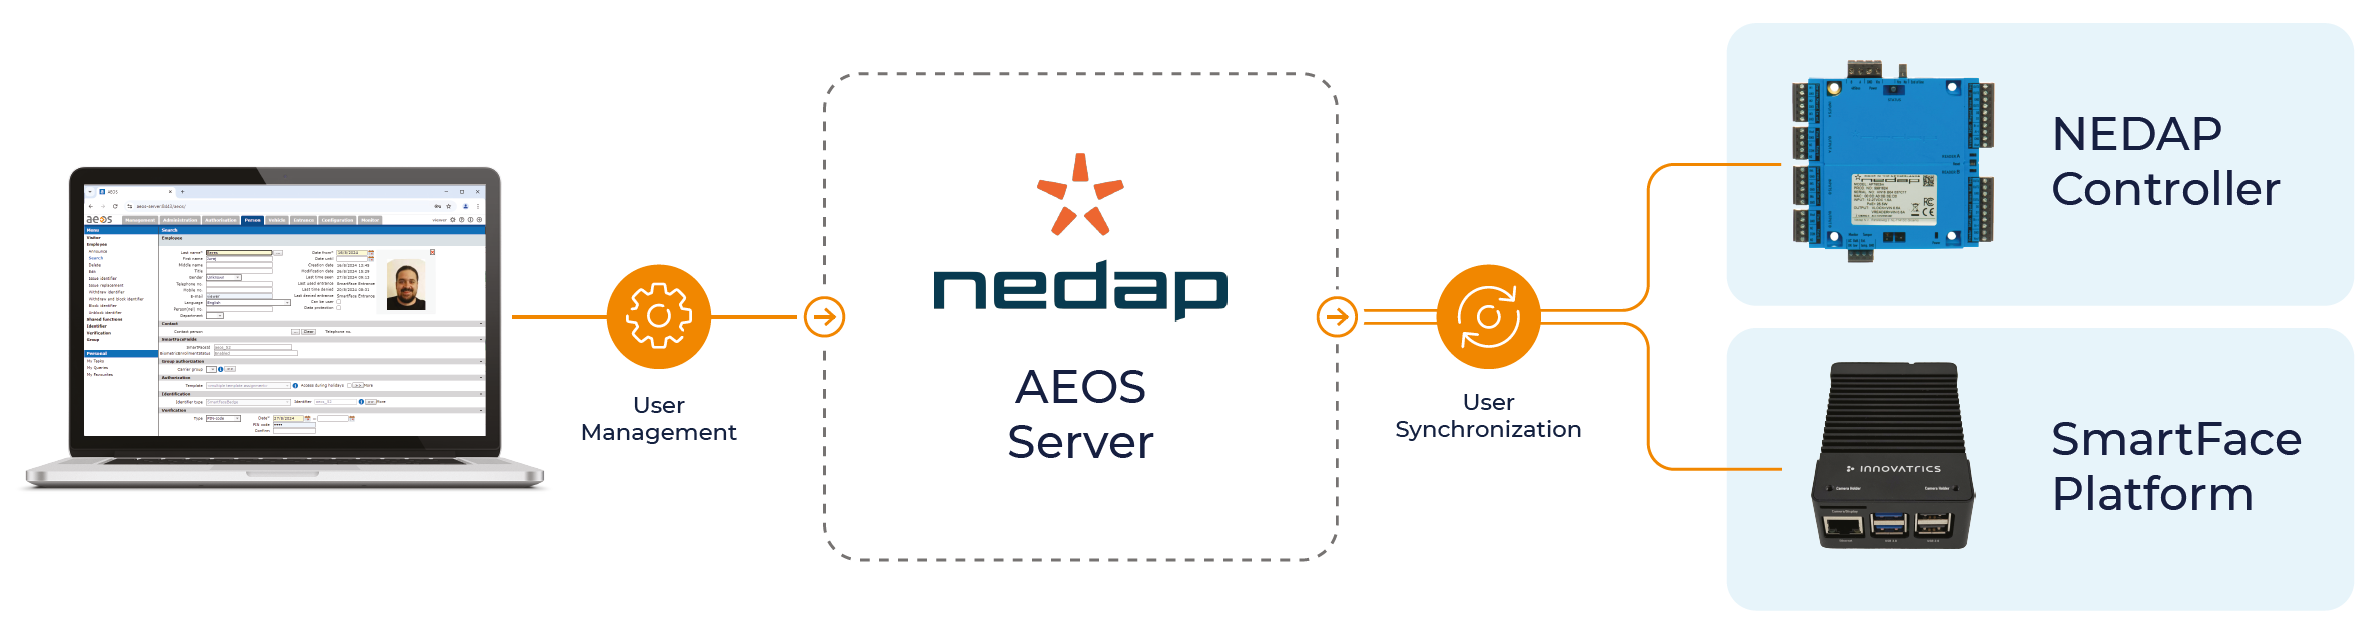
Integration
To integrate Video Processing Platform and Nedap Aeos together, some steps are needed on the Aeos server, each Aeos AEpu used that will work with cameras and on the Video Processing Platform server. All of these changes can be used within your project or within the Sample project.
Supported version
Video Processing Platform integration supports Aeos version AEOS 2023.2.6 and newer.
Aoes Configuration
Changes necessary for the Aeos server are as below:
Enabling Webservices
With the Aeos SOAP WebService, third parties can receive and change data in Aeos with SOAP calls. This includes the Video Processing Platform.
Once the Aeos Server is installed you need to access https://server-hostname:8443 to access the Aeos server, as the Aeos prefers to work with the hostnames instead of ip addresses. The default user is admin with default password aeosrules. This password needs to be changed to a custom one to be able to start using the Aeos.
Set up the AEOS to allow SOAP connections
During the Aeos software installation (setup), select SOAP WebService in the “Select the desired options for the AEOS” application window.
If the AEOS is already installed, just run the setup again and don’t change any settings except the selection of the SOAP WebService.
NOTE: From AEOS 2023.1, all options (including SOAP) are installed by default and are only activated as necessary. You do not have to select SOAP during the setup anymore.
In AEOS, enable SOAP in the system properties.
a) Go to Administration > Maintenance > Settings > System properties
b) Select the SOAP WebService checkbox (44.15).
c) Click OK.
d) Restart the AEOS application server service .

Allow AEOS to Video Processing Platform sync port 8443
You need to ensure the firewall rule enables the port 8443 from and to the AEOS server on the Windows firewall to ensure the communication is possible. Once enabled you can test out the connection using the telnet command on the linux environment:
telnet 192.168.17.10 8443
where 192.168.17.10 is the IP Address of the AEOS server.
Create or modify system users in AEOS to handle SOAP calls
The program that sends SOAP calls to AEOS (such as the Video Processing Platform integration), needs to ‘log in’ to AEOS as a system user in order to have the rights to access or change information there.
For this reason, you need to create one or more system users in AEOS and give these users a user role with the correct authorities to ‘access the correct menu options’ from within AEOS.
- Log in to AEOS.
- Go to Management > System users > Maintain user role
- Create a user role (or edit an existing one) for the SOAP client, and select at least these functions:
- Administration, Integrations, AEOS WebService, External calls
- Person, Employee, * - all functions starting with Person, Employee
The first function is necessary to make WebService calls. The other functions allow find/add/update/delete actions on contractors, employees, visitors and/or cars.
NOTE: See also Required user role functions for each SOAP call.
- If necessary, define an Entrance filter to restrict the entrances that can be seen, changed, deleted, or used for carrier authorization by the SOAP client.
- Create or modify system users for use with the SOAP client.
- If you will use only one system user for the SOAP client, create this user and assign them the correct user role and any filters you may have defined.
- If people will log in with their own system user account through SOAP, add the correct functions and filters to their existing user role.
Creating new Free Fields
The Free Fields are used as custom fields, to add additional Video Processing Platform integration related data without disturbing any existing installation.
We need to add new Free Fields into our employees: BiometricEnrollmentStatus, SmartFaceKeepUser and SmartFaceId. The names used for the Free Fields are customizable in the sense that you can set them up in the .env.aeos to match the AEOS setup. Unless needed, use the default names.
Add new Free Field Category
- Click on Administration in the top AEOS menu, then the Maintenance > Free fields > Free field categories.
- Create a Free field category called
SmartFaceFields
| Field | Value |
|---|---|
| Default name* | SmartFaceFields |
| Sequence* | 0 |
| Carrier type* | All |
Add Free Fields
For each Free Field:
- Open Maintenance > Free fields > Free fields
- Click New
- Define the Free Field
- Click OK
The new Free Field’s name must match AeosSync__Aeos__Integration__Freefield value in the docker configuration in the .env.aeossync environmental variables file. If you are using the default values, use values as below:
SmartFaceKeepUser
| Field | Value |
|---|---|
| Default name* | SmartFaceKeepUser |
| Data type* | Yes/No |
| Column* | 1 |
| Sequence* | 1 |
| Free Field Category* | SmartFaceFields |
| Write | TRUE |

SmartFaceId
| Field | Value |
|---|---|
| Default name* | SmartFaceId |
| Data type* | String |
| Column* | 1 |
| Sequence* | 2 |
| Free Field Category* | SmartFaceFields |
| Length* | 28 |
| Write | TRUE |
| Unique value | TRUE |

BiometricEnrollmentStatus
| Field | Value |
|---|---|
| Default name* | BiometricEnrollmentStatus |
| Data type* | String |
| Column* | 1 |
| Sequence* | 3 |
| Free Field Category* | SmartFaceFields |
| Length* | 30 |
| Write | TRUE |

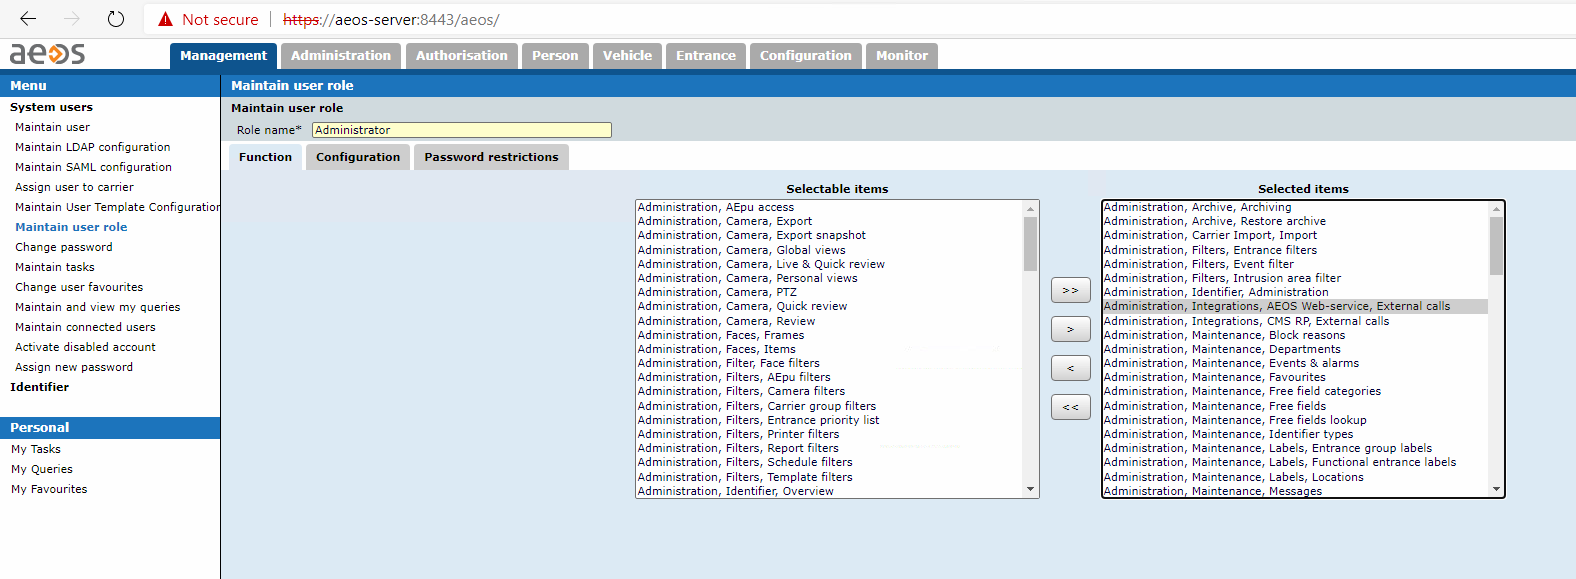
Asign Free Fields to User Roles
Once the free fields are set, you need to allow them for each user role.
- Go to Management > System users > Maintain user role > Configuration
- Open each role.
- Click on the Configuration tab within the user role.
- Ensure the newly created Free Fields are added and enabled to a user as seen below:

Creating new Identifiers
We will add new identifier to server as “Video Processing Platform Badges” for the virtual IPBadge component. Each person to use the Video Processing Platform Facial Recognition needs to have such badge. The badges will be managed by the Aeos Sync component of the Video Processing Platform, we need to define such identifier first.
- Open Administration > Maintenance > Identifiers > Identifier types
- Choose Generic type and click New
- Define the identifier as below

The new Identifiers name must match AeosSync__Aeos__Integration__Identifier value in the .env.aeossync docker configuration. Use default values as below:
| Field | Value |
|---|---|
| Name* | SmartFaceBadge |
| Sub type* | 1 |
| Customer Code type* | Numeric |
| Identification Type | Alpha numeric |
| Identifier Length* | 0 |
Do not forget to log out and log in to reload the new Identifiers and Freefields configuration.
Creating new users
To create a new user compatible with the Video Processing Platform Facial Recognition, the Employee needs to have at least these attributes below:
| Field | Description |
|---|---|
| Last name | The minimum to create a new Employee in AEOS. Adding first name is recommended, however not necessary. |
| Photo | You need to add a photo as an Employee without a photo picture will not be used by Video Processing Platform |
| SmartFaceKeepUser | This field is optional. Do not use for the sample project. It is used only if the Video Processing Platform is the source of truth. When AEOS is the source of truth, this field is not needed. If it is checked (set to TRUE) and you delete the Employee in the AEOS, it will be preserved as a Video Processing Platform Watchlistmember including it’s search history and autolearn images. Otherwise it will be removed once it was deleted in the AEOS. |
AEpu Configuration
To configure your project to be compatible with the Video Processing Platform you need to add IP Badges that serve as input points for the Video Processing Platform in your project setup.
Adding IP Badges
Virtual IP Badges serve as connection point between the Aeos and Video Processing Platform. Video Processing Platform uses them to trigger Nedap workflows.
In the Aeos Aemon open the diagram of your AEpu. From the Miscellaneous, pick up the IP Badge and add it into the project. Connect components so the IP Badge is a badge input within your project.
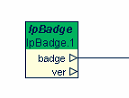
Configure it using the Generic Badge and note the Listening port. In our sample project we will use the ports 11020 and 11021. Each camera should be mapped to one IP Badge using a distinct port.
Video Processing Platform Server
Please see below steps needed within the Video Processing Platform system. These changes are already set within the sample project.
- Adding Aeos Connector
- Adding Aeos Sync
Aeos Connector
Aeos Connector is a module used on top of the Video Processing Platform that provides communication between the Video Processing Platform and the Aeos and its AEpus. If a person is identified by a camera and the access is granted based on the Video Processing Platform configuration (Access Controller) then a signal is sent into the IPBadge within an AEpu mapped to the camera. Based on the Aeos configuration the door/locker/turnstile is opened/unlocked the access is denied.
Add Aeos Connector to Video Processing Platform
To add the Aeos Connector into the Video Processing Platform, update the main docker-compose.yml file by adding the new service:
  aeos-aepuconnector:
    image: ${REGISTRY}integrations-aepuconnector:latest
    container_name: SFAeosAepuConnector
    restart: unless-stopped
    env_file: .env.aeosaepu
Enable the changes by applying the docker compose up -d command.
NOTE: in the package provided for the sample project it is already set
AEpu mapping
Part of the package is the Aeos Connector that serves as a connector between the Video Processing Platform and a physical device - the AEpu. Each camera used for Facial Recognition with the Nedap Aeos needs to be mapped within the .env.aeosaepu docker environment variables file. If such file does not exists yet within the same folder where is the docker-compose.yml, create the file.
NOTE: in the package provided for the sample project it is already set
Sample file would look like below:
AccessController__Schema=http
AccessController__Host=192.168.17.11
AccessController__Port=5050

AEpuMapping__0__StreamId=6b7b8f5c-6c28-4ccb-1b9e-08db2952c2b7
AEpuMapping__0__AepuHostname=aepu.aeos.com
AEpuMapping__0__AepuPort=11020

AEpuMapping__1__StreamId=f9de3d6b-8f98-4bef-13bb-08db0aa598ba
AEpuMapping__1__AepuHostname=aepu.aeos.com
AEpuMapping__1__AepuPort=11021
AccessController__Schema
This is the schema used for communication with the Access Controller, please keep the default value http
AccessController__Host
This is the ip address of the machine where the Access Controller is running, in a common or default installation it is the same as the Video Processing Platform’s host machine. In the sample project it is 192.168.17.11.
AccessController__Port
This is the port used to communicate with the Access Controller. You can use the default value 5050.
Each line starts like this, using camera index, starting at 0: AEpuMapping__0__. For each camera a new mapping is added, incrementing the index, replacing the X, such as __0__,__1__ etc. Each mapping has the fields below:
| Field | Value |
|---|---|
| StreamId | The ID of the camera/edge camera. You can get it by opening a camera/edge camera in the Cameras tab of the Video Processing Platform Station. You can get in either using the REST API or in the Video Processing Platform Station, when you go to the Cameras section and click on the camera in the list. The value is the last part of the URL, such as http://192.168.17.11:8000/cameras/edge-stream-detail/9eababd7-c1c3-45f3-9b51-05b721afd467. In this case the value would be: 9eababd7-c1c3-45f3-9b51-05b721afd467. |
| AepuHostname | AepuHostname is the hostname of the AEpu controller where the IpBadge is used. This information can be found (and set) in the AEConf. |
| AepuPort | AepuPort is the port used by the IpBadge. If multiple cameras use the same AEpu, use additional IpBadge with a unique port for each camera. |
Apply any changes by using the command docker compose up -d within the package directory.
Aeos Sync
Aeos Sync is a module used on top of the Video Processing Platform that provides synchronization between the database of users in the Nedap Aeos and the Watchlist Members in the Video Processing Platform.
Add Aeos Sync to Video Processing Platform
To add the Aeos Sync into the Video Processing Platform, update the main docker-compose.yml file by adding the new service:
  AeosSync:
    image: ${REGISTRY}integrations-AeosSync:latest
    container_name: SFAeosSync
    restart: unless-stopped
    env_file: .env.aeos
Enable the changes by applying the docker compose up -d command.
NOTE: in the package provided for the sample project it is already set
Sync configuration
The synchronization can be configured and it has several parameters that can be updated. To configure them, update the .env.aeossync docker environment variables file.
NOTE: in the package provided for the sample project it is already set
The Video Processing Platform integration allows for 2 different ways:
A. The AEOS is the source of truth
B. The Video Processing Platform is the source of truth
For complex Nedap Aeos projects we use the type A, where the AEOS is the source of truth.
Sample file would look like below:
Serilog__MinimumLevel__Default=Warning
AeosSync__DataSource=AEOS
AeosSync__SyncPeriodMs=60000
AeosSync__SmartFace__FirstNameOrder=first
AeosSync__SmartFace__RestApi__ServerUrl=http://<smartface-ip-address>:8098
AeosSync__SmartFace__RestApi__PageSize=100
AeosSync__SmartFace__GraphQL__ServerUrl=http://<smartface-ip-address>:8097/graphql
AeosSync__SmartFace__GraphQL__PageSize=100
AeosSync__SmartFace__Import__Watchlist=innovatrics
AeosSync__SmartFace__Import__DefaultThreshold=40
AeosSync__SmartFace__Import__FaceDetectorConfig__MaxFaces=1
AeosSync__SmartFace__Import__FaceDetectorConfig__MaxFaceSize=600
AeosSync__SmartFace__Import__FaceDetectorConfig__MinFaceSize=30
AeosSync__SmartFace__Import__FaceDetectorConfig__ConfidenceThreshold=400
AeosSync__SmartFace__Import__KeepAutoLearnPhotos=false
AeosSync__Aeos__Server__Wdsl=https://<aeos-ip-address>:8443/aeosws?wsdl
AeosSync__Aeos__Server__PageSize=100
AeosSync__Aeos__Server__User=<aeos-user>
AeosSync__Aeos__Server__Pass=<aeos-password>
AeosSync__Aeos__Integration__Freefield=SmartFaceId
AeosSync__Aeos__Integration__Identifier=SmartFaceBadge
AeosSync__Aeos__Integration__SmartFaceKeepUser=SmartFaceKeepUser
AeosSync__Aeos__Integration__BiometricEnrollmentStatus=BiometricEnrollmentStatus
AeosSync__Aeos__NoImageWarningNotification=false
AeosSync__Aeos__AutoBiometryEnablement=true
AeosSync__Aeos__AutoBiometryPrefix=inno_
AeosSync__Aeos__KeepPhotoUpToDate=true
Terms used:
<smartface-ip-address> - the IP address of the Video Processing Platform server
<aeos-ip-address> - the IP address of the Nedap Aeos server
<aeos-user> - the user used for the AEOS API
<aeos-password> - the password used for the AEOS API
Please see the tables below for further description. They are organized by the prefixes:
AeosSync__
| Field | Descriptions |
|---|---|
| DataSource | We keep this value as AOES, so it uses the way Aeos as the source of truth. |
| SyncPeriodMs | This is the periodicity of synchronization in milliseconds. The counting is reset by a new synchronization and starts when the sync is finished. |
AeosSync__SmartFace__
| Field | Descriptions |
|---|---|
| FirstNameOrder | You can set the way to name Watchlist Members in the Video Processing Platform, whether their name is in the format of firstname lastname or lastname firstname |
| RestApi__ServerUrl | URL location of the Video Processing Platform server and its REST API service Default port is 8098 |
| RestApi__PageSize | The REST API uses sizing, you can define size of each page/iteration |
| GraphQL__ServerUrl | URL location of the Video Processing Platform server and its GraphQL API service Default port is 8097 |
| GraphQL__PageSize | The GraphQL API uses sizing, you can define size of each page/iteration |
AeosSync__SmartFace__Import__
| Field | Descriptions |
|---|---|
| Watchlist | The intended name of watchlists in the SF database. Can stay as default |
| DefaultThreshold | This sets threshold for face recognition for the defined Watchlists. Higher the number more strict for the entrance |
| FaceDetectorConfig__MaxFaces | The amount of faces to try to detect within the user profile image. Keep the default value of 1 |
| FaceDetectorConfig__MaxFaceSize | Value in pixels, for the maximum possible size of a detected face |
| FaceDetectorConfig__MinFaceSize | Value in pixels, for the minimum possible size of a detected face |
| FaceDetectorConfig__ConfidenceThreshold | Minimum confidence of the face detector that it detected a face. Low quality faces are below 1200, good quality faces start at 1500. Perfect face detections are above 3500. |
| KeepAutoLearnPhotos | Used during registration, we can keep the default false |
AeosSync__Aeos__Server__
| Field | Descriptions |
|---|---|
| Wdsl | URL for the WDSL schema for the SOAP API on the Aeos server |
| PageSize | The SOAP API of the Aeos server uses sizing, you can define size of each page/iteration |
| User | Username to be used for the SOAP calls |
| Pass | Password to be used for the SOAP calls |
AeosSync__Aeos__Integration__
| Field | Descriptions |
|---|---|
| Freefield | Integration value, needs to be created in the AEOS. It represents the name of the new field to track user’s unique ID |
| Identifier | Integration value, matches Identifier type. Needs to be created in the AEOS |
| SmartFaceKeepUser | Keep user in AOES if removed from the Video Processing Platform. Used only when the Video Processing Platform is the source of truth. |
| BiometricEnrollmentStatus | Show the status of the Video Processing Platform biometry directly in the AOES Employee profile. |
AeosSync__Aeos__
| Field | Descriptions |
|---|---|
| NoImageWarningNotification | If enabled it shows a warning if a user does not have an image |
| AutoBiometryEnablement | Enables Facial Biometry for each user that has a picture automatically. Sets user Freefield and Identifier |
| AutoBiometryPrefix | Each user created in the Video Processing Platform will have a prefix a set in here. Must end with underscore symbol _ |
| KeepPhotoUpToDate | If true, the picture is updated in the Video Processing Platform when updated in AEOS |
Additional configuration
Once the Video Processing Platform and Aeos integration is configured additional options are available. This includes for example the Liveness / Spoof checks and specific Access Controller configuration. For more information read the specific sections of the documentation.
Sample Project
Here is sample project with lower complexity showing you how to setup 1 door entrance with 2 Video Processing Platform Edge cameras and card readers for both entrance and exit. A more complex projects generally expect additional setup from the Nedap Aeos' side. If the project grows in size, more cameras need to be mapped to additional IPBadges.
Before you start with this project ensure you went through the integration steps and you have both Nedap Aeos and Innovatrics Video Processing Platform installed and ready to be used.
AEpu setup
Setup you AEpu, define it’s hostname to aepu.aeos.com if using the Nedap Integration Package. Open AEMON and connect to the AEpu. Follow the steps below to set up the AEpu. You can also download existing configuration from the AEpu project configuration file.
Project overview
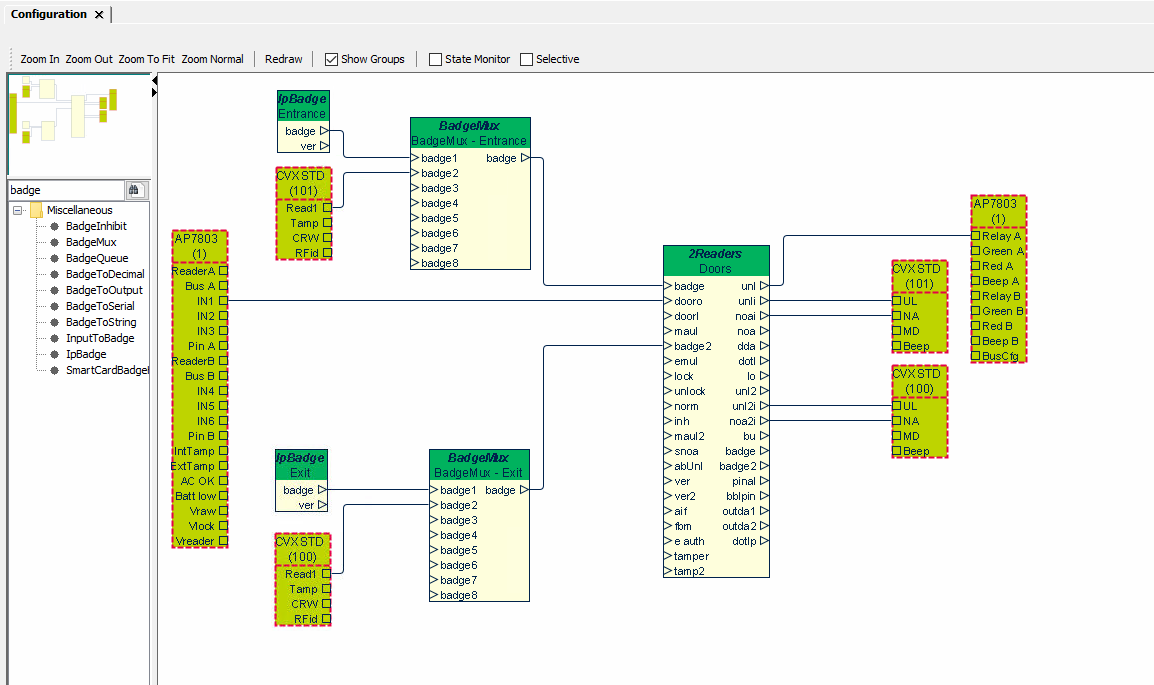
Please add the components as per table below.
| Component | Description |
|---|---|
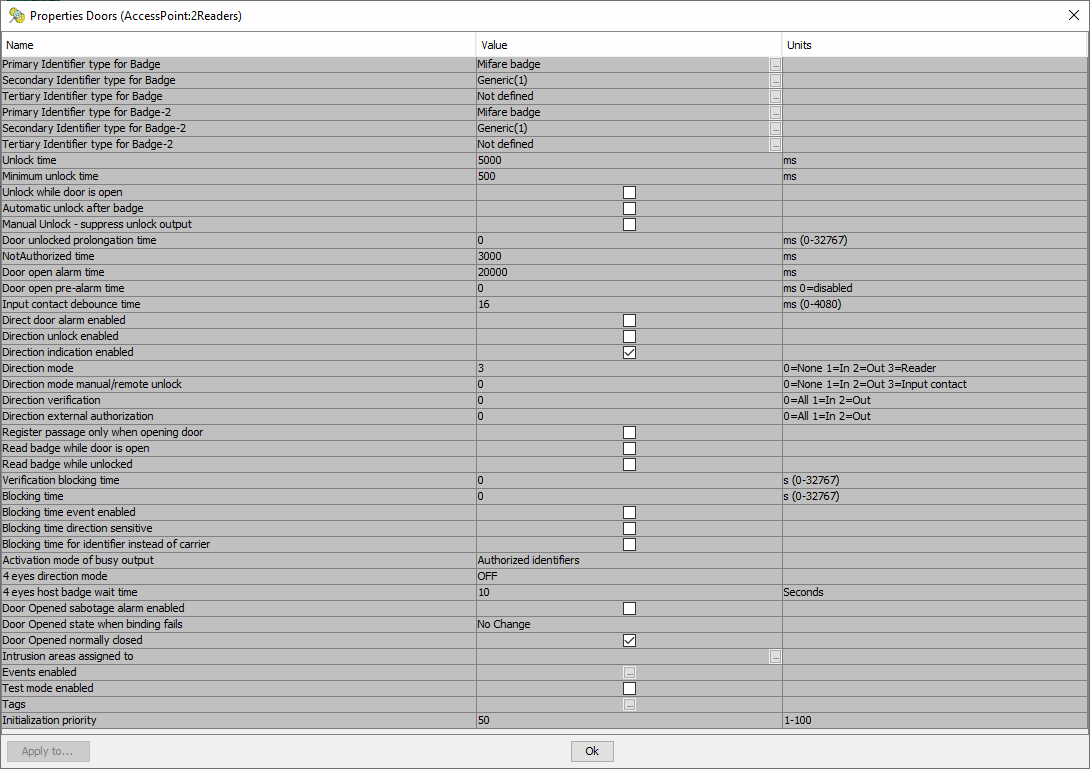
| AEpu AP7803 | This is the AEpu component. It is connected to the 2Readers - Door using the IN1 - door0 connection |
| IpBadge - Entrance | This is the virtual badge, mapped for the entrance camera in the Video Processing Platform configuration Connected to the BadgeMux - Entrance using the badge - badge1 connection |
| Badge Reader CVXSTD - Entrance | This is an optional physical card reader connected to the BadgeMux - Entrance using the Read1 - badge2 connection |
| BadgeMux - Entrance | The Badge Mux combines the outputs of the both physical reader and the virtual IP Badge and connects them in the 2Readers Doors using the badge - badge connection |
| IpBadge - Exit | This is the virtual badge, mapped for the entrance camera in the Video Processing Platform configuration Connected to the BadgeMux - Exit using the badge - badge1 connection |
| Badge Reader CVXSTD - Exit | This is an optional physical card reader connected to the BadgeMux - Exit using the Read1 - badge2 connection |
| BadgeMux - Exit | The Badge Mux combines the outputs of the both physical reader and the virtual IP Badge and connects them in the 2Readers Doors using the badge - badge connection |
| 2Readers Doors | The doors are connected with the AEpu and the Standard readers. The AEpu connection is done via unl and Relay AThe readers are connected using the unl and UL and unli to NA connections for Entrance and the unl2 and UL and unli2 to NA for the Exit respectively |
IP Badges
Set Badge device type as Generic Badge
Click on ... next to the Generic Badge and set listening port 11020 for the Entrance and 11021 for the Exit.
Entrance setting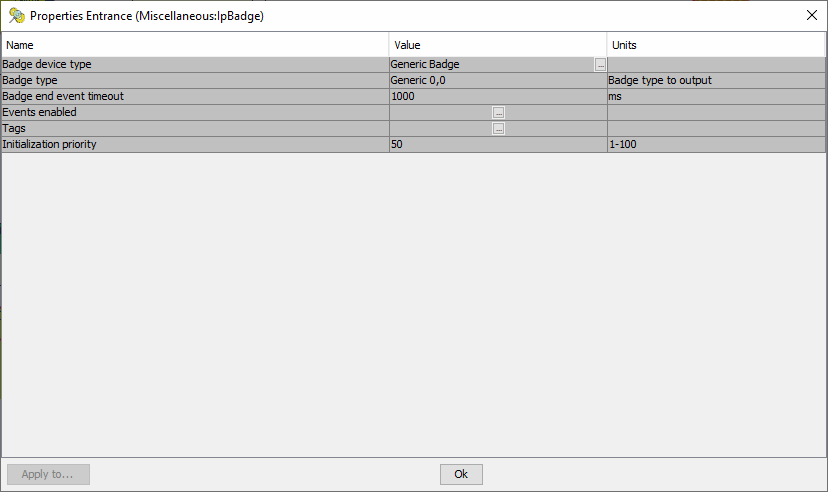
Entrance port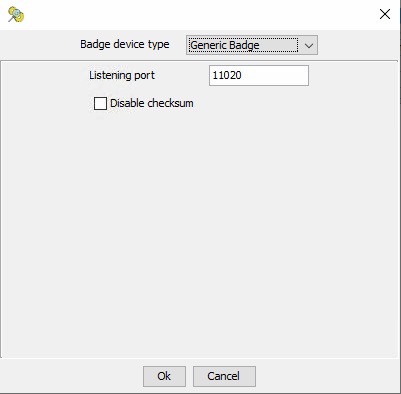
Exit setting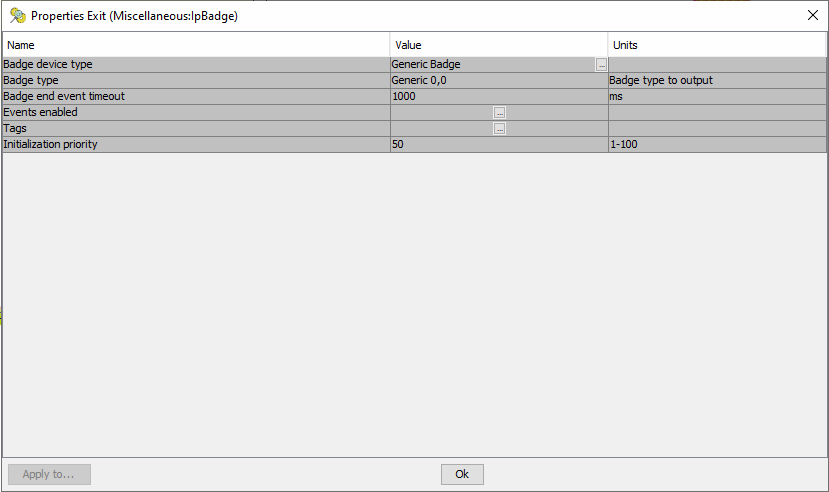
Exit port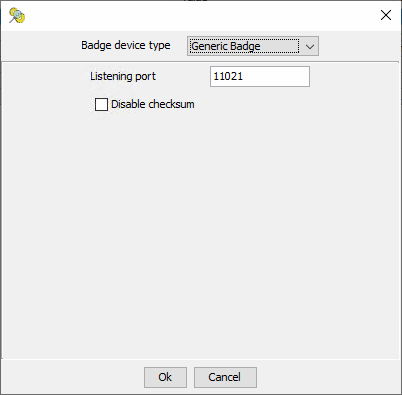
2Readers
Aeos setup
Create Entrance
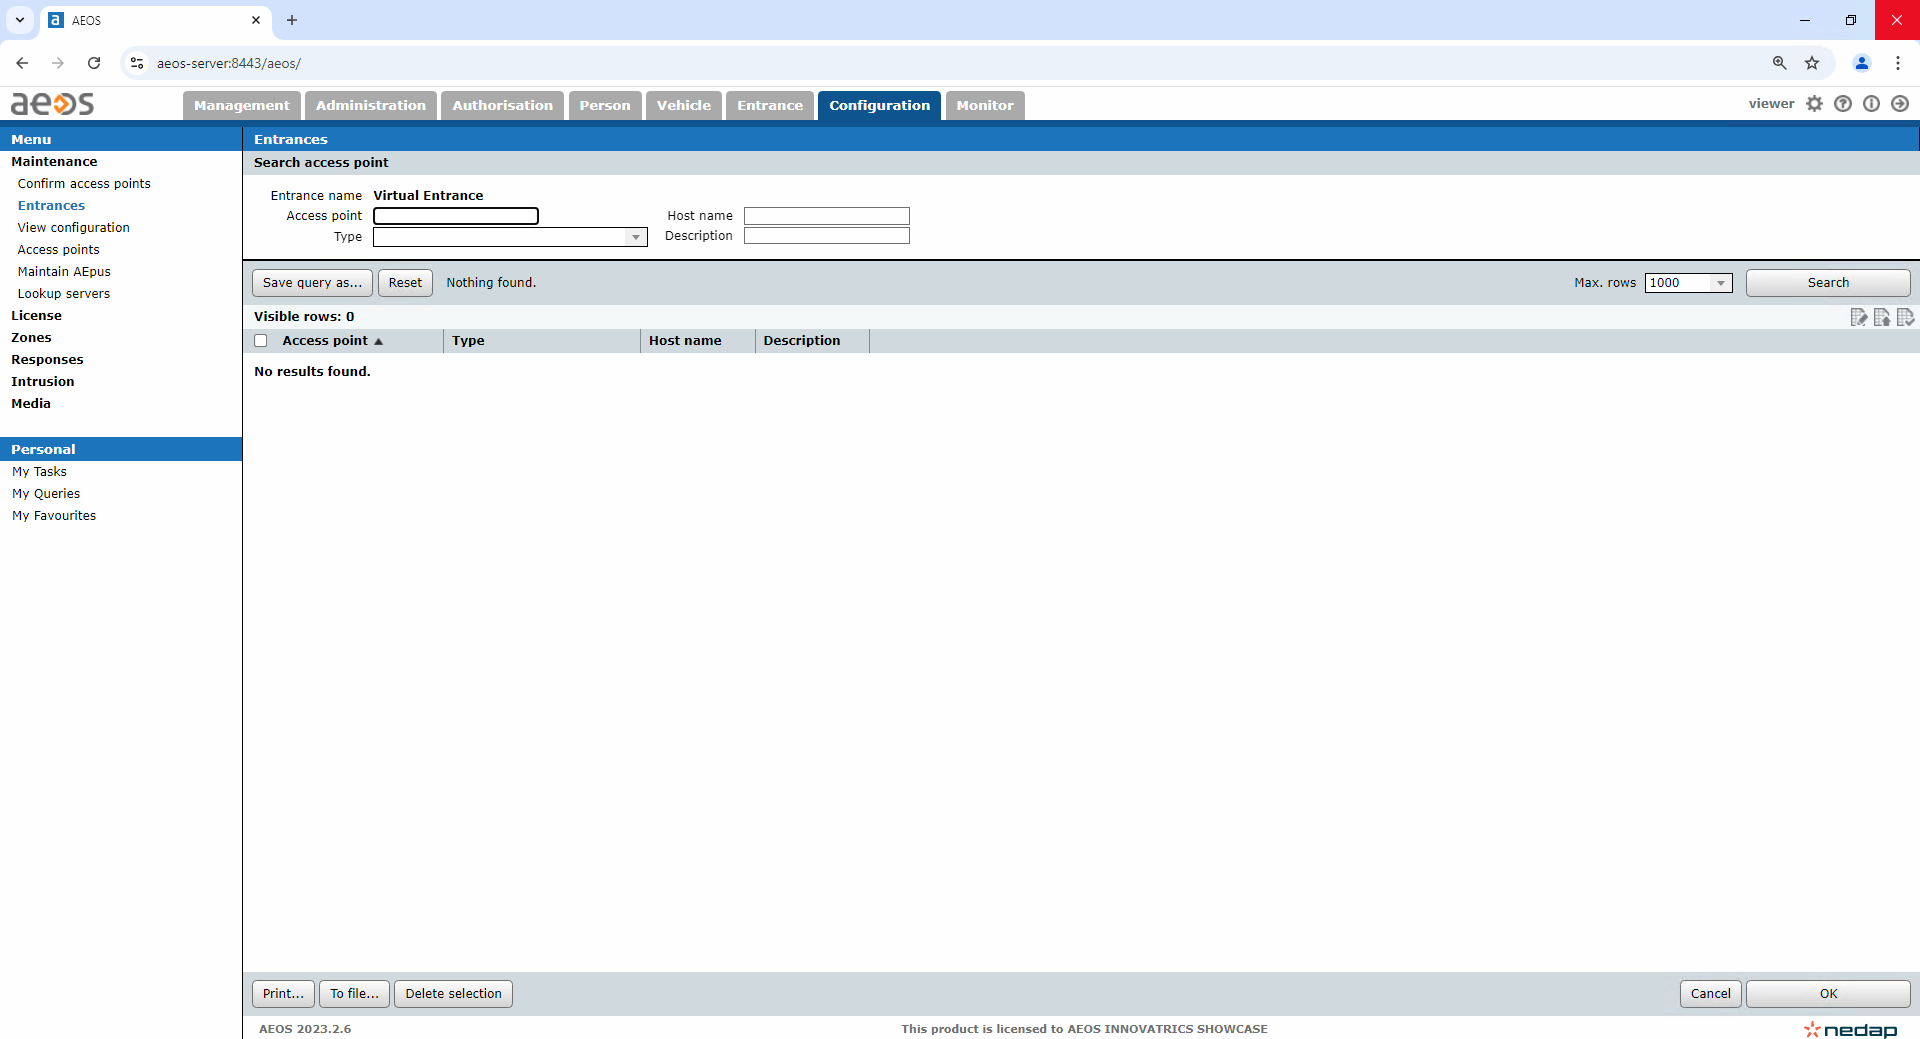
We need to create the entrance in the AEOS system.
- Navigate to Configuration > Maintenance > Entrances
- Click New

- Fill out the Name and click on the Add access points
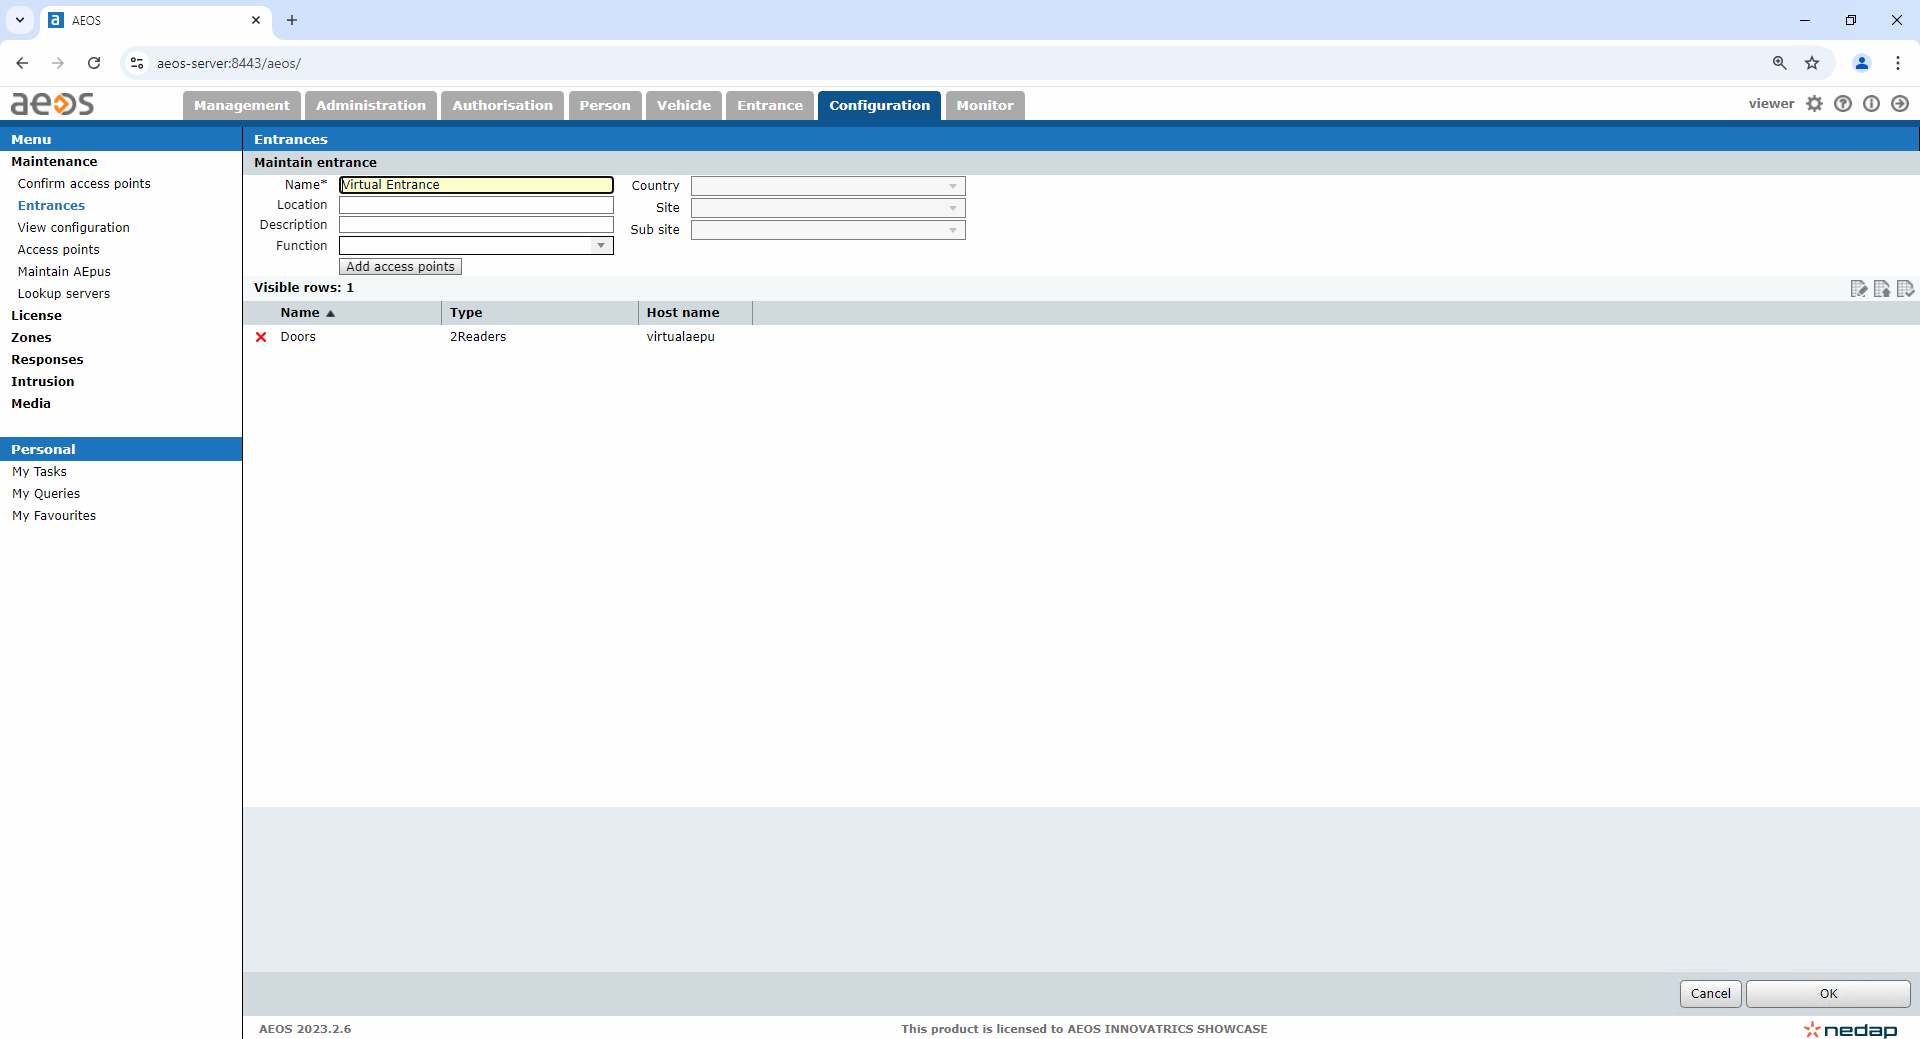
- Click Search, choose the
Doorsentrance. - Click Ok, confirm Ok again
Add an Employee
Add employees for your project. The easiest way to achieve this, anounce an employee at Person > Employee > Announce.
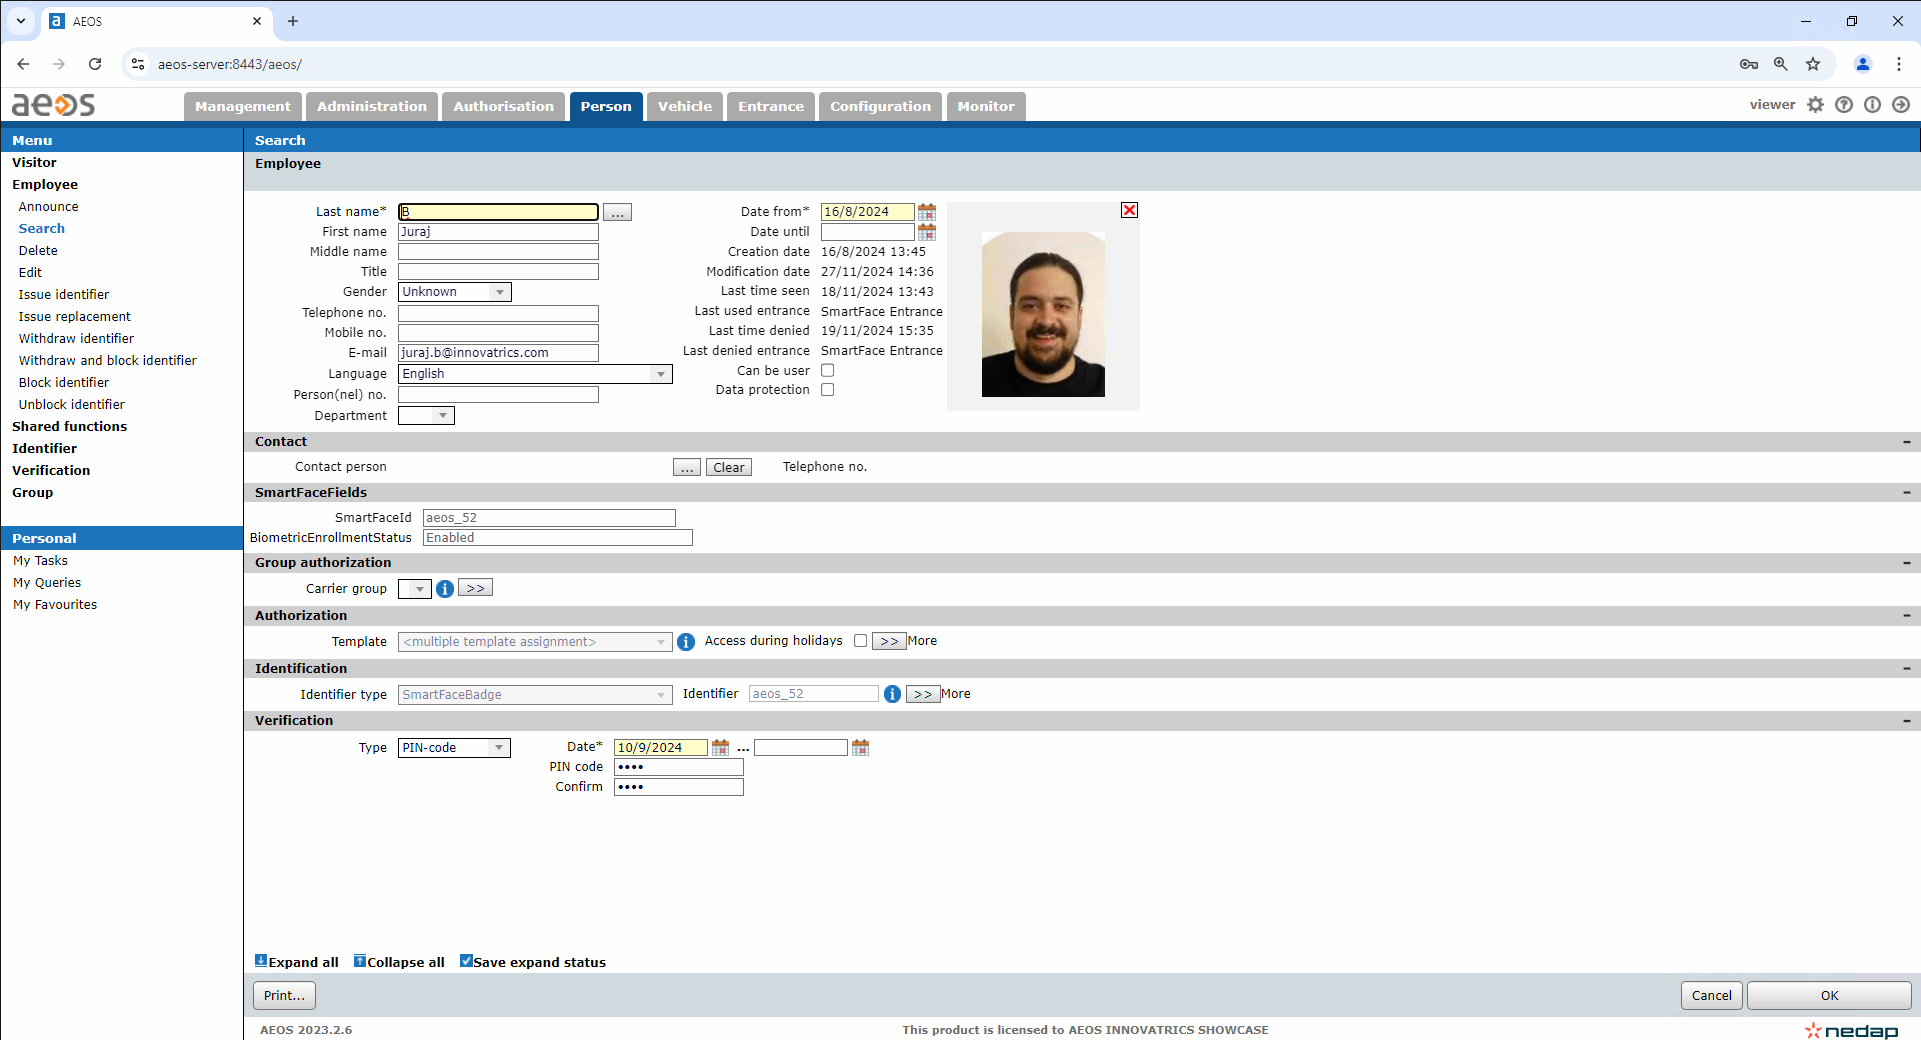
Add First name and Last name. Add a suitable photo. Click OK to finalize the creation of the profile.
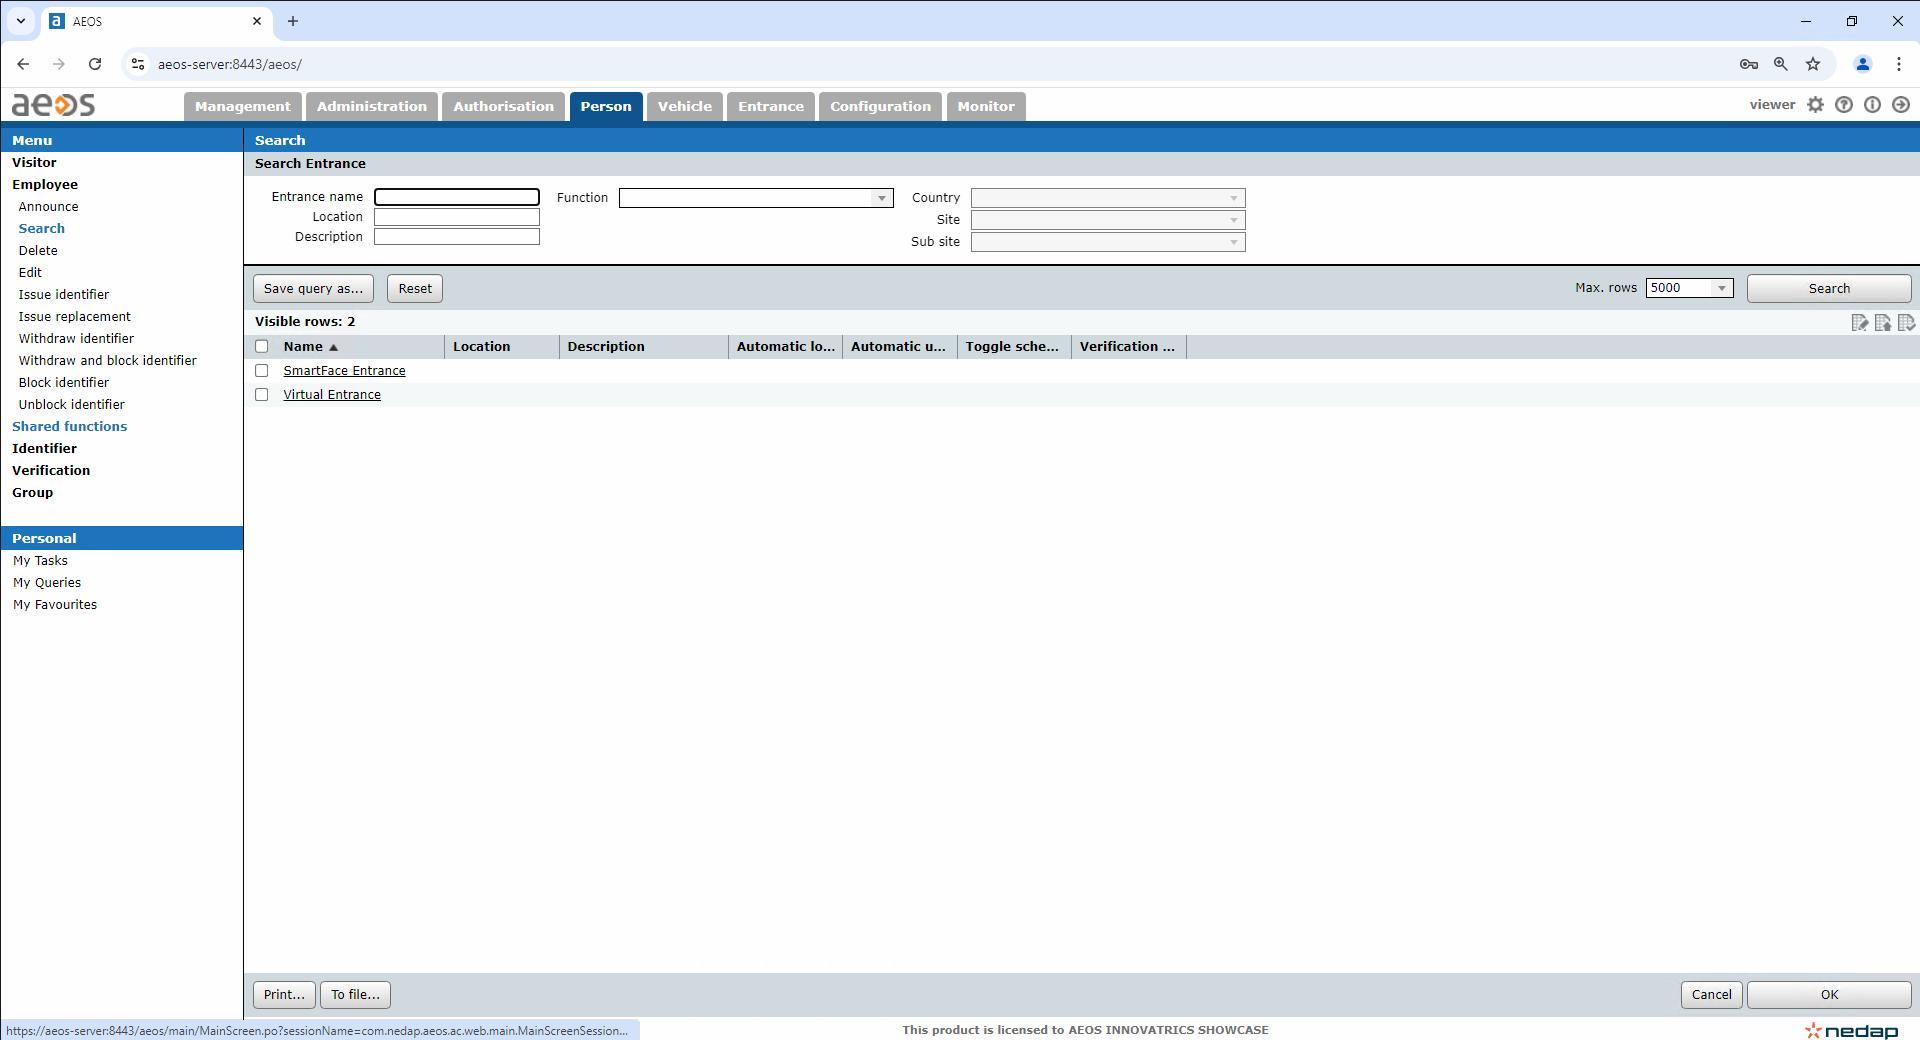
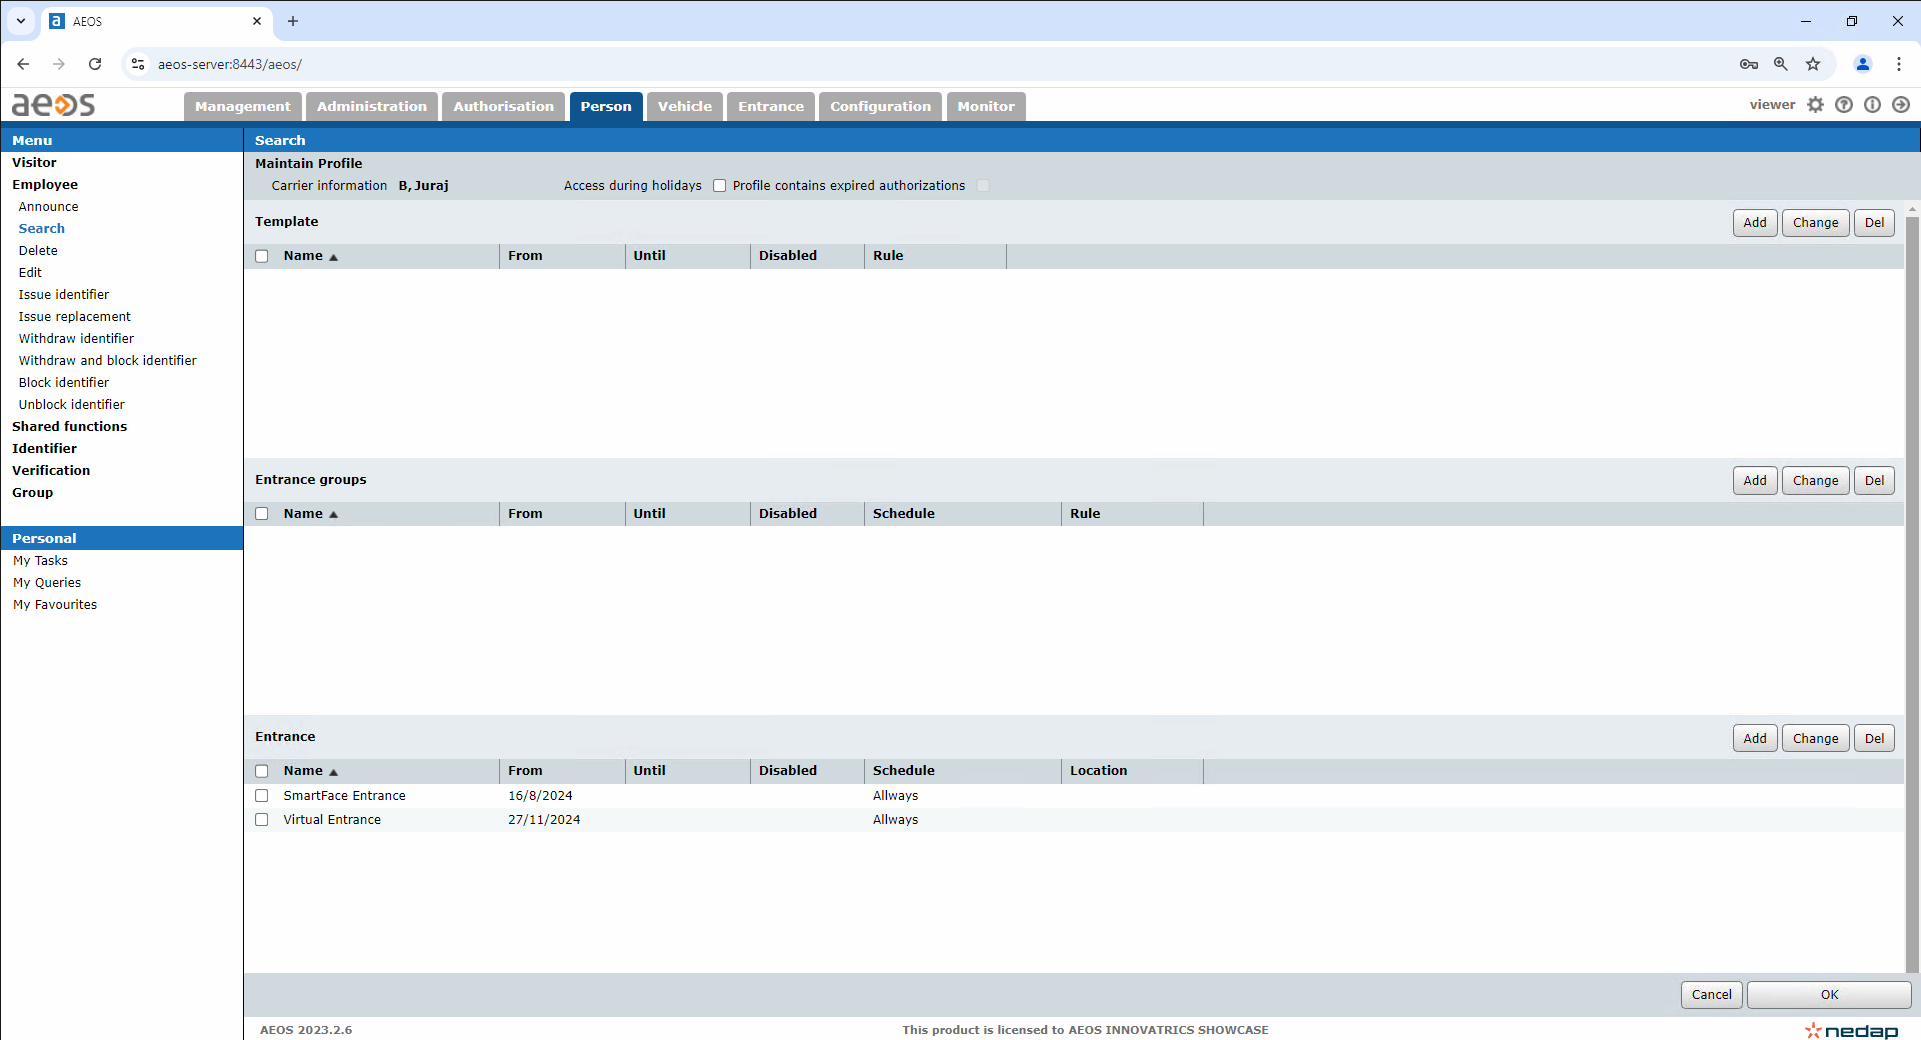
Add Entrance to Employee
To enable the sample demo project setup working with the doors, you need to add the doors to a user profile.
Video Processing Platform setup
If you have followed all the steps from the guide, and you are using the Nedap Integration Package, you are all set up for the Sample project.
How to use the Aeos Integration Package
When the package is set, up and running you can approach the door and camera, the door is opened and you can seamlessly enter the door as long as you are enrolled into a Watchlist that is synced with the Edge cameras.