Nx Witness Integration
This documentation is intended to provide you with an overview and the installation details of the integration between Nx Witness VMS and the Video Processing Platform.
The integration between Nx Witness VMS and Video Processing Platform enhances the Nx Witness with face recognition capabilities. The main advantage of this integration is that information processed by the Video Processing Platform is displayed and stored by Nx Witness VMS together with processed video streams.
The Integration supports both RTSP and Edge Stream Cameras (using the Video Processing Platform Embedded Stream Processor). It is suggested to use the new lightweight Edge Stream Camera integration.
For more information about the SFE Stream Processor integration, read here.
Key features
Nx Witness displays and stores the following information from Video Processing Platform: Face detection, Face tracking, Age and gender estimation, Face mask status, Identification of a person, Information about a person not identified against any of the watchlists, Person identification spoofing, and Cropped faces
The information in Nx Witness is provided in the form of objects and analytic events. For more information about displayed data please navigate here.

Lightweight Edge Stream Integration
The Lightweight Edge Stream Integration is the suggested version of the NX Witness integration as it is easy to use and has a low impact on the server hardware. Use of Smart Cameras is needed.
For more information about the Smart Edge Cameras and the Video Processing Platform Embedded Stream Processor read here.
Architecture overview
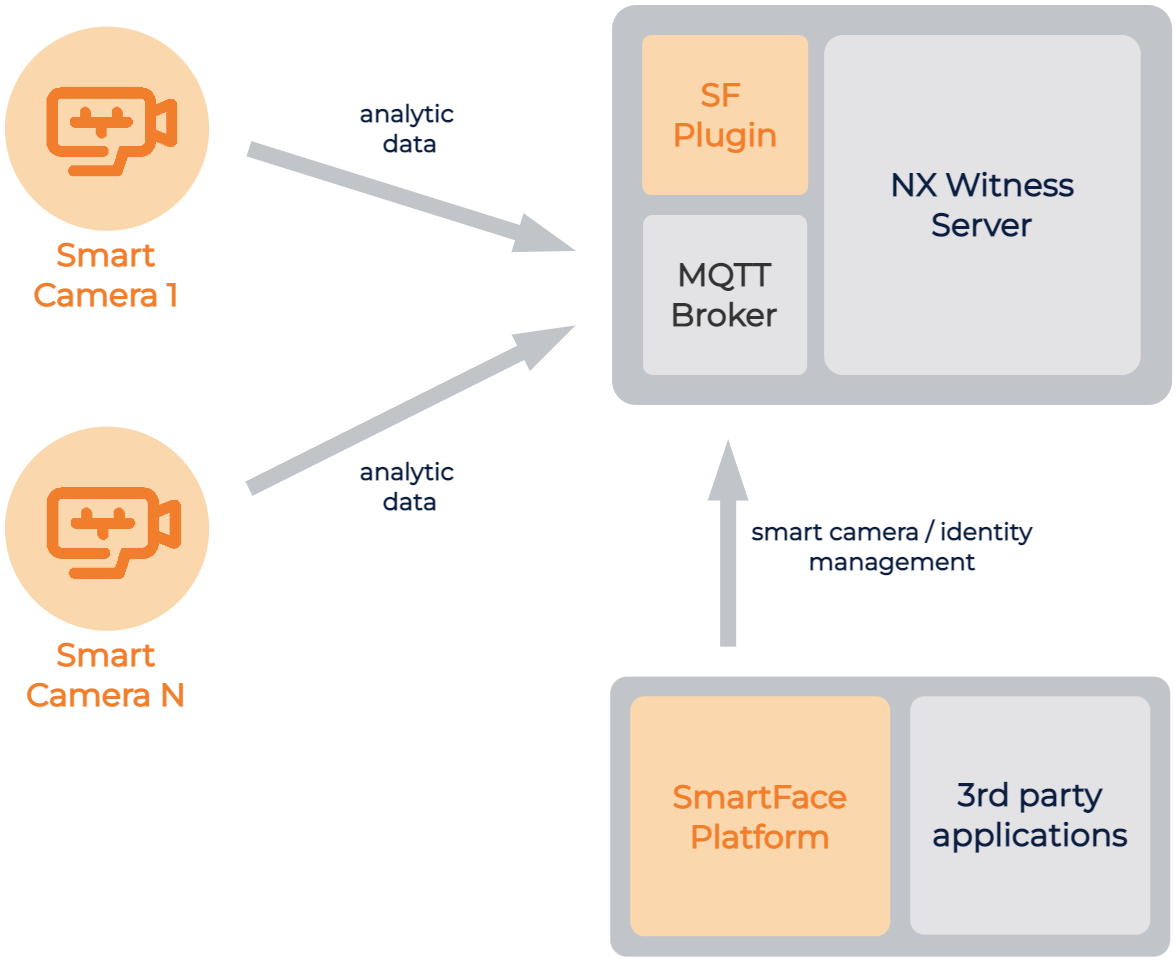
SFE Stream Processor application/plugin is running on the Smart Cameras processing the camera input, detecting faces, extracting landmarks, extracting face templates, matching the extracted template against the database and sending MQTT messages to an MQTT broker. Video Processing Platform is used for the synchronization of the watchlists from the server to smart cameras.
NX plugin consumes the MQTT messages coming from the Smart Camera, synchronizes the metadata with frames coming from the RTSP stream and invokes events in the NX VMS.
MQTT protocol is used for communication between the SFE Stream Processor on camera and Nx Witness VMS server.
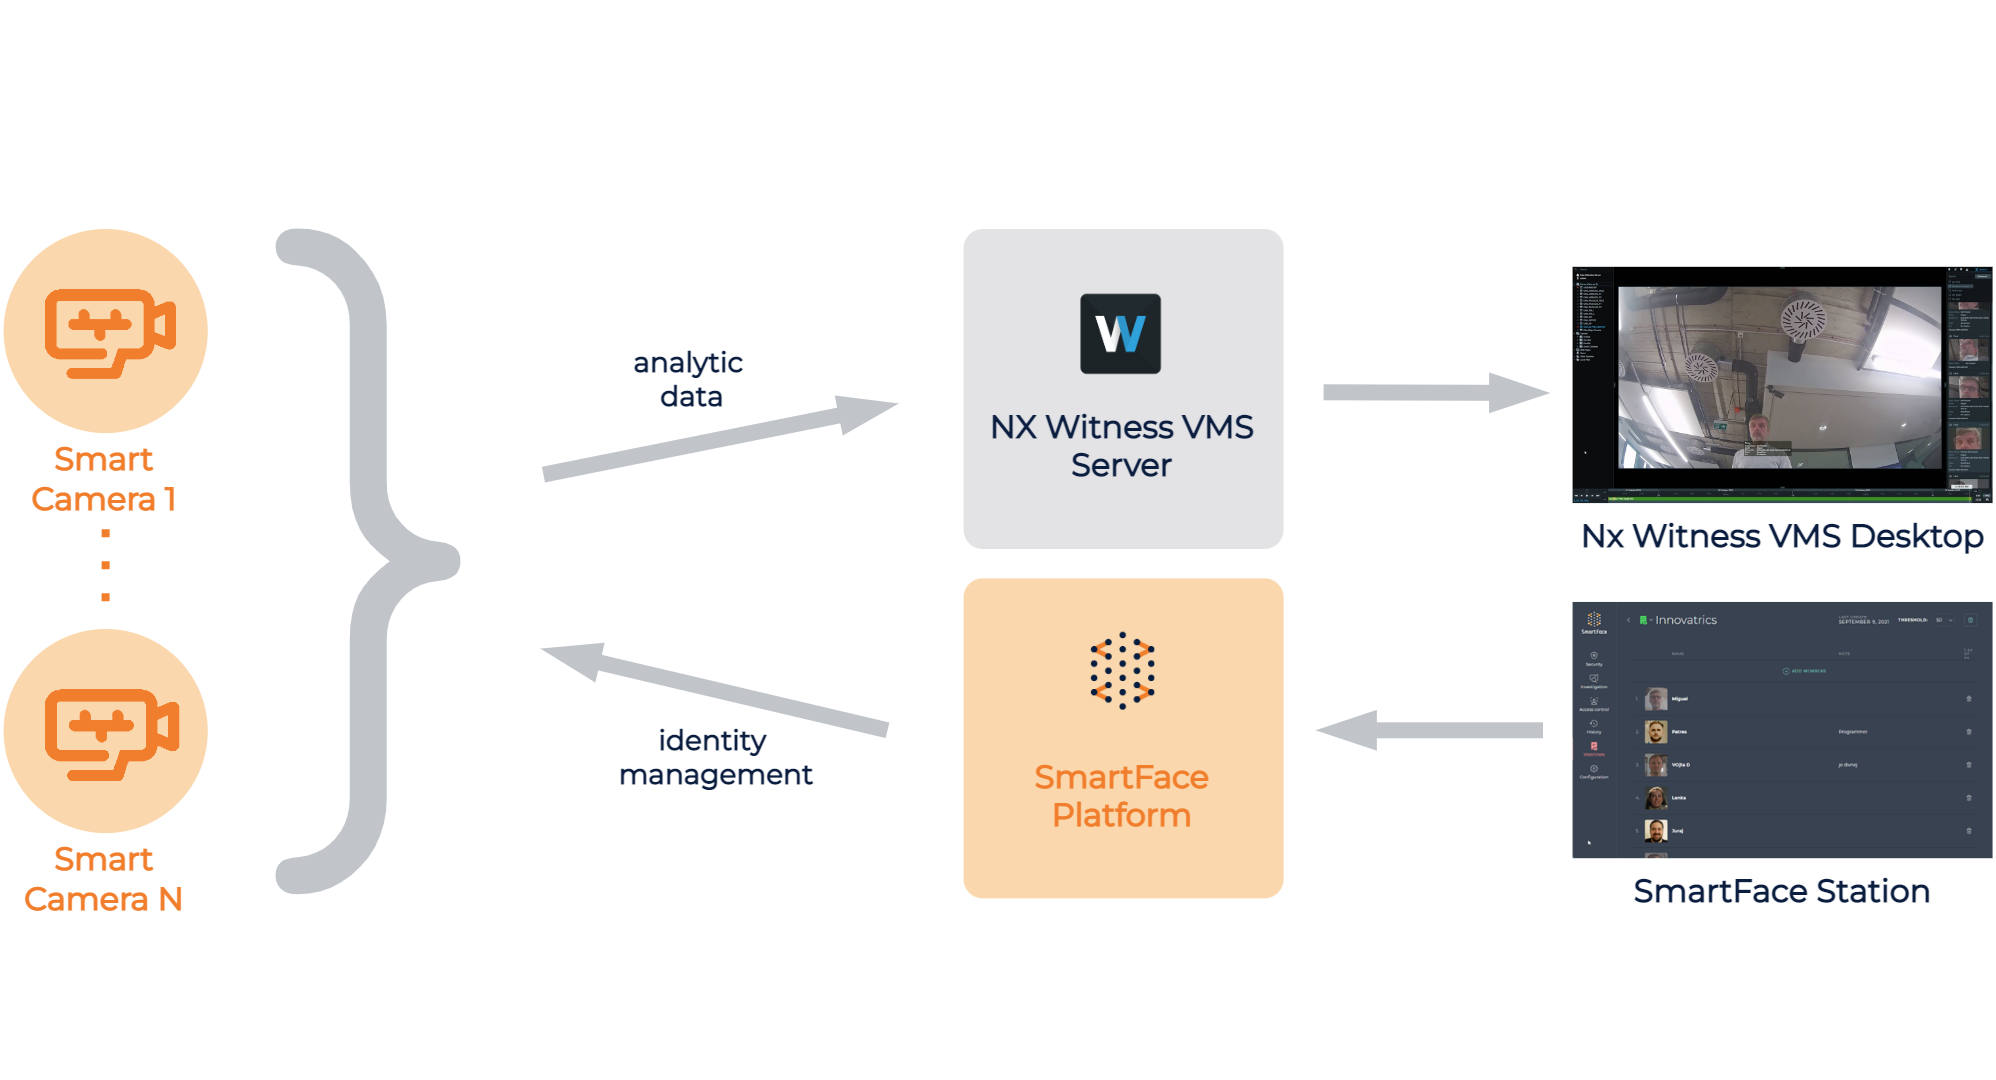
MQTT protocol is also used for watchlist synchronization between the Video Processing Platform (server) and SFE Stream Processor (camera). For more information about the Watchlist Management for the SFE Stream Processor, please read here. If you are not using Video Processing Platform as a server application, you need to run an MQTT broker on your server to be able to receive MQTT messages from the smart cameras.
MQTT broker is necessary to run on the camera as an MQTT Client is running both in SFE Stream Processor and NX VMS plugin. One MQTT Client publishes MQTT messages to a specific MQTT topic to which the other MQTT Client is subscribed.
Video Installation Guide
If you prefer a video step by step guide please watch the prepared tutorial video. If you prefer to read a step by step guide, please skip this section and navigate to the Installation section.
Installation
- Install Video Processing Platform
- Install Video Processing Platform Embedded Stream Processor on Edge Cameras
- Install Nx Witness VMS
- Install Video Processing Platform Embedded plugin
- Enable and Configure Smart Cameras
Install Video Processing Platform
Install the Video Processing Platform. For information on how to install Video Processing Platform, see Installation on Windows and Installation on Linux.
Install Video Processing Platform Embedded Stream Processor on Edge Cameras
Please follow the installation guide as per your camera brand and type.
Install Nx Witness VMS
Install the Nx Witness VMS v5.X or later. You will need both Server and Client, as the Client will be used in configuration. Client should be typically installed on VMS operator’s machine.
Install Video Processing Platform Embedded plugin
Stop the Nx Witness server
- On Windows, you can do it by right-clicking the tray icon and selecting Stop Server.
- On Linux (Ubuntu), you can do it with
sudo service networkoptix-mediaserver stopcommand in the terminal
Download the Video Processing Platform analytics plugin from our Customer Portal. It is available in the download section of the Video Processing Platform Embedded product as
SFE_Edge_Stream_NX_plugin_vx.y.z_Linux.tar.bz2for the Linux installation, orSFE_Edge_Stream_NX_plugin_vx.y.z_Windows.zipfor the Windows installation.Untar (
tar xvf SFE_Edge_Stream_NX_plugin_vx.y.z_Linux.tar.bz2) or unzip the downloaded files.- On Windows copy the unzipped
.dllfile to{NxInstallPath}\plugins\usually onC:\Program Files\Network Optix\Nx Witness\MediaServer\plugins. - On Linux move the untared file
libsfe_edge_stream.soinside the{NxInstallPath}/bin/pluginsusually on/opt/networkoptix/mediaserver/bin/plugins.
- On Windows copy the unzipped
Start the Nx Witness VMS.
- On Windows by right-clicking the tray icon and selecting Start Server.
- On Linux (Ubuntu) with
sudo service networkoptix-mediaserver start
Enable and Configure Smart Cameras
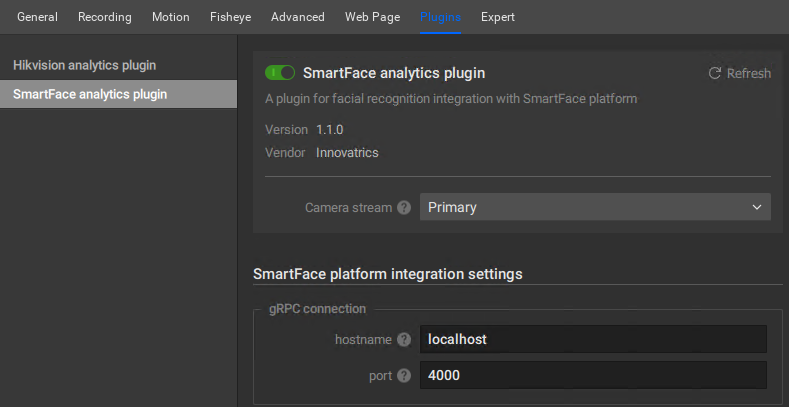
After you install the DLL, you can enable the Video Processing Platform Embedded Camera plugin in the Camera Settings under Plugins tab for each camera.
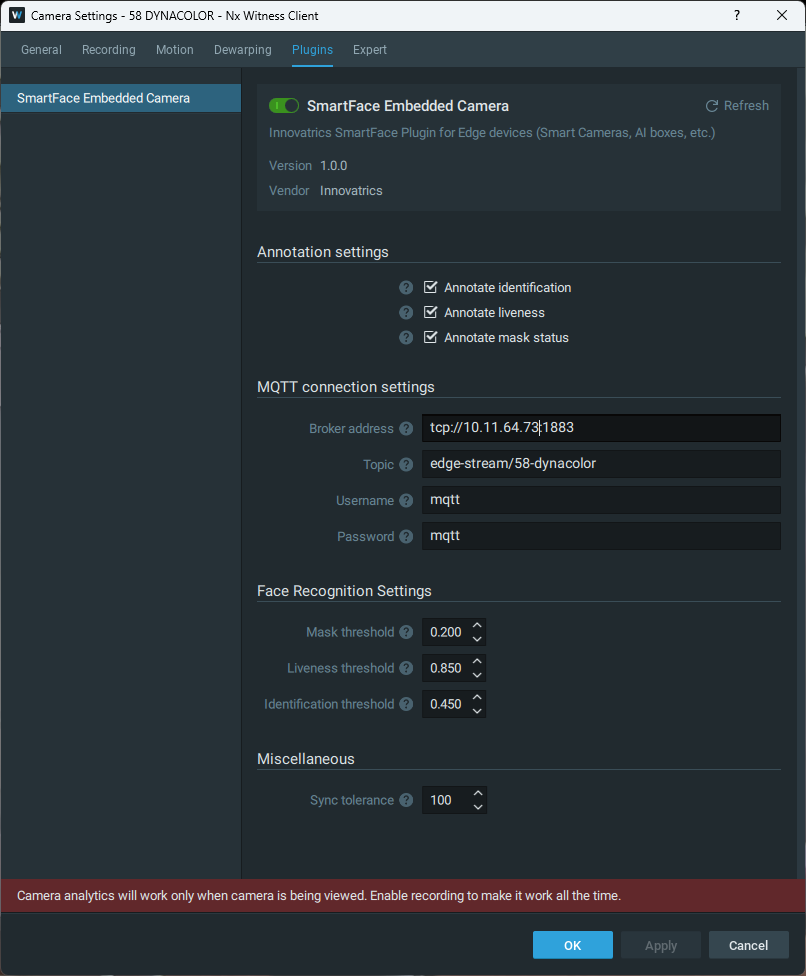
- Configure the MQTT connection properly. The MQTT configuration (
broker,topicandcredentials) has to be the same as on the camera running the SFE Stream Processor. - Choose what information you want to annotate in the camera preview.
- Configure the face recognition thresholds. These thresholds impact the annotations in the camera preview.
- Set tolerance in milliseconds for timestamp synchronization between video frames and MQTT frame_data messages.
- Ensure the camera time is synchronized with the server running Nx Witness VMS.
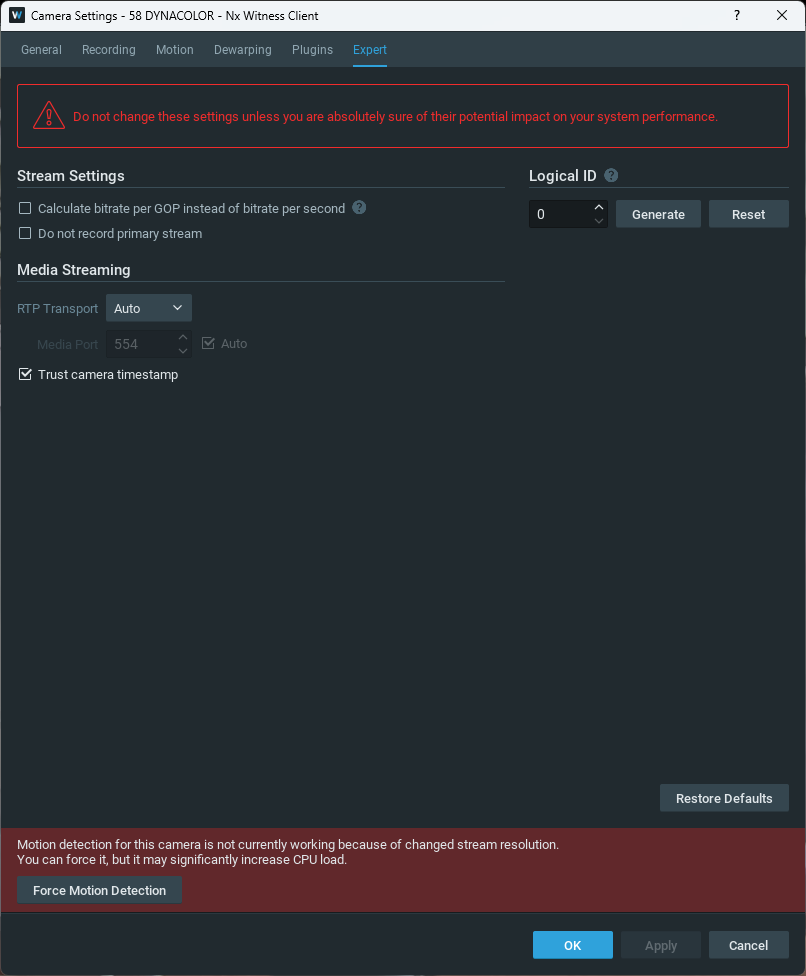
We also recommend checking the Trust camera timestamp in Camera Settings under Expert tab.
Display events
You need to enable the following events by adding a new event in Camera rules of a specific camera:
- Analytics Object Event with Face object type to show the face detection and face recognition events
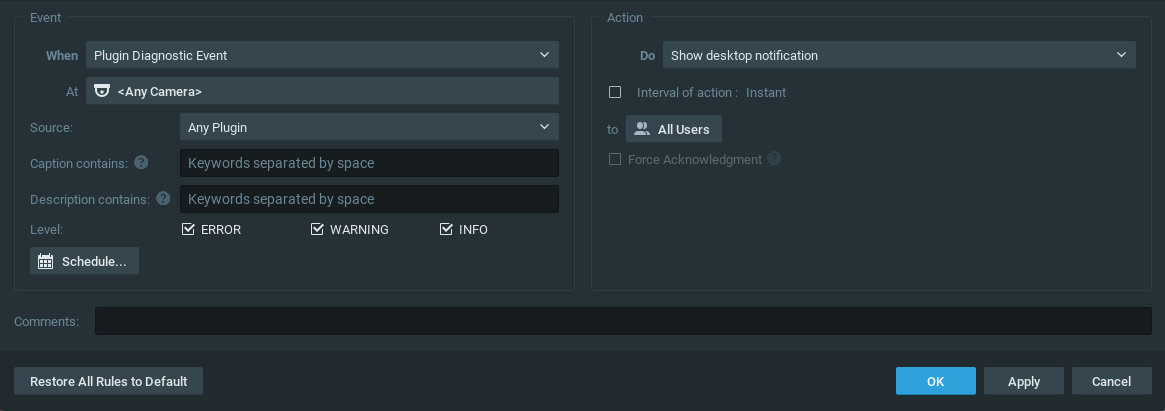
- Plugin Diagnostics Event to show connection and debug notifications
RTSP Camera Integration
Architecture overview
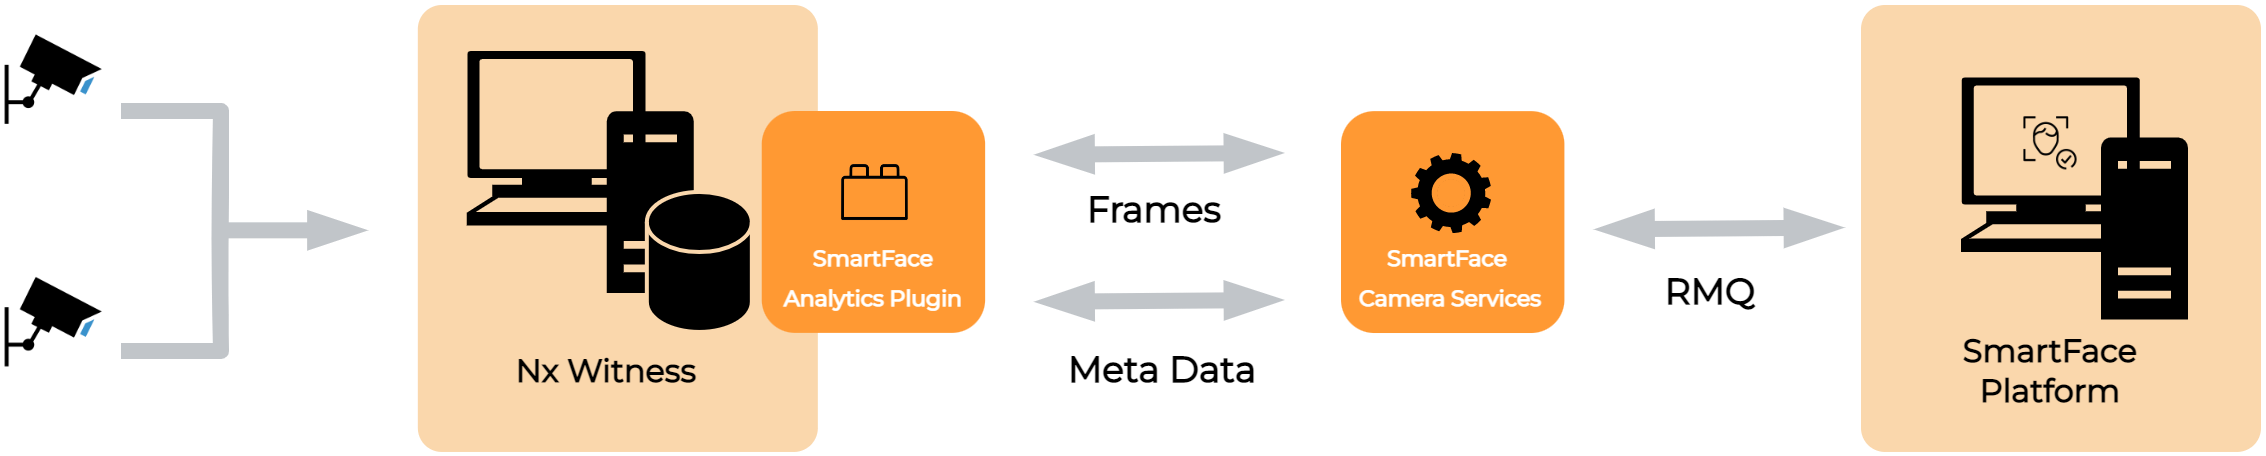
Integration between the Video Processing Platform facial recognition platform and Nx Witness VMS is performed through the Video Processing Platform Analytics plugin and Video Processing Platform Camera services installed on Nx Witness server.
Video Processing Platform Analytics plugins running within Nx Witness are responsible for the communication and transformation of data received from Video Processing Platform. Video Processing Platform Camera services installed on the Nx Witness server send processed frames into the Video Processing Platform.
The Camera services perform also lightweight processing in the form of tracking of detected faces. Video Processing Platform detects faces on incoming frames, extracts demographic data from the detected faces and matches the faces against watchlists stored in Video Processing Platform.
All information obtained by Video Processing Platform is sent back to Nx Witness. Video Processing Platform Analytics plugin then processes data coming from Video Processing Platform, so that Nx Witness can display it.
Fully featured Video Processing Platform
As the integration is backed by Video Processing Platform all Video Processing Platform features are available to you.
Installation
For the proper functioning of the integration, it is required to install the Video Processing Platform, Nx Witness VMS and the Video Processing Platform analytics plugin. Video Processing Platform and Nx Witness VMS should be successfully installed and configured before you start to install the integration components.
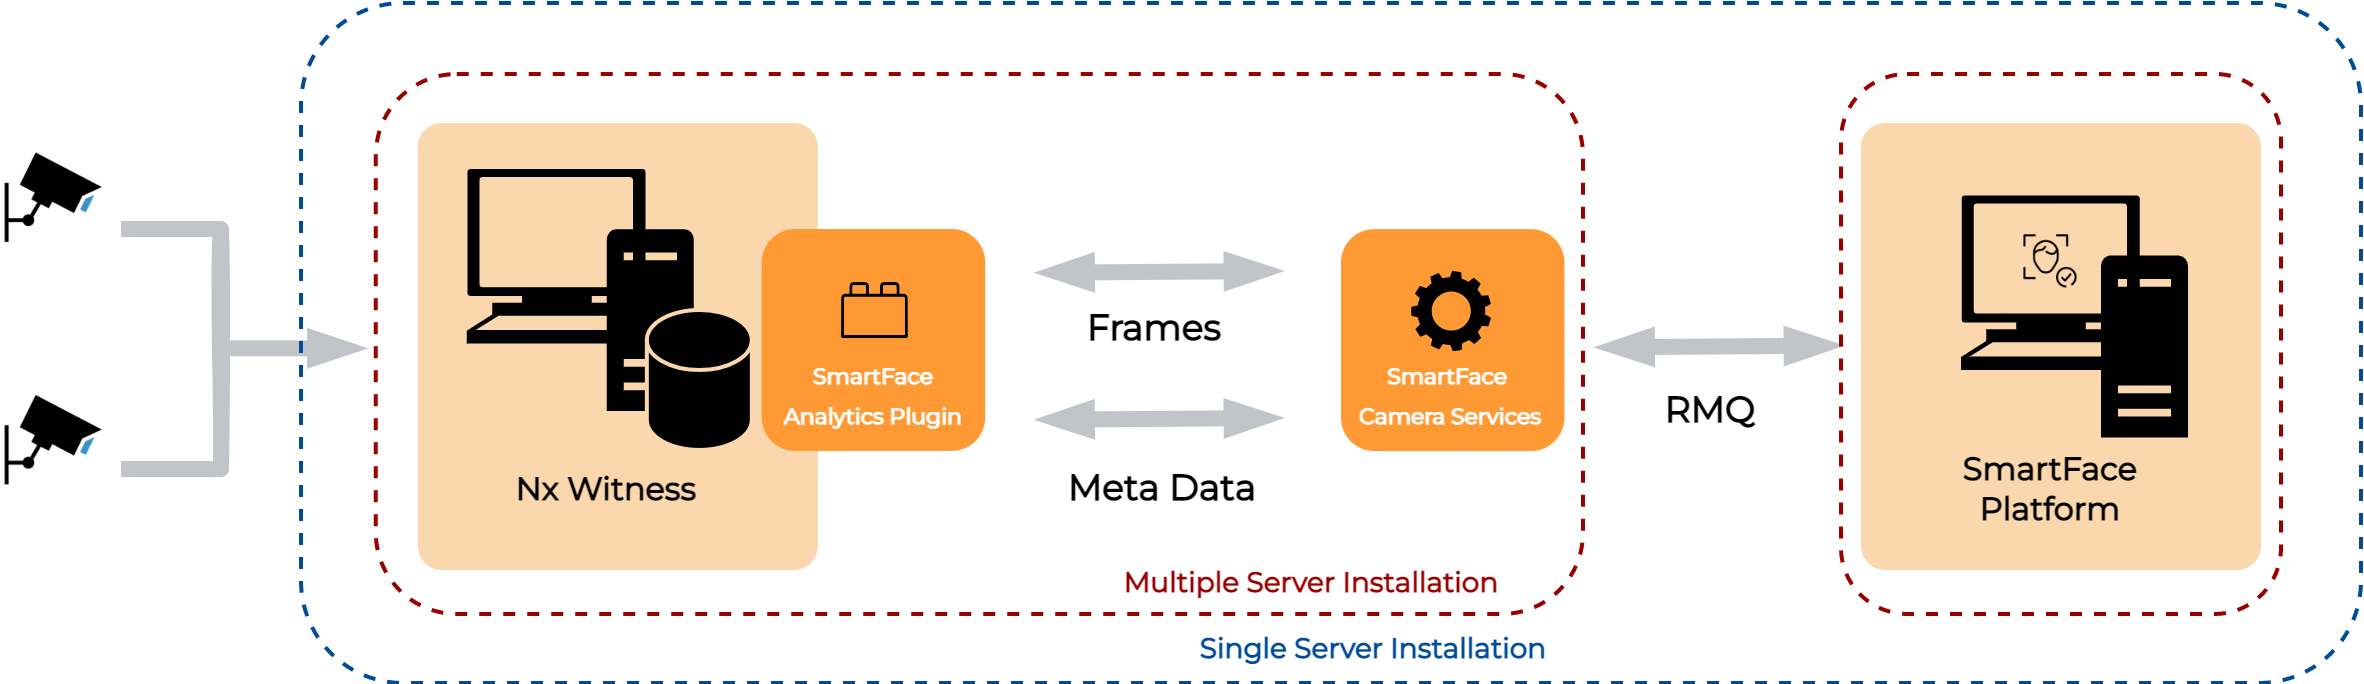
The Nx Witness VMS can be installed on the same machine as the Video Processing Platform, or on a separate machine. We recommend installing Video Processing Platform and Nx Witness server on separate machines. Please consider which option you choose based on your hardware infrastructure.
Instructions which describe both options can be found in these chapters:
Video Processing Platform Camera services are lightweight and they process raw frames coming from Nx Witness server which produces raw frame data. Having Video Processing Platform Camera on same machine as Nx Witness would ensure the data isn’t sent across the network, potentially limiting the throughput.
A single Full HD raw frame is ~6.2 MB, so at 30 FPS one camera processing takes ~186 MB/s of network traffic, which may cause network contention and slow down the video processing performed by Video Processing Platform.
Installing on a single machine
To install and configure Video Processing Platform integration with Nx Witness on a single machine, follow these steps:
- Single Machine - Install Video Processing Platform
- Single Machine - Install Nx Witness VMS
- Single Machine - Install and configure the integration components
Single Machine - Install Video Processing Platform
Install the Video Processing Platform. For information on how to install Video Processing Platform, see Installation on Windows and Installation on Linux.
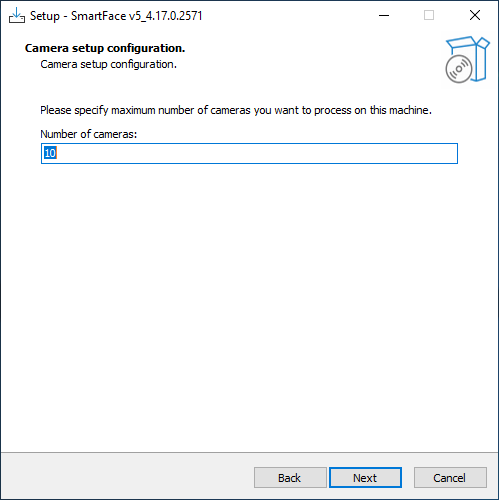
For Windows installation adjust the number of cameras to match the number of Nx cameras
or for Linux in the run.sh script adjust the parameter -p to match the number of Nx cameras
 ${SF_ADMIN_IMAGE} \
        run-migration \
            -p 5 -c "$(getvalue ConnectionStrings__CoreDbContext)" -dbe $DB_ENGINE \
            --rmq-host "$(getvalue RabbitMQ__Hostname)" --rmq-user "$(getvalue RabbitMQ__Username)" --rmq-pass "$(getvalue RabbitMQ__Password)" \
            --rmq-virtual-host "$(getvalue RabbitMQ__VirtualHost)" --rmq-port "$(getvalue RabbitMQ__Port)" --rmq-use-ssl "$(getvalue RabbitMQ__UseSsl)"
Configure Microsoft SQL and RabbitMQ
After a successful Video Processing Platform installation, ensure that Microsoft SQL Server and RabbitMQ are reachable from the machine on which Nx Witness is hosted:
- Create a new user (The default guest user is available only locally).
- Add the created user to the required virtual host named /.
For more information about how to enable remote Microsoft SQL connection, see How to configure remote access and connect to a remote SQL Server instance with ApexSQL tools.
Single Machine - Install Nx Witness VMS
Install the Nx Witness VMS v5.X or later. You will need both Server and Client, as the Client will be used in configuration. Client should be typically installed on VMS operator’s machine.
Single Machine - Install and configure the integration components
1. Stop the Nx Witness server
- On Windows, you can do it by right-clicking the tray icon and selecting Stop Server.
- On Linux (Ubuntu), you can do it with
sudo service networkoptix-mediaserver stopcommand in the terminal
2. Download the Video Processing Platform analytics plugin
Visit our Customer Portal. They are available in the download section of the Video Processing Platform product.
You can download Video Processing Platform-NX-AnalyticsPlugin-x.y.z-linux.tgz for the Linux installation, or Video Processing Platform-NX-AnalyticsPlugin-x.y.z-windows.zip for the Windows installation.
Untar or unzip the downloaded files.
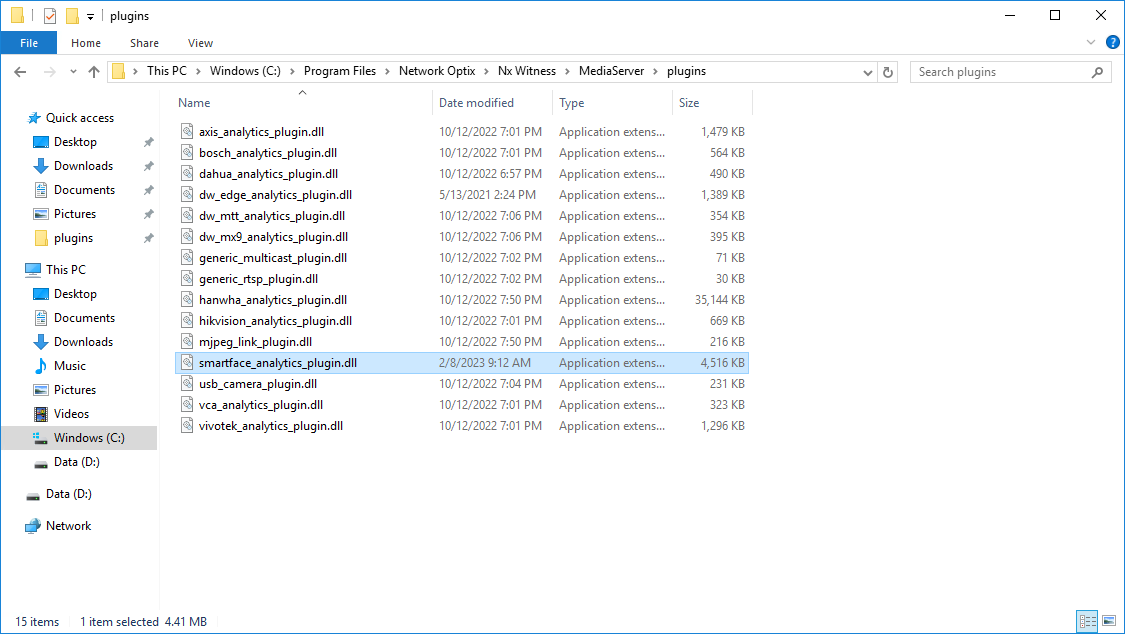
- On Windows copy the
.dllfile to{NxInstallPath}\plugins\usually onC:\Program Files\Network Optix\Nx Witness\MediaServer\plugins. See bellow:
- On Linux create folder
smartface_analytics_plugininside the{NxInstallPath}/bin/pluginsusually on/opt/networkoptix/mediaserver/bin/pluginsand copy.dllinto this folder. See bellow:

3. (optional) Analytics Plugin branding
In case you would like to brand the plugin with your labels, specify the plugin white labeling
Create
sf_plugin_branding.jsonfile in the installation path of Nx Witness server- On Windows usually in
C:\Program Files\Network Optix\Nx Witness\MediaServer\ - On Linux in
/opt/networkoptix/mediaserver/
- On Windows usually in
Use formatting of sf_plugin_branding.json file below:
{
    "product_name": "Video Processing Platform",
    "plugin_name": "Video Processing Platform analytics plugin",
    "vendor_name": "Innovatrics"
}
Change labels for your desired branding
4. Start the Nx Witness VMS.
- On Windows by right-clicking the tray icon and selecting Start Server.
- On Linux (Ubuntu) with
sudo service networkoptix-mediaserver start
5. enable the Video Processing Platform analytics plugin
In the left panel, right-click the camera you want to process with Video Processing Platform and select Camera Settings. Then In the Plugins tab, enable the plugin .

Repeat the step for each camera that you want to process with Video Processing Platform.
6. Set a unique port for each camera
In the Camera Settings of the analytics plugin, set a unique port for each camera that should be processed by Video Processing Platform. We recommend to start from port 4000. This is a TCP port which is used for a communication between the Nx Witness plugin and Video Processing Platform Camera services.
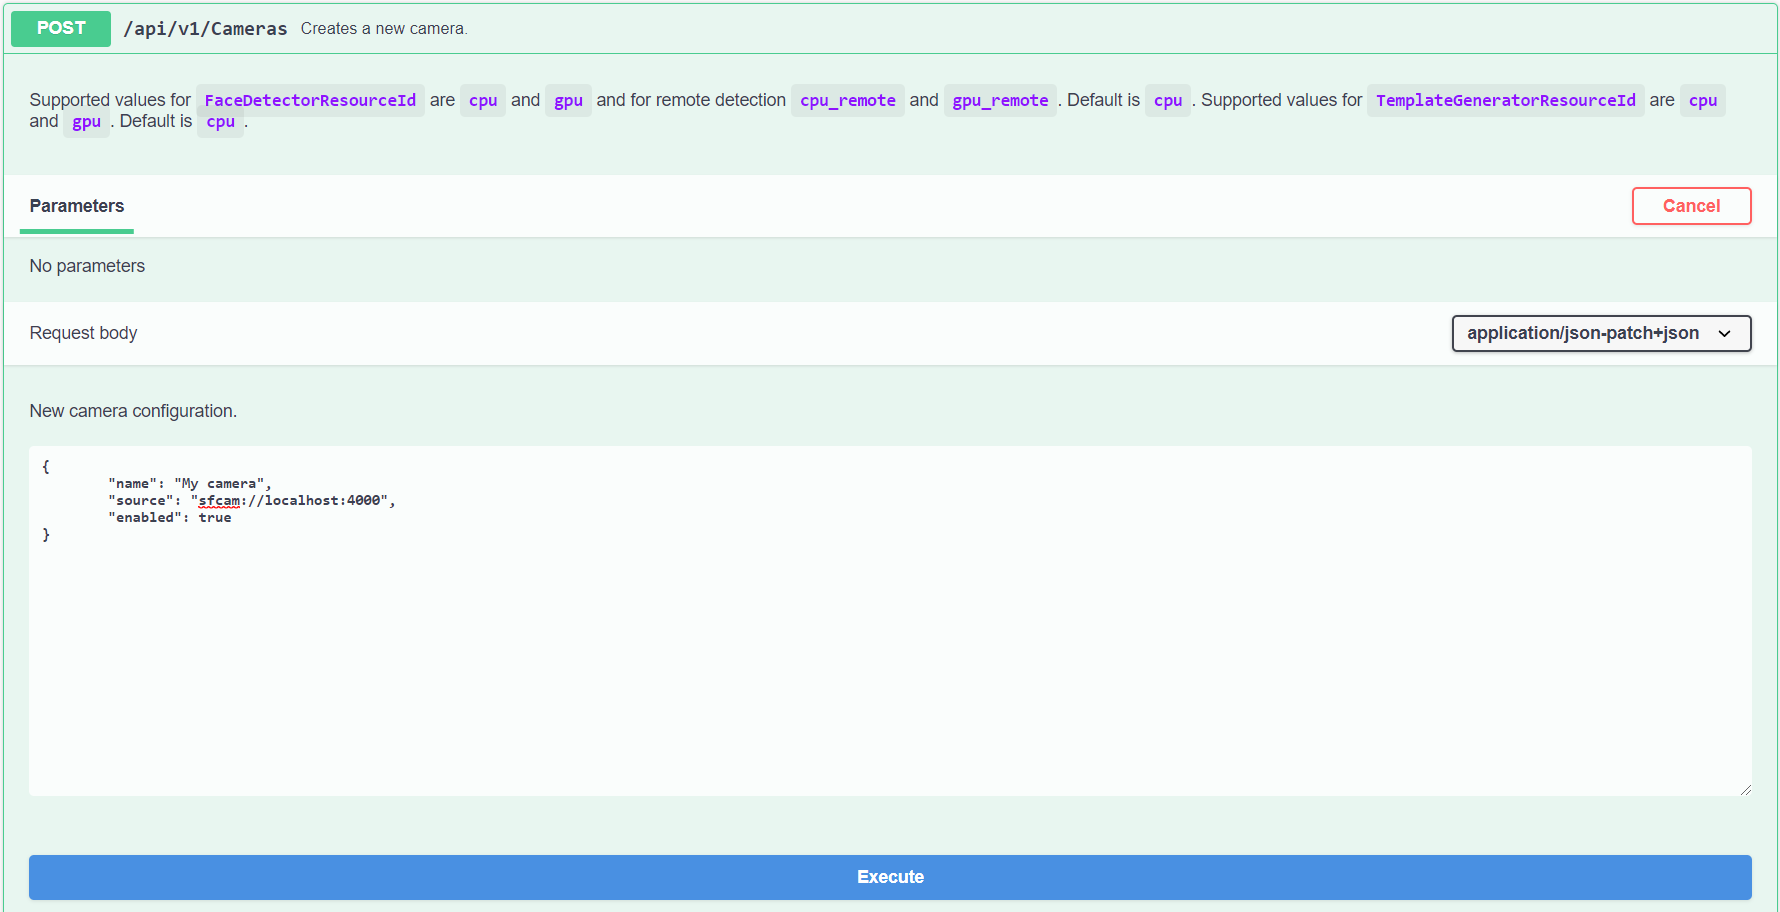
7. Create a camera using the Video Processing Platform API
Video Processing Platform is managed through the API. By default, the API is hosted on port
8098and Swagger UI is available onlocalhost:8098/index.html.The endpoint to create the camera is POST
/api/v1/Cameras. To find it in Swagger UI, go to the Camera section, open the POST call and click Try it out. Delete the prefilled request body and then fill it according to the following Example request body:
    {
        "name": "My camera",
        "source": "sfcam://localhost:4000",
        "enabled": true,
    }
Set the name property as an arbitrary string used to identify the camera.
Set the source property to the custom string in the format
sfcam://<host>:<port>. For example,sfcam://localhost:4000where:<host> is the address (IPv4 or hostname) of the machine where the Nx server is hosted as accessible from the Video Processing Platform Camera service. In most cases the value localhost should suffice.
<port> is the TCP communication port that you have set in the Nx Witness camera plugin settings.
(Optional) Configure other camera parameters depending on your requirements.
To send the request, click Execute.
When the Video Processing Platform camera is enabled, then the video processing should be running and face objects should be available in Nx Witness.
Installing on multiple machines
To install and configure Video Processing Platform integration with Nx Witness on separate machines, you should complete the following three steps:
Multiple machines - Install and configure Video Processing Platform
Multiple machines - Install and configure the integration components
Multiple machines - Install and configure Video Processing Platform
Install the Video Processing Platform. For information on how to install Video Processing Platform, see Installation on Windows and Installation on Linux.
For Windows installation adjust the number of cameras to match the number of Nx cameras
or for Linux in the run.sh script adjust the parameter -p to match the number of Nx cameras
 ${SF_ADMIN_IMAGE} \
        run-migration \
            -p 5 -c "$(getvalue ConnectionStrings__CoreDbContext)" -dbe $DB_ENGINE \
            --rmq-host "$(getvalue RabbitMQ__Hostname)" --rmq-user "$(getvalue RabbitMQ__Username)" --rmq-pass "$(getvalue RabbitMQ__Password)" \
            --rmq-virtual-host "$(getvalue RabbitMQ__VirtualHost)" --rmq-port "$(getvalue RabbitMQ__Port)" --rmq-use-ssl "$(getvalue RabbitMQ__UseSsl)"
Configure Microsoft SQL and RabbitMQ
After a successful Video Processing Platform installation, ensure that Microsoft SQL Server and RabbitMQ are reachable from the machine on which Nx Witness is hosted:
- Create a new user (The default guest user is available only locally).
- Add the created user to the required virtual host named /.
For more information about how to enable remote Microsoft SQL connection, see How to configure remote access and connect to a remote SQL Server instance with ApexSQL tools.
Multiple machines - Install and configure Nx Witness VMS
Install the Nx Witness VMS v5.X or later. You will need both Server and Client, as the Client will be used in configuration. Client should be typically installed on VMS operator’s machine.
Multiple machines - Install and configure the integration components
Perform these steps on the machine that hosts Nx Witness.
To install the Video Processing Platform analytics plugin
1. Stop the Nx Witness VMS
2. Download the Video Processing Platform analytics plugin
You can download it from our CRM portal and unzip the .dll file to {NxInstallPath}\plugins. For example, for Nx Witness on Windows to C:\Program Files\Network Optix\Nx Witness\MediaServer\plugins.
3. (optional) Branding
In case you would like to brand the plugin with your own labels, specify the plugin white labeling:
Create sf_plugin_branding.json file in the installation path of Nx Witness server (Default windows path is
C:\Program Files\Network Optix\Nx Witness\MediaServer\).Use formatting of sf_plugin_branding.json file below:
    {
        "product_name": "Video Processing Platform",
        "plugin_name": "Video Processing Platform analytics plugin",
        "vendor_name": "Innovatrics"
    }
- Change labels for your desired branding
4. Start the Nx Witness VMS.
5. Enable the Video Processing Platform analytics plugin
In the left panel, right-click the camera you want to process with Video Processing Platform and select Camera Settings. In the Plugins tab, enable the Video Processing Platform analytics plugin . 
Repeat the step for each camera that you want to process with Video Processing Platform.
6. Set a unique port for each camera
In the Camera Settings of the analytics plugin, set a unique port for each camera that should be processed by Video Processing Platform. We recommend starting from port 4000. This is a TCP port that is used for communication between the Nx Witness plugin and Video Processing Platform Camera services.
7. Copy over the Video Processing Platform installation folder
Copy over the Video Processing Platform installation folder from an existing installation on the machine with the Video Processing Platform into the machine with the NX Witness installation. The default installation directory is: C:\Program Files\Innovatrics\Video Processing Platform
8. Configure the Video Processing Platform Camera service
Configure the Video Processing Platform Camera service with the Microsoft SQL Server connection string and RabbitMQ address and credentials on the NX Witness machine. This is performed by modifying the Video Processing Platform.appsettings.json file:
Configure the Microsoft SQL connection string under the key
ConnectionStrings.CoreDbContextto the value you have set during the Video Processing Platform installation.Configure the RabbitMQ under the keys
RabbitMQ.Username,RabbitMQ.Password,RabbitMQ.VirtualHost,RabbitMQ.HostnameandRabbitMQ.Portto the values you have set during the Video Processing Platform installation.
9. Start the Video Processing Platform Camera service for each Nx Witness camera
To start the Video Processing Platform Camera service for each Nx Witness camera that you want to process with Video Processing Platform:
Save the Service_Installer.bat into the folder where you have copied the installation folder over. Run the
Service_Installer.batscript as an administrator within the folder.When prompted to enter the service you would like to install, insert a camera.
For the service name of the Video Processing Platform Camera Service on Nx Witness server, enter the Nx ID (UUID) of the Nx Witness camera that you want to process.
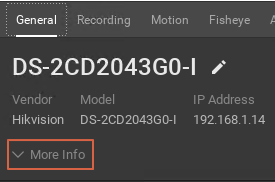
To obtain the Nx ID: Go to Camera Setting (right-click on a particular camera) and under the General tab, select More info. Then, copy the Nx ID from the Camera ID field.
10. Create a camera using the Video Processing Platform API, hosted on the server where Video Processing Platform is installed
Video Processing Platform is managed through the API. By default, the API is hosted on port 8098 and Swagger UI is available on localhost:8098/index.html
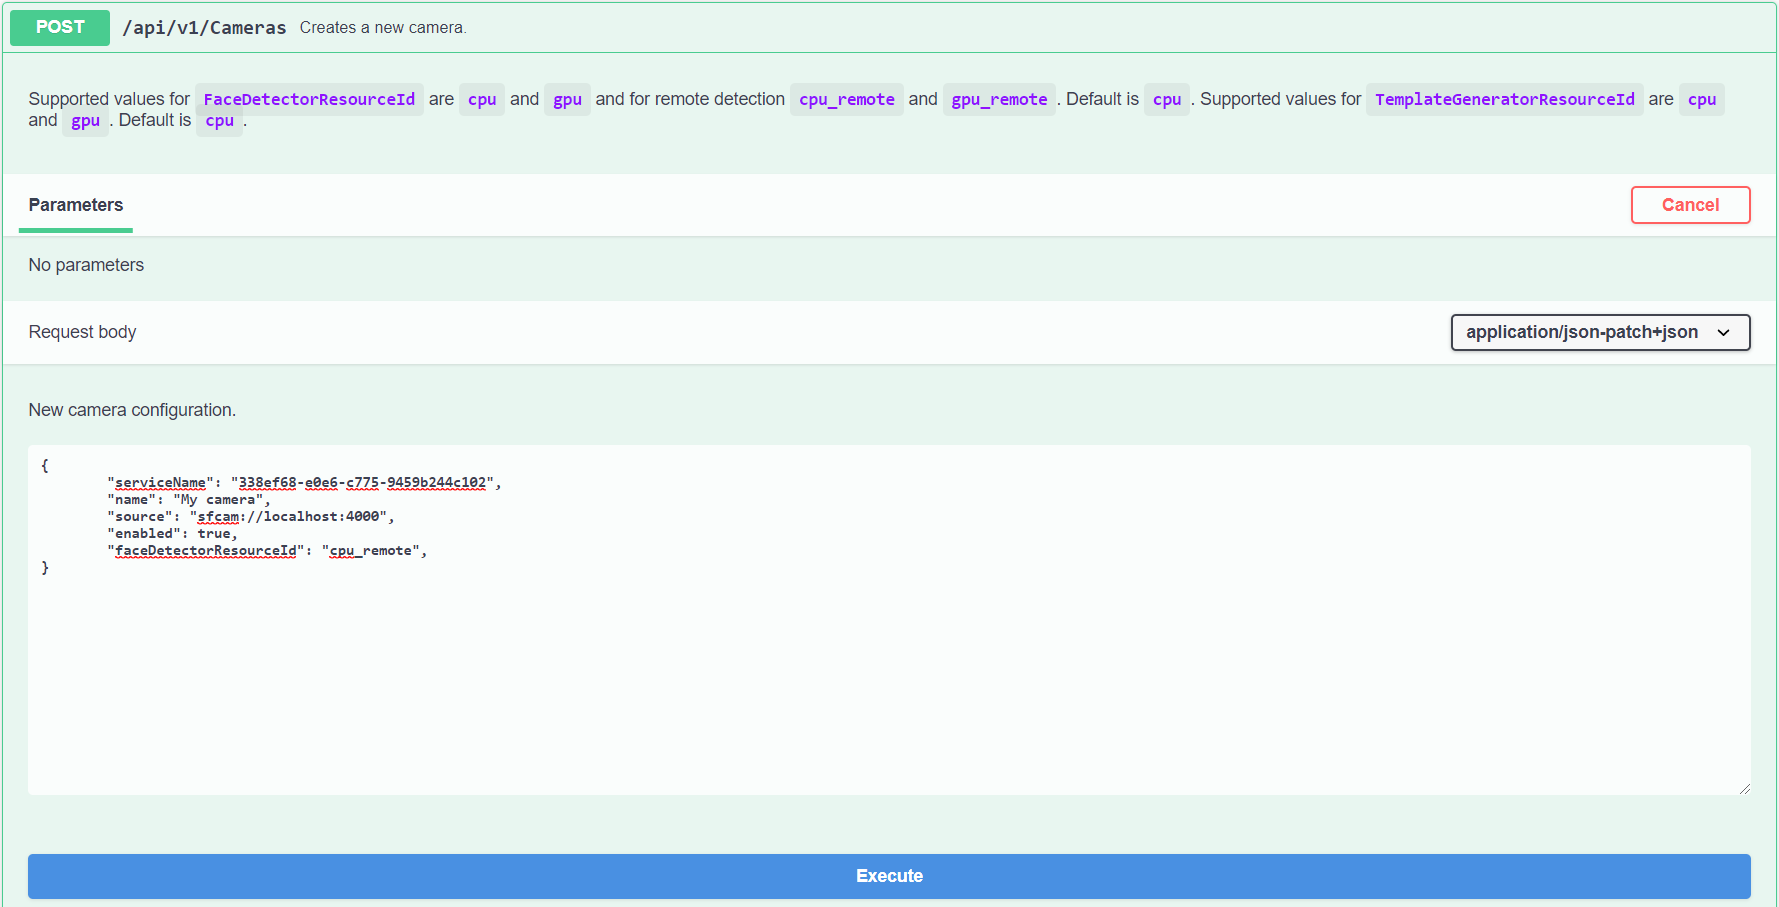
The endpoint to create the camera is POST
/api/v1/Cameras. To find it in Swagger UI, go to the Camera section, open the POST call and click Try it out. Delete the prefilled request body and then fill it according to the following Example request body:
      {
          "serviceName": "338ef68-e0e6-c775-9459b244c102",
          "name": "My camera",
          "source": "sfcam://localhost:4000",
          "enabled": true,
          "faceDetectorResourceId": "cpu_remote",
      }
Set the serviceName property to the Nx camera ID. The instructions on how to obtain the Nx ID are described above. This step binds the Video Processing Platform Camera service with the camera created on the API.
Set the name property as an arbitrary string used to identify the camera.
Set the source property to the custom string in the format
sfcam://<host>:<port>. For example,sfcam://localhost:4000where:< host >is the address (IPv4 or hostname) of the machine where Nx Witness is hosted. As the Nx Witness and Camera services should be hosted on the same machine, localhost should suffice.< port >is the TCP communication port which you have set up in the Nx Witness camera plugin settings.Preferably, set the remote detection for the Video Processing Platform Camera service as follows: set the FaceDetectorResourceId to either cpu_remote or gpu_remote, depending on whether you want to use GPU.
(Optional) Configure other camera parameters depending on your requirements.
To send the request, click Execute.
When the Video Processing Platform camera is enabled, then the video processing should be running and face objects should be available in Nx Witness.
Video Processing Platform data displayed in Nx Witness
In this chapter you can find information about the Video Processing Platform information displayed in Nx Witness and also about how to configure this information.
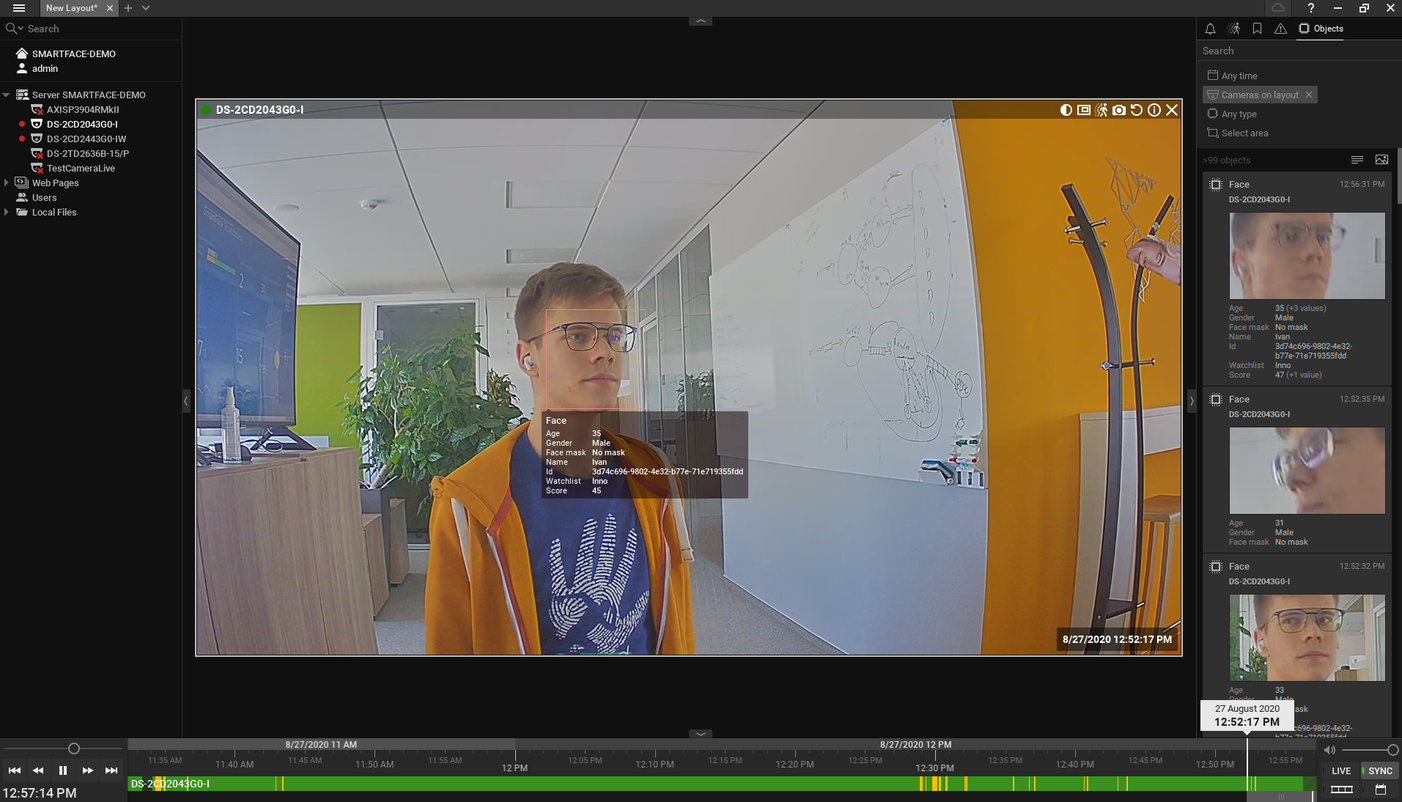
Faces which are detected by Video Processing Platform are displayed as Face objects in the Nx Witness VMS video items. The position of the face is tracked as it moves in the video, which enables Nx Witness to render bounding boxes around the detected faces.
All detected faces are automatically matched against all members saved in watchlists available in Video Processing Platform. If the detected face is matched against a watchlist member in Video Processing Platform, then information about the watchlist name, watchlist member and the matching score is also displayed.
For an identified person Nx Witness displays the following attributes:
Age – Estimated age
Gender – Female or Male
Face mask – Information if the detected person is wearing a mask
Name – The name of the person who is saved as a watchlist member
Id – ID of the watchlist member
Watchlist – The name of the watchlist in which the detected person is stored as a watchlist member
Score – The matching score of the detected face and the matched watchlist member
IsSpoof -
TrueorFalse(if spoof detection is configured).
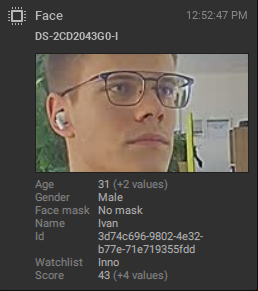
Face preview in the Objects tab.
To display the face attributes, select the Objects tab in the right pane. After that the face attributes are displayed in two locations – on the camera item, in the Overlay info and in the right panel, in the Objects tab. The difference between these views is that the Overlay info displays face attributes continuously from the obtained information, but the Object tab displays the first obtained face attributes and marks other information in brackets.
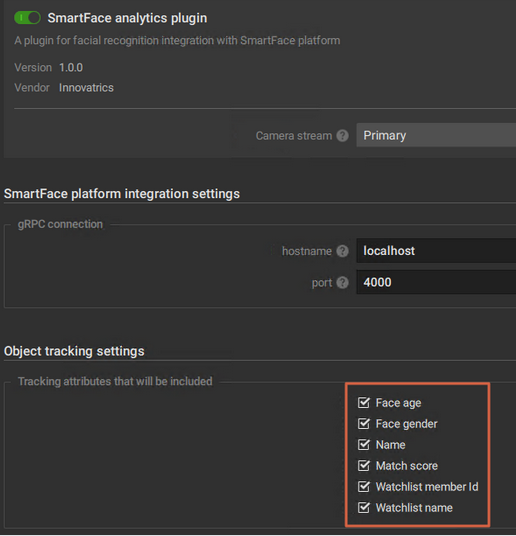
Configure which Video Processing Platform information is displayed
In the left panel, right-click the camera for which you want to set up which Video Processing Platform information is displayed and select Camera Settings.
Go to Plugins and select Video Processing Platform analytics plugin.
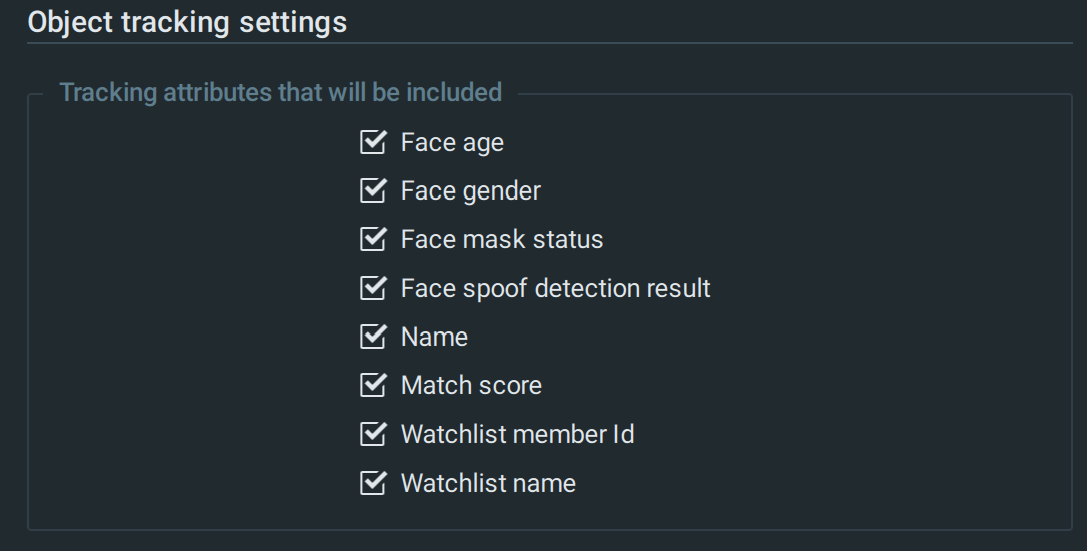
To enable or disable a face tracking attribute, mark or clear the relevant checkboxes in the Object tracking settings section (see the figure below).
Repeat the steps for each camera for which you want to set up these settings.
Filtering Video Processing Platform data in Nx Witness
It is possible to filter objects based on the face attributes: Age, Gender, Face mask, Name, Id, Watchlist, IsSpoof and Score
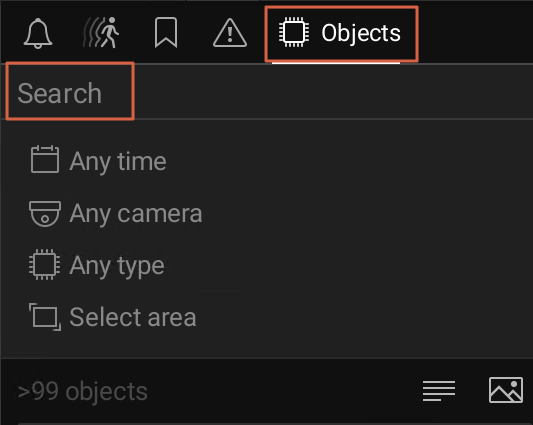
To filter the objects
Go to the right panel and select Objects.
Then, type a face attribute (for example, the name of a person) based on which Nx Witness filters the results.
You may further narrow your search, by specifying the time, camera, object type and selected area of the camera view.
Video Processing Platform analytic events in Nx Witness
Nx Witness enables you to create custom rules based on Video Processing Platform’s analytics events. After you defined an event rule based on the Video Processing Platform events, the Nx Witness will trigger the appropriate action. For more information, see the Nx Witness documentation, the chapter Configuring Events and Actions.
In this chapter you can find information about:
Enable or disable Video Processing Platform analytics events
Configure rules for Video Processing Platform analytics events
Video Processing Platform analytics event types
Video Processing Platform Analytics Plugin provides three types of analytics events for Nx Witness VMS – PersonIdentified, PersonUnidentified and PersonIdentificationSpoofDetected.
PersonIdentified
When a person is detected, Video Processing Platform automatically performs matching against all watchlist members stored in Video Processing Platform. When Video Processing Platform matches (identifies) the person against a member in any of the watchlists, the system sends the analytics event PersonIdentified to Nx Witness.
PersonUnidentified
When Video Processing Platform doesn’t match a person against any of the watchlists member (the person is unidentified), the system sends the analytics event PersonUnidentified to Nx Witness.
PersonIdentificationSpoofDetected
When Video Processing Platform matches (identifies) the person against a member in any of the watchlists and spoof detection is configured, the system sends analytic event PersonIdentificationSpoofDetected which signals that potential face presentation attack (spoof) was detected.
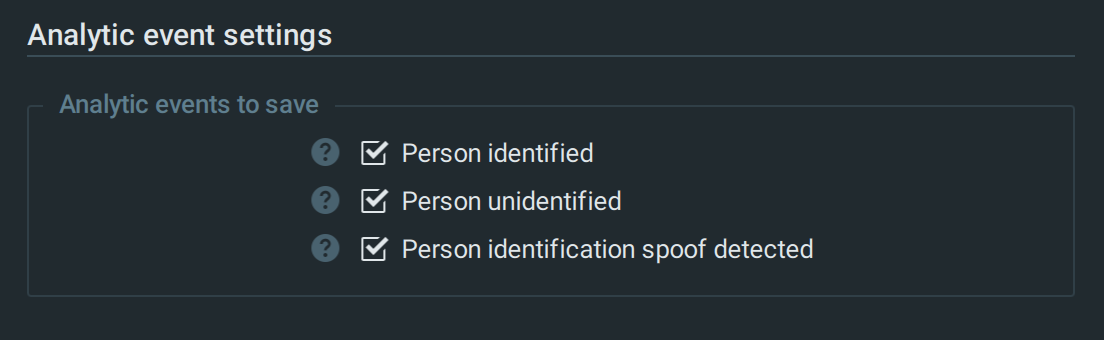
Enable or disable Video Processing Platform analytics events
In the left panel, right-click the camera for which you want to enable or disable Video Processing Platform analytics events and select Camera Settings.
Go to Plugins and select Video Processing Platform analytics plugin.
To enable or disable a Video Processing Platform analytics event, mark or clear the relevant checkboxes in the Analytic event settings section (see the figure below).
Repeat the steps for each camera for which you want to enable or disable the events.
Configure rules for Video Processing Platform analytics events
Go to the Main menu (click
 ) and select System Administration.
Click Event Rules.
Click Add.
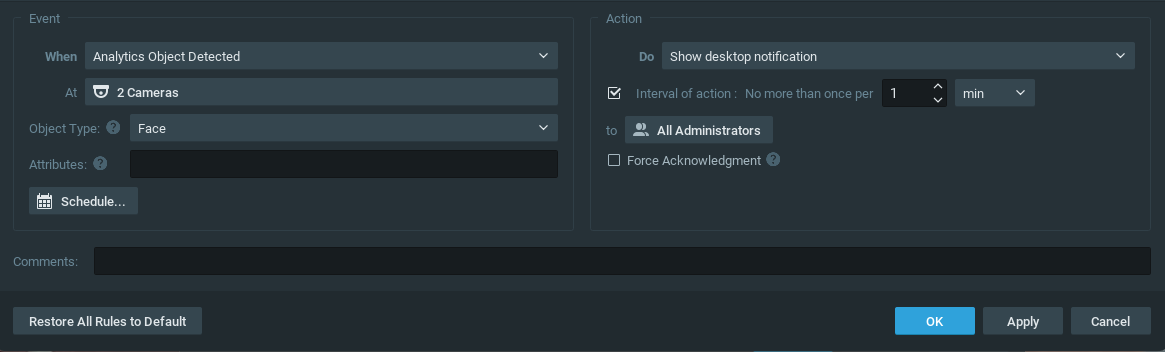
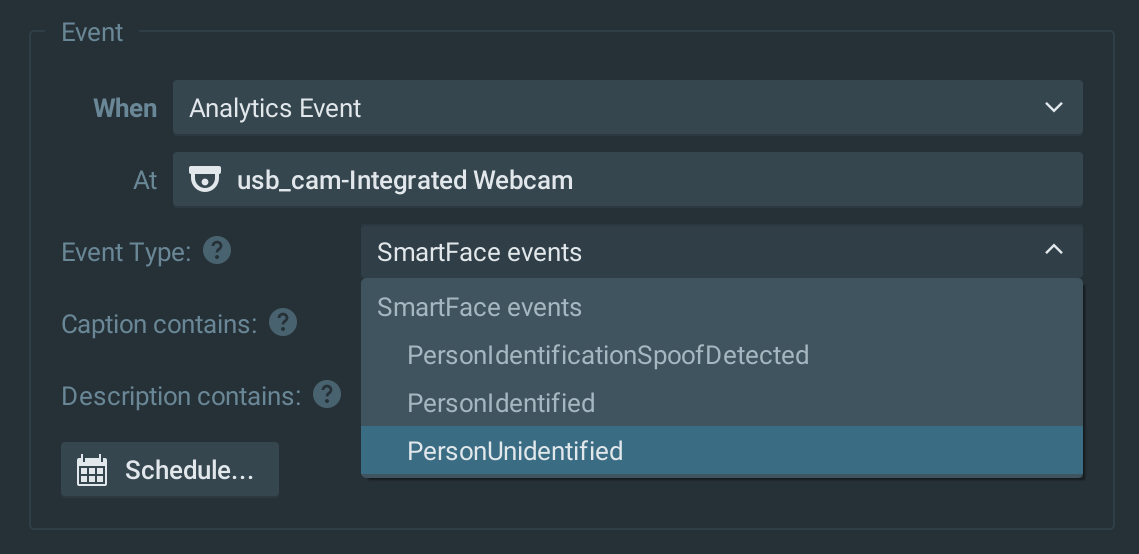
In When, choose Analytics Event.
In At, select the desired cameras.
Choose between the event types
PersonIdentified,PersonUnidentifiedorPersonIdentificationSpoof. Each of the events consists of a caption and description part.(Optional) You may specify the Caption contains and Description contains fields with keywords to filter out when an action is triggered for a Video Processing Platform event. See the instructions How to fill Caption contains and Description contains below.
After you defined an event rule based on the Video Processing Platform event types, the Nx Witness will perform an action based on settings you have made in the Action panel.
How to fill Caption contains and Description contains for Video Processing Platform analytics events
You may further specify the event by entering the keywords in the Caption contains and Description contains. How to fill in these fields depends on the type of the Video Processing Platform event. Please check also the rules for filling out these fields. Each event consist of the Caption and the Description field.
Format of Video Processing Platform analytics events:
PersonIdentified
Caption: Person < watchlist-member-display-name > matched.
Example:
Person John Doe matched.Description: Person < watchlist-member-display-name > (< watchlist-member-full-name >) matched in watchlist < watchlist-display-name > (< watchlist-full-name >). Face mask status is (< face-mask-status >).MatchResultID = < match-result-id >
Example:
Person John Doe (John Doe 734939) matched in watchlist HR Employees (Human Resource Department Employees). Face mask status is (Mask present). MatchResultID = 5b7f8168-220a-43c6-9c00-87830c3c1d34ℹ️ <face-mask-status> can have the valuesNo mask,Mask presentorUnknown.
PersonUnidentified
Caption: Analyzed person (<gender>, <age>) not matched.
Example:
Analyzed person (Female, 35) not matched.Description: Person (gender: <gender>, age: <age>, face mask status: <face-mask-status>) not matched in any watchlist. *MatchResultID = <match-result-id>
Example:
Person (gender: Female, age: 35, face mask status: No mask) not matched in any watchlist. MatchResultID = 1b3ad0bc-6d81-4e72-8ed8-e1330bd34224ℹ️ <face-mask-status> can have the valuesNo mask,Mask presentorUnknown. < gender > can have valuesMale,FemaleorUnknown.
PersonIdentificationSpoofDetected
Caption: Person <watchlist-member-display-name> match spoof detected.
Example:
Person John Doe match spoof detected.Description: Person <watchlist-member-display-name> (<watchlist-member-full-name) matched in watchlist <watchlist-display-name> (<watchlist-full-name>). Face mask status is (<face-mask-status>). MatchResultID = <match-result-id>
Example:
Person John Doe (John Doe 734939) matched in watchlist HR Employees (Human Resource Department Employees). Face mask status is (Mask present). MatchResultID = 5b7f8168-220a-43c6-9c00-87830c3c1d34ℹ️ face-mask-status can have the valuesNo mask,Mask presentorUnknown. gender can have valuesMale,FemaleorUnknown.
Rules for filling in Captions and Description contains
Please follow these rules when entering the keywords in Caption contains and Description contains:
Keywords are case-sensitive (Keyword is not the same as keyword)
Space character is used as separator (Keyword1 Keyword2)
Quotes can be used for multi-term keywords (“Multi term keyword”)
When you specify more than one keyword in either Caption or Description contains, the filter will apply to events that match with at least one of the entered keywords:
Example
The example event Description is: Person (gender: Female, age: 35, face mask status: No mask) not matched in any watchlist. MatchResultID = 1b3ad0bc-6d81-4e72-8ed8-e1330bd34224
Description keywords are “age: 34” and “age: 35”. The filter applies to the example event as the second keyword is a part of the event Description.
Description keyword is 34. The filter applies to the example event as this keyword is a part of the event Description (The MatchResultId near the end contains 34)
Description keywords are “age: 33” and “age: 34”. The filter doesn’t apply to the example event, as the keywords aren’t part of the event Description.
When you specify keywords for both Caption and Description contains, the filter will apply only to events, which match with both Caption and Description contains in at least one keyword:
Example
The example event Caption is:
Person John Doe matched.The example event Description is:
Person John Doe (John Doe 734939) matched in watchlist HR Employees (Human Resource Department Employees). Face mask status is (Mask present). MatchResultID = 5b7f8168-220a-43c6-9c00-87830c3c1d34Caption keyword is “John Doe” and the Description keyword is “HR Employees”. The filter applies to the example event.
Caption keywords are “John Doe” “Bob Doe” and the Description keywords are Management “Manual Workers”. The filter doesn’t apply to the example event, because though one Caption keyword is a part of the example event Caption, no Description keyword isn’t a part of the example event Description.
Troubleshooting for Nx Witness integration
If the integration doesn’t work properly, try the following steps:
Video Processing Platform camera logs are available at
%PROGRAMDATA%\Innovatrics\Video Processing Platformwhere the filename corresponds to the Nx Witness camera ID.There might be some issues regarding the camera rotations. To make sure that the raw frame feed is correct, check if Video Processing Platform MPEG1 camera preview generates a valid video.
By default, Nx Witness Client buffers 500 ms before rendering the live preview. This means Video Processing Platform processing must be performed under 500 ms to show bounding boxes on the live preview. If you are encounter a bigger delay than 500 ms, then you can increase the buffering to 1000 ms.
The buffering can be set as follows:In Nx Witness open the Main menu (click
 ).
).Select Local Settings… and the Advanced tab.
To increase the buffering, move the slider Maximum Live Buffer Length to the maximum value.
Click OK.