MyQ Connector
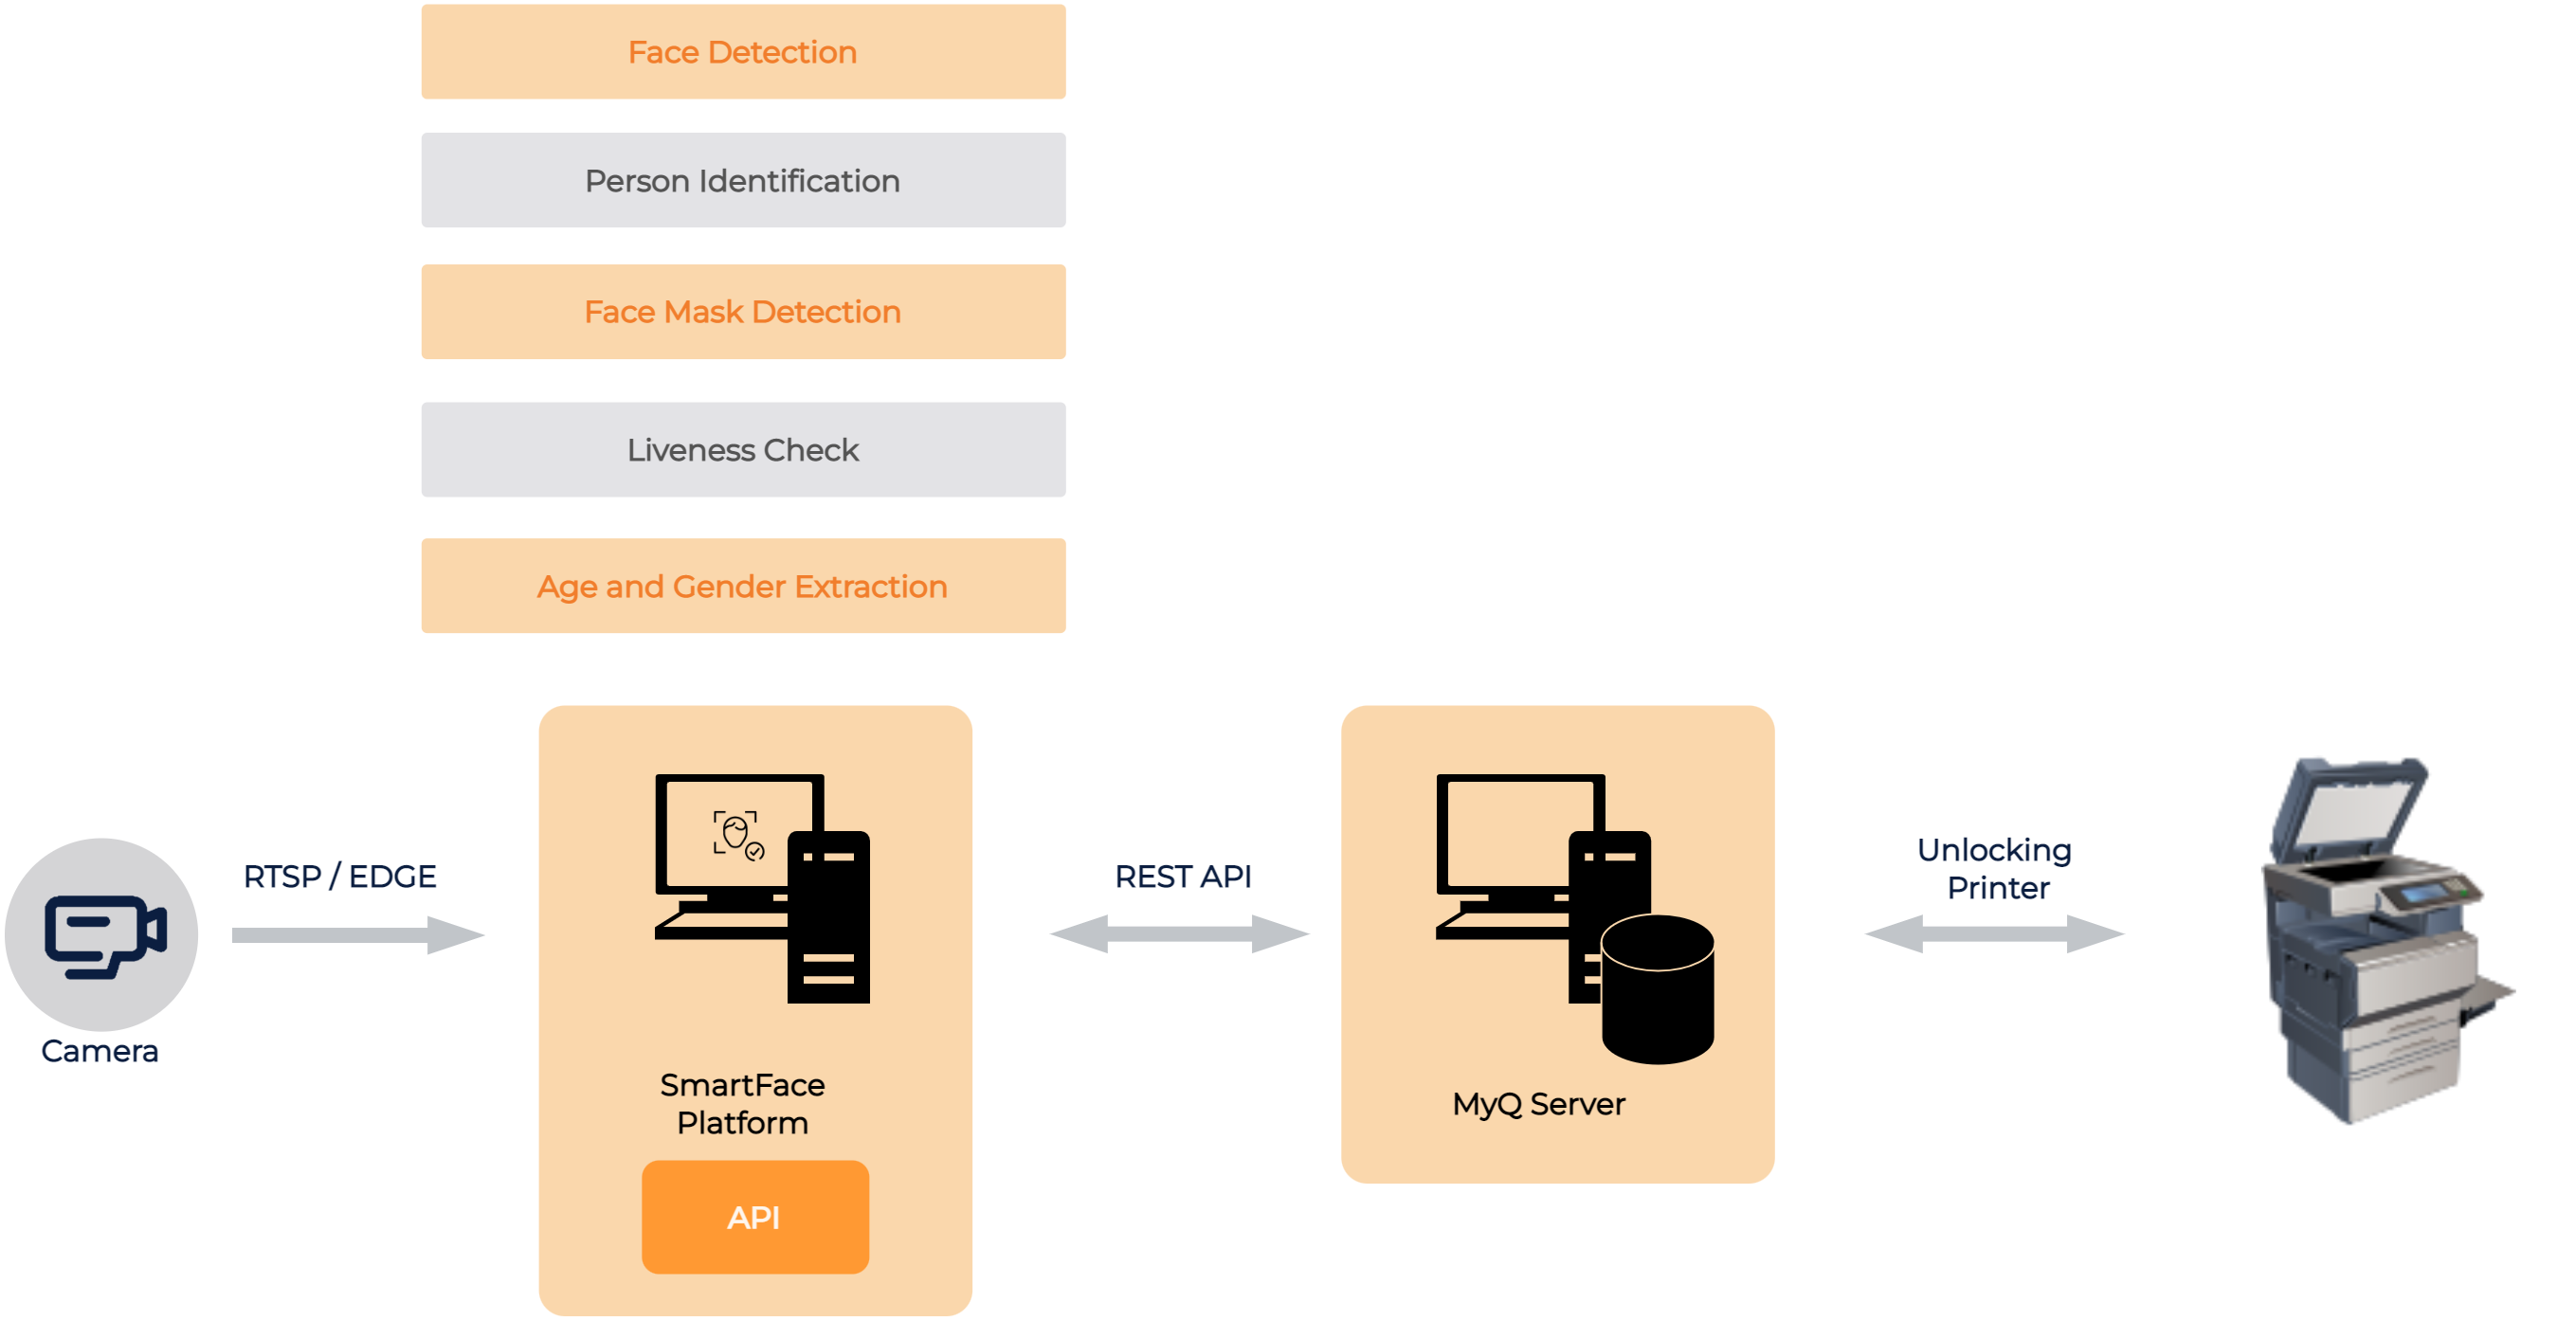
Video Processing Platform provides face biometry for various purposes including the access control. This module allows you to use face biometry to unlock your printer using MyQ without a need for any PIN, Access Card or physical Access Token. Communication between the Video Processing Platform and the MyQ is done over the network.
How does it work
The Video Processing Platform provides face biometry by processing RTSP and Edge Streams from cameras. Such a camera can be mapped to a printer. On Each camera there are several processes that can be used, depending on your needs and configuration. This includes the features, such as Face Detection, Person Identification, Face Mask Detection, Liveness (Spoof) Check and Age and Gender Extraction.
The module connects to the Video Processing Platform AccessController gRPC stream, process GRANTED notifications and creates a set of requests that Unlock a MyQ Printer.
How to get the module
The source code is available on our Github as it is a part of the - Access Control Connector. To run application locally, follow these steps
- clone the
https://github.com/innovatrics/smartface-integrations/Github repository using the git commands (git clone https://github.com/innovatrics/smartface-integrations/) or download the code uzing the “Download Zip” button - open terminal
- navigate to
/src/AccessControlConnector/within the git directory - configure the system as per configuration
- run
dotnet run(dotnet system must be available and running on your system)
Please note that above steps of How to get the module are suitable for quick testing or to develop your own version of the code. You can use already deployed and ready to use code for the Linux Docker environment. Information about how to use it is available here.
Configuration
To run the deployed application configure the Video Processing Platform, the MyQ Server and do a configuration akin to your chosen environment:
Video Processing Platform
To deploy and use the MYQ integration you need an existing and up and running Video Processing Platform installation. For more information about how to set up the Video Processing Platform, please read the Get Started section.
Watchlistmember data
The integration uses a label key Email. To allow a Watchlistmember to use the MyQ Connector the user needs to have such label added. For more information about how to enable labels and how to manage labels for Watchlistmembers, please read the guide.
A sample setup would look like this for the .env.sfstation docker configuration
WATCHLIST_MEMBER_KEY_0=email
WATCHLIST_MEMBER_LABEL_0=Email
or in .env configuration file for the Windows installation, with default path: C:\Program Files (x86)\Video Processing Platform Station\.env.
Camera ID
To map a camera to a printer you need to know the camera’s id. The integration supports both RTSP and Edge Cameras. We can find the value using REST API.
For the RTSP cameras use the endpoint GET /api/v1/Cameras and for the Edge cameras use the endpoint GET /api/v1/EdgeStreams.
Sample output of such endpoint would be similar as the snippet below. Please keep in mind, this is just a part of the outcome you will receive:
[
  {
    "spoofDetectorResourceIds": [
      "none"
    ],
    "id": "e4e6791c-92b2-4ab2-8086-20bdb8f5302f",
    "name": "Test Camera",
    "source": "rtsp://user:password@192.168.1.200:554/onvif/H.264/media.smp",
    "enabled": true,
    "faceDetectorConfig": {
      "minFaceSize": 35,
      "maxFaceSize": 600,
      "maxFaces": 20,
      "confidenceThreshold": 450
    },
...
Please note the value of the id. You will use it as <smartface-camera-id> within this guide.
MyQ Server
Install your MyQ Server. Setup the users and if needed the user synchronization as per the MyQ Documentation.
For a valid integration we need to setup a REST API app in the MyQ settings and we need to ensure the MyQ users have fulfill some requirements. Those are having personal number, card and userid being the same value. Using the LDAP username sAMAccountName for the User properties Card and Personal number will do the setup for the LDAP if it is used.
Create a REST API App
Log into your MyQ installation as an administrator. Go into Settings > REST API Apps.
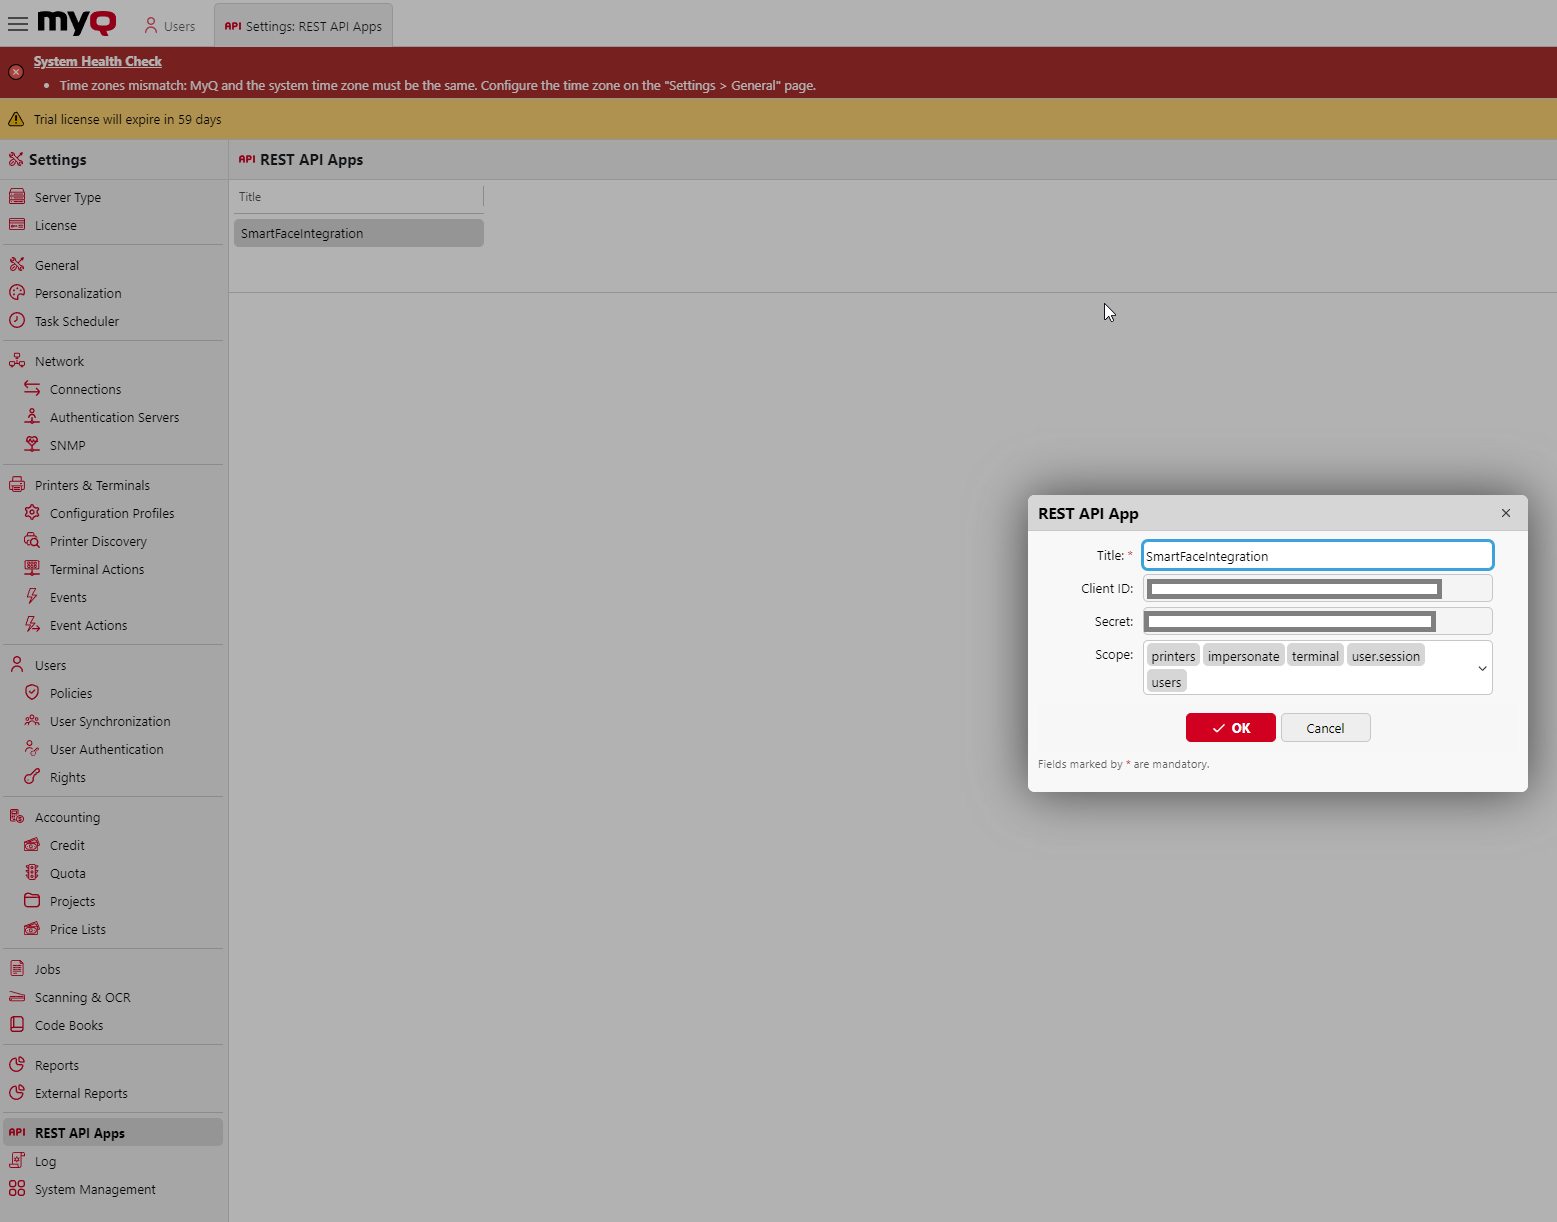
There you need to Add a new app. Choose a title, such as Video Processing Platform Integration and add scopes: users and printers. The <clientID> and <clientSecret> will generated and available to you. Please note these values for your connector configuration.
Set up user properties
To make the integration module work, you need to ensure the user has it’s account created in both systems, the MyQ and the Video Processing Platform. Users in MyQ need to have Card and Personal number filled and identical. They also need to have Email filled. The email address used needs to be identical to the label Email for the Video Processing Platform enrolled Watchlist Member (user).
Setting up user policies using LDAP
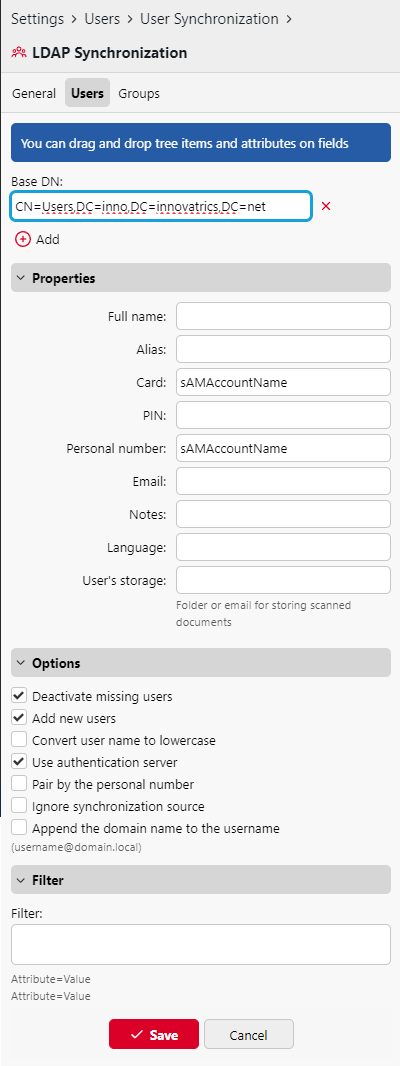
Using LDAP for the MyQ is the simplest way to create and sync users in the MyQ. Log into your MyQ installation as an administrator. Go into Settings > User Synchronization. Edit your User Synchronization (LDAP). Go into the Users tab.
In the right panel open CN=Users. Select a random user. Drag’n’Drop sAMAccountName onto the Card and Personal number properties in the left Users tab. Also drag the the mail property of the user and drop it onto the Email in the left panel. Click Save.
Connector On Windows
Run the deployed Windows application. To adjust the configuration please edit and configure the appsettings.json file. Re-run the application to apply changes.
Setup the Access Controller
You can adjust the IP address by changing SFAccessController and the port used by the Video Processing Platform server’s Access Controller module. This is being used as a provider of the GRANTED/DENY decisions.
"AccessController": {
        "Schema": "http",
        "Host": "SFAccessController",
        "Port": 5050
},
Setup MyQ Connector
Use the <clientID> and <clientSecret> values set in the MyQ Server. Set <ip or hostname of MyQ Server> for the MyQ Server. Do not use port number or http or https within the <ip or hostname of MyQ Server>. For <ip or hostname of Video Processing Platform Server> set the URL (the schema and port is prewritten in this sample) for the Video Processing Platform installation, such as http://localhost:8098. If you do not use SSL on the MyQ Server set <true or false, default true> to true.
"MyQConfiguration":
{
    "clientId":"<clientID>",
    "clientSecret":"<clientSecret>",
    "scope":"users printers",
    "loginInfoType":1,
    "MyQHostname":"<ip or hostname of MyQ Server>",
    "MyQPort":443,
    "SmartFaceURL":"http://<ip or hostname of Video Processing Platform Server>:8098",
    "BypassSslValidation":"<true or false, default true>"
},
Define mappings between cameras and printers
Add new mapping for each camera - printer pair. Value for <Printer Serial Number> can be found in the MyQ Server. Click Settings > Printers. The Serial number is readable in the printers list or within the printer details under Information > Serial number.
"AccessControlMapping":
[
  {
    "Type":"MYQ_CONNECTOR",
    "StreamId":"<Camera Stream Id>",
    "TargetId":"<Printer Serial Number>",
    "UserResolver":"WATCHLIST_MEMBER_LABEL_EMAIL"
  }
]
Connector On Docker
Update docker-compose.yml file
Add the following pattern to add access-control-connector to an existing docker compose:
  ...
  access-control-connector:
    image: ${REGISTRY}integrations-access-control-connector:<version>
    restart: unless-stopped
    env_file: .env.actrlcon

networks:
  default:
    external:
      name: sf-network
The <version> represents the current version number of the docker image. If you are not interested in a specific version, you can use latest or latest-arm depending on your deployment architecture.
Create new environmental file
Create/add the file .env.actrlcon into the same directory as where the docker-compose.yml file is located. Inside the file, switch the provided <values> for your values and credentials. The sample below uses 1 camera to 1 printer mapping. Additional pairs of cameras and printers can be added.
Content of the .env.actrlcon
API__Host=SFApiNoAuth
API__Port=80

AccessController__Host=SFAccessController
AccessController__Port=80

# camera/printer mapping #1
AccessControlMapping__0__Type=MYQ_CONNECTOR
AccessControlMapping__0__StreamId=<Camera Stream Id>
AccessControlMapping__0__TargetId=<Printer Serial Number>
AccessControlMapping__0__UserResolver=WATCHLIST_MEMBER_LABEL_EMAIL

# General MyQ Configuration
MyQConfiguration__clientId=<clientId>
MyQConfiguration__clientSecret=<clientSecret>
MyQConfiguration__scope=users printers
MyQConfiguration__loginInfoType=1
MyQConfiguration__myQSchema="https"
MyQConfiguration__MyQHostname=<ip or hostname of MyQ Server>
MyQConfiguration__MyQPort=443
MyQConfiguration__SmartFaceURL=http://<ip or hostname of Video Processing Platform Server>:8098
MyQConfiguration__BypassSslValidation=<true or false, default true>
Connection to access controller
You can adjust the IP address <values> and the port used by the Video Processing Platform server’s Access Controller module that is being used as a provider of the GRANTED/DENY decisions.
General configuration
To get the <clientID> and <clientSecret> values you need to log into your MyQ installation as an administrator. Go into Settings > REST API Apps. There you need to Add a new app. Choose a title, such as Video Processing Platform Integration and add scopes: users and printers. The <clientID> and <clientSecret> will generated and available to you.
Set <ip or hostname of MyQ Server> for the MyQ Server. Do not use port number or http or https within the <ip or hostname of MyQ Server>. For <ip or hostname of Video Processing Platform Server> set the URL (connection schema and the port are prewritten in this sample) for the Video Processing Platform installation, such as http://localhost:8098. If you do not use SSL on the MyQ Server set <true or false, default true> to true.
Camera to printer mapping
Add new mapping for each camera - printer pair. Value for <Printer Serial Number> can be found in the MyQ Server. Click Settings > Printers. The Serial number is readable in the printers list or within the printer details under Information > Serial number.
Apply changes to docker
To apply changes above, use the command:
docker-compose up -d