Scaling
Introduction
Each of the Video Processing Platform services has its own role and responsibilities. Some of the services, specially the one involved in video processing pipeline, has to to adapt to different workload and amount of the incomming data. Put it in simple way - the more cameras connected to the Video Processing Platform, the more workload on specific services.
Majority of the Video Processing Platform services are designed to run on single core for the better control and scalability of the system. That means services cannot dynamically adapt to workload and increase CPU usage. Instead, a new instances of service needs to be started.
What to scale
Scaling of services in terms of Video Processing Platform basically means to add new replicas of service. Several of the services can and should be scaled up. Some of these services even can be set to use the CPU or GPU explicitly on service level. You can decide what will they use while performing the adding action. The way how we add new replicas differs on Windows and Linux.
Here is the table of services that should be scaled:
| Service | Description |
|---|---|
| Camera | Handles video stream processing |
| Detector | Detects faces in video streams, files and API requests |
| Extractor | Extracts facial features from detected faces |
| Matcher | Matches extracted templates against a watchlists |
| Liveness | Performs liveness detection on faces |
Camera service
Each RTSP stream processed needs to have an underlying service. For example Video Processing Platform deployment with 50 camera streams connected need to have 50 camera services running.
Detector service
In the default camera configuration the face detection is performed within the camera service itself. Detector is then used for handling watchlist member registration or when processing uploaded video files in Rapid Video Processing
Scaling samples
Video Processing Platform with 2 RTSP cameras for testing purposes
A typical Video Processing Platform deployment for PoC or exhibitions with 1-2 cameras, heavy traffic (three persons is in front of the camera all the time).
| Service | Instances |
|---|---|
| Camera | 2 camera services |
| Detector | 1 detector |
| Extractor | 2 extractor services |
| Matcher | 1 matcher |
| Liveness | 1 liveness service |
Video Processing Platform with 50 RTSP cameras for Security Surveillance
Video Processing Platform with 50 cameras for Security Surveillance with different traffic scenarios.
Low Traffic
Traffic: 4 persons per minute with 3 second appearance of one person
| Service | Instances |
|---|---|
| Camera | 50 camera services |
| Detector | 1 detector |
| Extractor | 1 extractor service |
| Matcher | 1 matcher |
| Liveness | 0 liveness service |
Medium Traffic
Traffic: 20 persons per minute with 3 second appearance of one person
| Service | Instances |
|---|---|
| Camera | 50 camera services |
| Detector | 1 detector |
| Extractor | 4 extractor services |
| Matcher | 1 matcher |
| Liveness | 0 liveness service |
High Traffic
Traffic: 120 persons per minute with 5 second appearance of one person
| Service | Instances |
|---|---|
| Camera | 50 camera services |
| Detector | 1 detector |
| Extractor | 34 extractor services |
| Matcher | 4 matchers |
| Liveness | 0 liveness service |
Extreme Traffic
Traffic: 300 persons per minute with 5 second appearance of one person
| Service | Instances |
|---|---|
| Camera | 50 camera services |
| Detector | 1 detector |
| Extractor | 84 extractor services |
| Matcher | 8 matchers |
| Liveness | 0 liveness service |
Calculations for RTSP cameras are based on standard Full HD RTSP camera with 500 milliseconds redetection and extraction interval and 10k database.
Scaling services on Linux
The easiest way to scale up services on Linux is to use the replica keyword in docker compose. If you would like to scale up a detector to have 5 running services instead of one, please add these lines into the detector’s container configuration:
deploy:
    replicas: 5
Please note than if you scale up an container you should not use the container_name key. The key should be unique, therefore manually set name will fail. The system can adjust the name automatically.
An example of a scaled up container would look like:
  liveness:
    image: ${REGISTRY}sf-liveness:${SF_VERSION}
      #container_name: SFLiveness
    restart: unless-stopped
    deploy:
      replicas: 5
    environment:
      - RabbitMQ__Hostname
      - RabbitMQ__Username
      - RabbitMQ__Password
      - RabbitMQ__Port
      - RabbitMQ__VirtualHost
      - RabbitMQ__UseSsl
      - AppSettings__Log_RollingFile_Enabled=false
      - AppSettings__USE_JAEGER_APP_SETTINGS
      - JAEGER_AGENT_HOST
    volumes:
      - "./iengine.lic:/etc/innovatrics/iengine.lic"
Adding new camera service
To add a new camera service, please add an additional set of lines for a new camera container. An example would be:
  sf-cam-5:
    image: ${REGISTRY}sf-cam:${SF_VERSION}
    container_name: SFCam5
    command: --serviceName SFCam5
    ports:
      - 30005:${CameraDefaults__PreviewPort}
    restart: unless-stopped
    environment:
      - RabbitMQ__Hostname
      - RabbitMQ__Username
      - RabbitMQ__Password
      - RabbitMQ__Port
      - RabbitMQ__VirtualHost
      - RabbitMQ__UseSsl
      - ConnectionStrings__CoreDbContext
      - Database__DbEngine
      - AppSettings__Log_RollingFile_Enabled=false
      - AppSettings__USE_JAEGER_APP_SETTINGS
      - JAEGER_AGENT_HOST
      - S3Bucket__Endpoint
      - S3Bucket__BucketName
      - S3Bucket__AccessKey
      - S3Bucket__SecretKey
    # - GstPipelineTemplate
    # - Gpu__GpuNeuralRuntime=Tensor
    volumes:
      - "./iengine.lic:/etc/innovatrics/iengine.lic"
    # - "/var/tmp/innovatrics/tensor-rt:/var/tmp/innovatrics/tensor-rt"
    #runtime: nvidia
Please notice the number 5 used across those lines. Due to needed uniquenes please for each added camera apply a different number across the definition. This includes the name of the container, ‘container_name’ and ‘ports’. So for example for a new 35th camera, the suggested port would be 30035 instead of the 30005.
Once you have updated the docker-compose.yml file, if the total number of cameras is higher than the default, we need to apply the changes in the database. The easiest way to do so is to rerun the run.sh script, however we need to update the script before running it. Please update the run.sh script and do a change in the code snippet below, please adjust the <camera-number> value to match you desired number of cameras.
run-migration \
            -p <camera-number> -c "$(getvalue ConnectionStrings__CoreDbContext)" -dbe $DB_ENGINE \
            --rmq-host "$(getvalue RabbitMQ__Hostname)" --rmq-user "$(getvalue RabbitMQ__Username)" --rmq-pass "$(getvalue RabbitMQ__Password)" \
            --rmq-virtual-host "$(getvalue RabbitMQ__VirtualHost)" --rmq-port "$(getvalue RabbitMQ__Port)" --rmq-use-ssl "$(getvalue RabbitMQ__UseSsl)"
For example, setting the camera number to be 35, the code snippet would look like below:
run-migration \
            -p 35 -c "$(getvalue ConnectionStrings__CoreDbContext)" -dbe $DB_ENGINE \
            --rmq-host "$(getvalue RabbitMQ__Hostname)" --rmq-user "$(getvalue RabbitMQ__Username)" --rmq-pass "$(getvalue RabbitMQ__Password)" \
            --rmq-virtual-host "$(getvalue RabbitMQ__VirtualHost)" --rmq-port "$(getvalue RabbitMQ__Port)" --rmq-use-ssl "$(getvalue RabbitMQ__UseSsl)"
You can then run the script with the command below to apply the changes:
sudo run.sh
The script will also apply changes to the docker-compose.yml files.
Scaling services on Windows
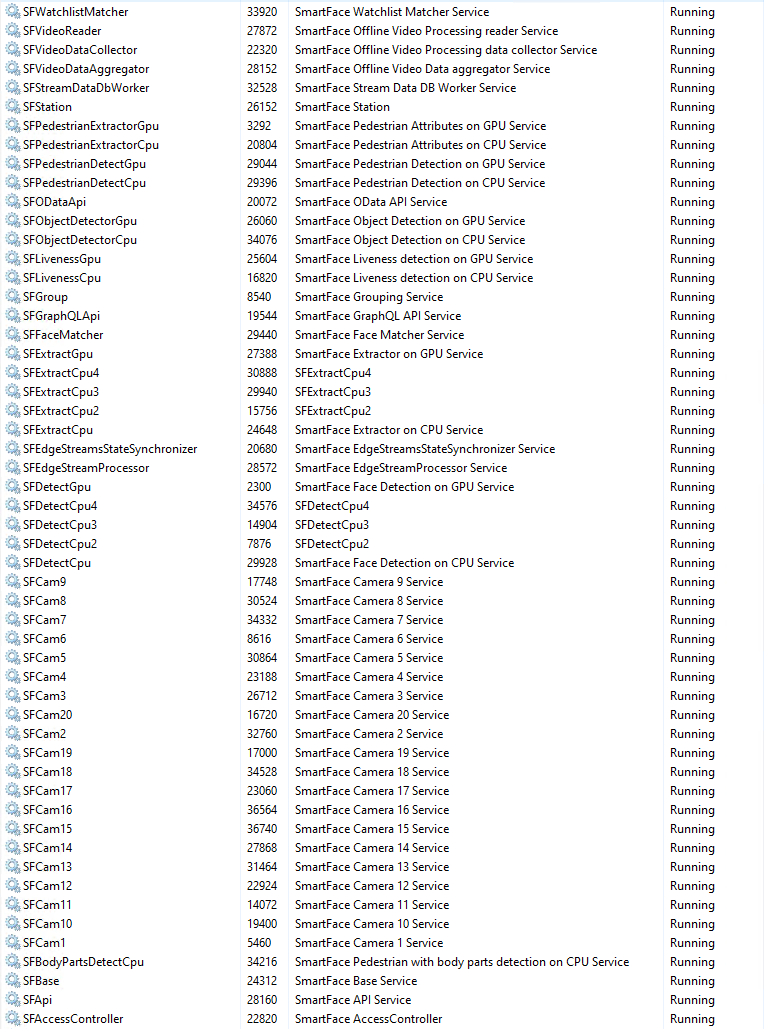
On Windows all Video Processing Platform Services are registered as a Windows Service. So, to add new replica means to add or register a new Windows Service. Adding multiple replicas means to add multiple Windows Services.
Here is a sample of well scalled single server Windows deployment and its services
To use the command below, please open the Windows Command Prompt (cmd.exe).
Adding extra service
You can add a new service using a command promtp command such as the example below.SC CREATE "{service-name}" binpath= "C:\Program Files\Innovatrics\Video Processing Platform\{application-executable-file} Gpu:GpuEnabled={true-false}" DisplayName= "{display-name}" start= delayed-auto
Please replace the {key} with a proper value as per your needs.
{service-name}
This is a service name, you can choose it as per your liking. The name should be unique and we suggest to keep it related to the service you plan to use. An example would be SFLivenessCpu2
{application-executable-file}
This is the executable binary file. It will be located in the path you have chosen during the installation process. Each service has it’s own file. An example would be RpcLiveness.exe
{true-false}
Here you can choose whether the service should be using a GPU for it’s computation. Not all services support GPU computation. You can choose true or false values
{display-name}
Here you can set a display name. It is a description used for better understanding what the service does. An example of an value vould be Video Processing Platform Liveness CPU 2
Here we have couple of examples:
Add new Extractor services
Run following command on Windows CMD (cmd.exe) to add 3 new instances of Extractor service
Running on CPU
SC CREATE "SFExtractorCpu2" binpath= "C:\Program Files\Innovatrics\Video Processing Platform\RpcExtractor.exe Gpu:GpuEnabled=false" DisplayName= "Video Processing Platform Extractor CPU 2" start= delayed-auto
SC CREATE "SFExtractorCpu3" binpath= "C:\Program Files\Innovatrics\Video Processing Platform\RpcExtractor.exe Gpu:GpuEnabled=false" DisplayName= "Video Processing Platform Extractor CPU 3" start= delayed-auto
SC CREATE "SFExtractorCpu4" binpath= "C:\Program Files\Innovatrics\Video Processing Platform\RpcExtractor.exe Gpu:GpuEnabled=false" DisplayName= "Video Processing Platform Extractor CPU 4" start= delayed-auto
Running on GPU
SC CREATE "SFExtractorGpu2" binpath= "C:\Program Files\Innovatrics\Video Processing Platform\RpcExtractor.exe Gpu:GpuEnabled=true" DisplayName= "Video Processing Platform Extractor GPU 2" start= delayed-auto
SC CREATE "SFExtractorGpu3" binpath= "C:\Program Files\Innovatrics\Video Processing Platform\RpcExtractor.exe Gpu:GpuEnabled=true" DisplayName= "Video Processing Platform Extractor GPU 3" start= delayed-auto
SC CREATE "SFExtractorGpu4" binpath= "C:\Program Files\Innovatrics\Video Processing Platform\RpcExtractor.exe Gpu:GpuEnabled=true" DisplayName= "Video Processing Platform Extractor GPU 4" start= delayed-auto
Add new Liveness services
Run following command on Windows CMD (cmd.exe) to add 3 new instances of Liveness service
Running on CPU
SC CREATE "SFLivenessCpu2" binpath= "C:\Program Files\Innovatrics\Video Processing Platform\RpcLiveness.exe Gpu:GpuEnabled=false" DisplayName= "Video Processing Platform Liveness CPU 2" start= delayed-auto
SC CREATE "SFLivenessCpu3" binpath= "C:\Program Files\Innovatrics\Video Processing Platform\RpcLiveness.exe Gpu:GpuEnabled=false" DisplayName= "Video Processing Platform Liveness CPU 3" start= delayed-auto
SC CREATE "SFLivenessCpu4" binpath= "C:\Program Files\Innovatrics\Video Processing Platform\RpcLiveness.exe Gpu:GpuEnabled=false" DisplayName= "Video Processing Platform Liveness CPU 4" start= delayed-auto
Running on GPU
SC CREATE "SFLivenessGpu2" binpath= "C:\Program Files\Innovatrics\Video Processing Platform\RpcLiveness.exe Gpu:GpuEnabled=true" DisplayName= "Video Processing Platform Liveness GPU 2" start= delayed-auto
SC CREATE "SFLivenessGpu3" binpath= "C:\Program Files\Innovatrics\Video Processing Platform\RpcLiveness.exe Gpu:GpuEnabled=true" DisplayName= "Video Processing Platform Liveness GPU 3" start= delayed-auto
SC CREATE "SFLivenessGpu4" binpath= "C:\Program Files\Innovatrics\Video Processing Platform\RpcLiveness.exe Gpu:GpuEnabled=true" DisplayName= "Video Processing Platform Liveness GPU 4" start= delayed-auto
Adding additional cameras
Adding a new camera consist of creating a new camera service and adding a new records in the Video Processing Platform database. Therefore the most practical way to achieve it is to rerun the Video Processing Platform instalation wizard. The wizard will reuse existing settings so please proceed through the steps that you do not plan to change.
Once you get to the screen, where you can choose the amount of cameras to be used, please update the value. Then proceed with the rest of the installation wizard. The Video Processing Platform will be updated.
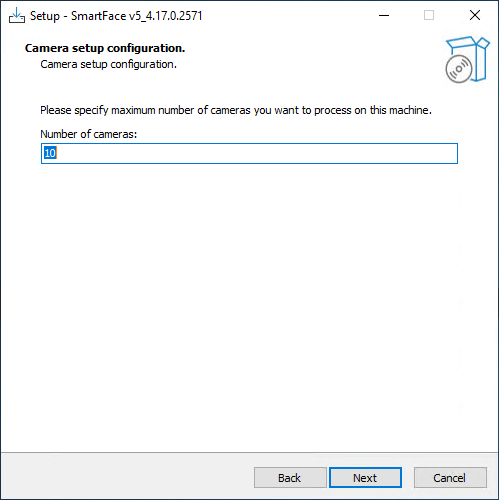
Updating the number of cameras