Camera
These guides will cover choosing the right cameras for you, how to connect and properly install it and how to set the optimal settings depending on your usage.
Choosing a camera
Camera parameters
Choosing the right camera is crucial to achieving great results for your use cases and projects. Cameras vary and we should be able to choose the right kind for the right use. It is possible that within one project several camera types would bring the best results. Each camera has plenty of parameters that you need to take in consideration. Please also keep in mind that some of the parameters can vary greatly between your use cases. Below are some parameters that you might want to consider when using the Video Processing Platform:
Indoor vs. Outdoor
Consider environmental factors like weather, lighting conditions, and potential vandalism. Choose cameras specifically designed for the environment they will be placed in. Outdoor cameras need to be weatherproof and durable and possibly have additional shielding against direct sunlight.
Form factor
Dome vs. Bullet cameras: Dome cameras are discreet and vandal-resistant, while bullet cameras are more visible and often designed for longer-range viewing.
Fixed vs. Pan-Tilt-Zoom (PTZ)
Fixed cameras provide a constant view, while PTZ cameras allow remote control to pan, tilt, and zoom for a dynamic view. Having configurability will help with ease of installation, and open more options for suitable positioning and mounting options. Having zoom will let you cover larger and more distant areas.
Resolution
Higher-resolution cameras provide clearer images. Consider the level of detail required for your needs. The Full HD (1080p) resolution is recommended. Higher resolutions will not necessarily improve the face recognition results, however they will be more demanding performance wise.
Low Light Performance
Choose cameras with good low-light performance or consider adding external lighting for areas with poor visibility. There should not be back light source coming directly from the direction where the camera is facing.
Wide dynamic range (WDR) is a functionality that helps to recognize people’s face in ideal light conditions where there is different contrast between parts of the scene, either too bright or too dimm. The WDR can help greatly, however due to common artifacts it brings into the camera’s image, it does worsen the passive liveness results.
Frame Rate
Higher frame rates provide smoother video but may require more storage. Choose a frame rate that meets your specific needs. The Video Processing Platform does not process each frame, therefore please consider camera that matches the detection and extraction frequencies for your use case. Generally, please consider a camera with at least 15 frames per second.
Field of View
Determine the required field of view based on the area you need to monitor. Some cameras offer adjustable lenses or varifocal lenses for flexibility. The field of view is a very important parameter as choosing a wrong field of view camera can worsen the experience of all users.
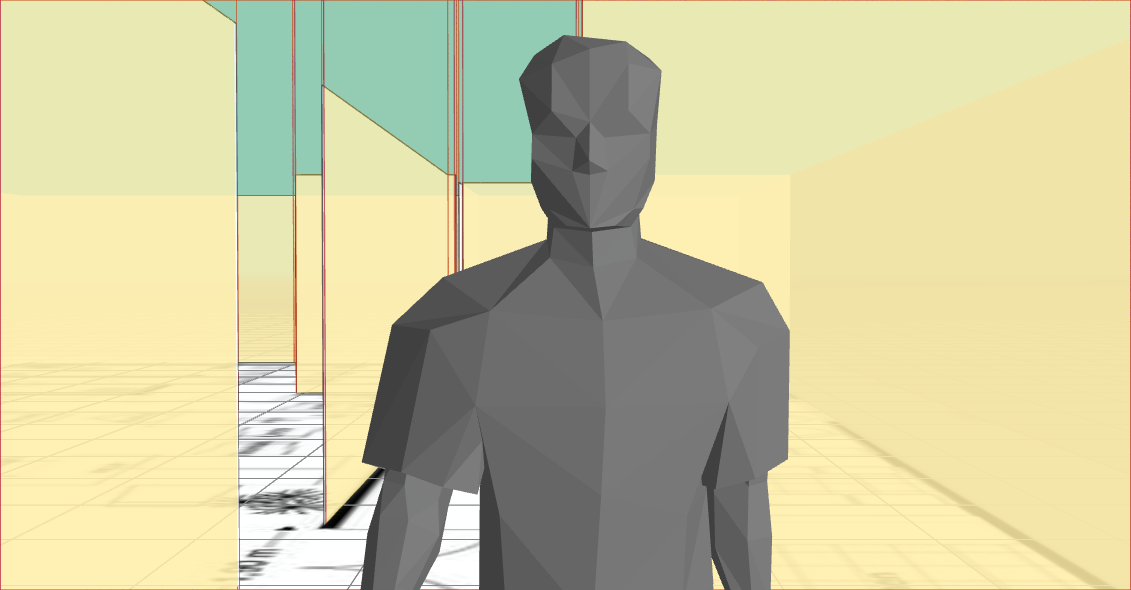
Field of view (FOV) is the maximum area of a sample that a camera can image. Generally speaking smaller the area, the less of the “fish eye effect” is present and the less distorted the faces. This means the further the person is, the face size is decreasing at a more linear rate. With cameras with wide FOV face size decreasing is significant and in some cases, a person only a short distance from the camera is too small to be used for face recognition.
For example, when you have a seamless access control use case, this could mean that the person can be recognized only very close to the camera, which is not very practical as the doors can open only when you are too close to the camera.
For seamless access control, it is suggested to have people identified from a reasonable distance while they are walking toward the camera and an optional physical barrier.
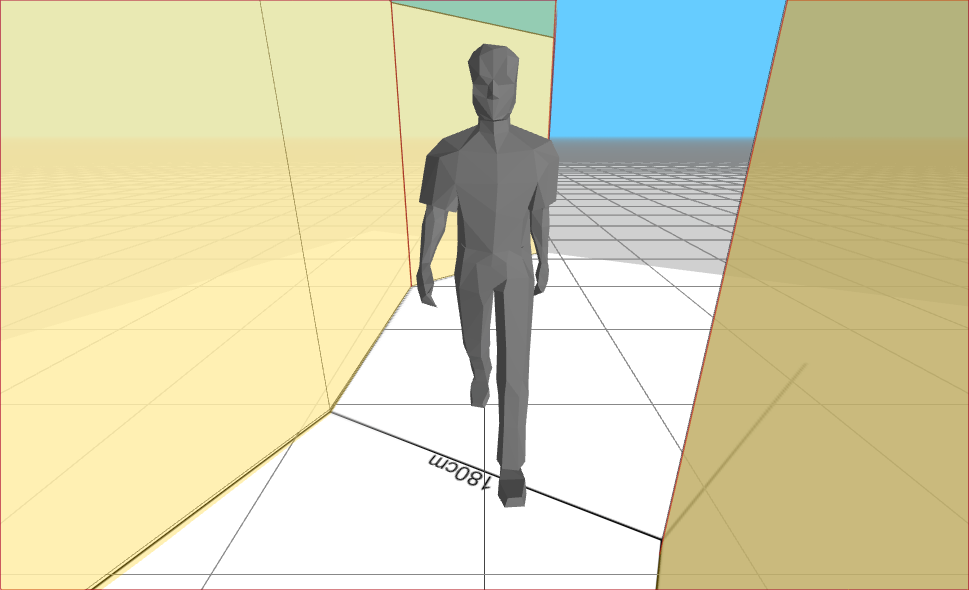
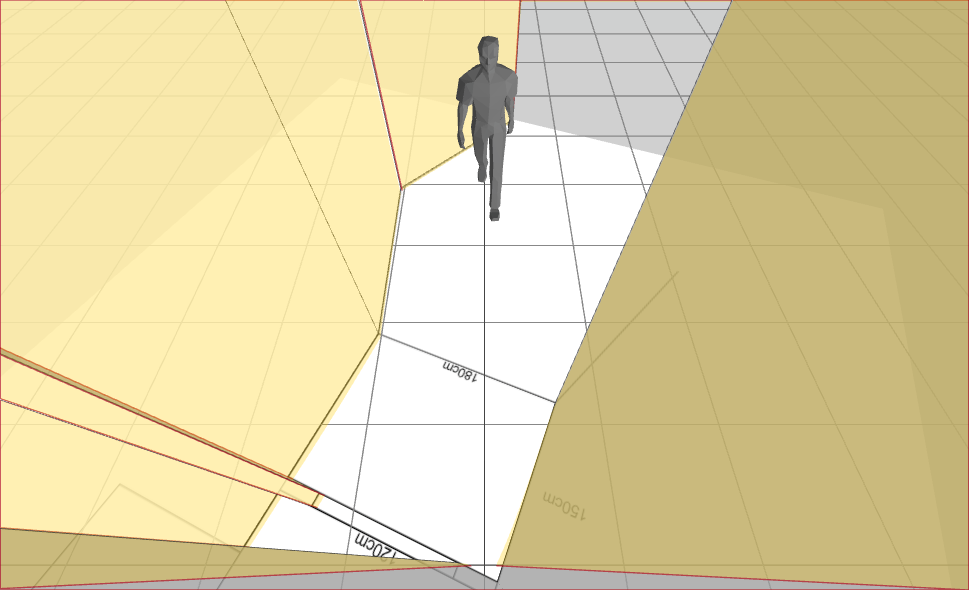
Below are two examples, using 2 different cameras with different configuration pointing at a person 2 meters away.
Lens 1.95 mm, F2.2; Horizontal field of view: 140°; Vertical field of view: 114°
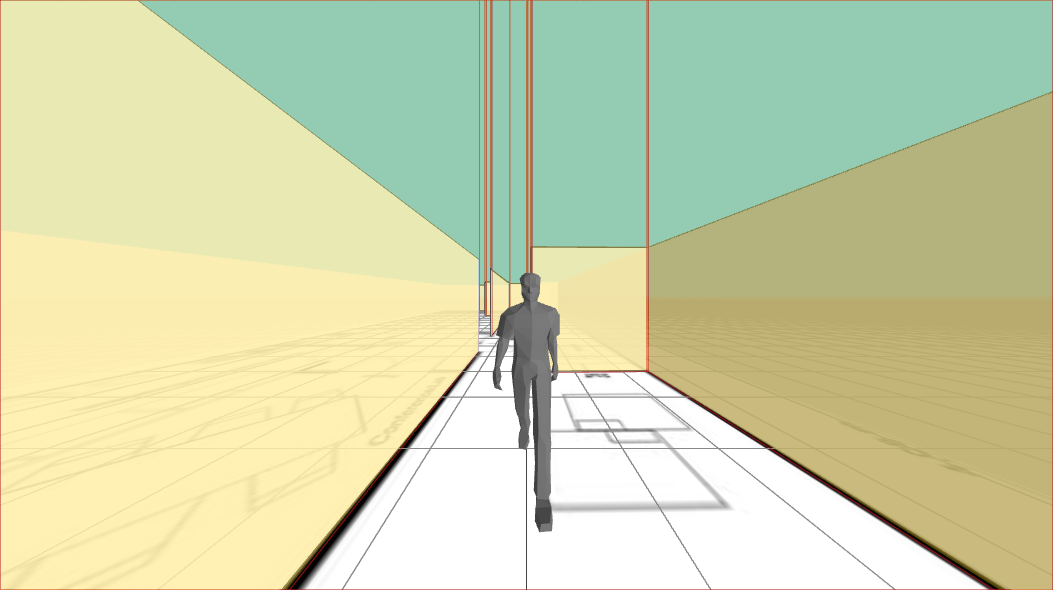
8.5 mm, F1.2; Horizontal field of view: 40°; Vertical field of view: 22°
Power Source
Choose between wired and wireless cameras based on power availability and the need for a continuous power source. Generally speaking, we recommend using wired cameras, as they provide availability at all times. To ease the installation we would also suggest using Power Over Ethernet (POE) cameras. They allow you to connect cameras only using one cable, combining both network and power on said cable providing simplified installation.
Connectivity and protocol support
Cameras on the market do support different stream technologies. The Video Processing Platform platform supports the RTSP streams and Edge Streams.
Budget
Consider your budget constraints and find cameras that provide the necessary features within your financial limits.
Brand and Support
Choose reputable brands with good customer support. Warranty and after-sales service are important considerations.
Facial biometry challenges
Each camera model has its own requirements. Please read the documentation or contact your camera dealer if in doubt. The intention of this section is to define the camera setup conditions for a reliable operation of facial biometry on the Smartface Platform.
When the image does not have a required quality it might not be suitable for facial biometry. While the Video Processing Platform can work with images of various quality gathered from the “wild conditions”, the better the image is provided the more precise the results are. Therefore we suggest trying to avoid issues with the quality of the images used as inputs to the Video Processing Platform. Especially we suggest providing high-quality enrollment photos to have the best possible base for future matching.
Resolution related
Face Size / Minimum eye distance
For the purpose of the Video Processing Platform video processing, the intention is to have a sharp image from each processed frame (in focus and without strong compression artefacts) with pixel face size / eye distance at least 50 pixels. A smaller value such as 30 pixels can be used, however, going lower with the face size will be detrimental to the quality of face templates used for matching purposes. Using values lower than 30 pixels are not recommended. To keep the face size to have a reasonable value, there are several ways to achieve it, such as
- using a reasonable resolution
- mounting the camera in a correct spot - angle and distance according to your use case and zoom options of the camera
- using a camera with a correct field of view (FOV) for your use case
Choose base camera pixel resolution
It is recommended to have a resolution with a width of at least 720 pixels. The ideal resolution would be the Full HD resolution - 1920 x 1080 pixels. Higher resolution does not necessarily bring better results.
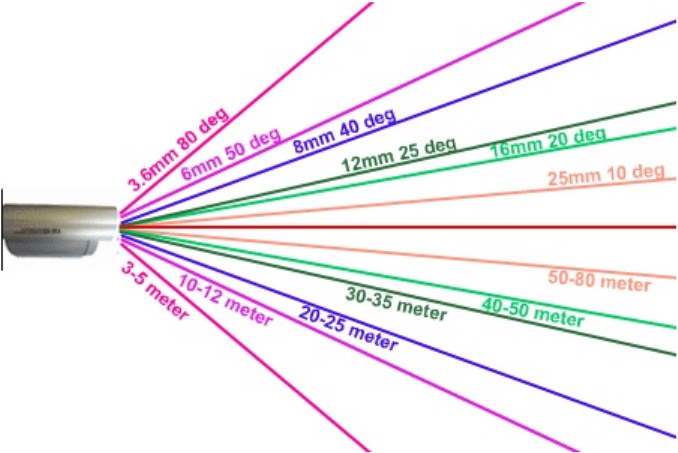
Choose the right lens
Choosing the right lens depends on the spatial condition of your environment and whether you are expecting the faces for the facial biometry to be close or further away from the camera.
For the Near Distance you can use the prime lens with a fixed focal length, but we do not recommend using lower than 2.8 mm to prevent perspective deformation. For the Far Distance you can use the zoom lens. The goal of the zoom is to get at least 50px between eyes. This would for example mean, that if you have a camera with 720px resolution, then a face would be at least 1/8 of the camera image’s view.
For more information about the face size please read the introduction to the biometry manual.
Lost contrast of the image
In the context of images, contrast refers to the difference in brightness between the light and dark areas of an image. It is a key visual element that helps define and distinguish objects and details within the image. High-contrast images have a significant difference between light and dark areas, resulting in well-defined edges and a more visually striking appearance. On the other hand, low-contrast images have less noticeable differences between light and dark areas, resulting in a softer and more muted appearance.
Please see below the most common issues related to losing contrast:
The Subject being placed out of focus
In the context of images, focus refers to the clarity and sharpness of the details in a photograph. A well-focused image has clear and distinct details, making the subject or elements within the frame sharp and easily distinguishable.
Achieving proper focus is crucial in biometry, as it directly impacts the overall quality of the image. Using a higher quality images brings better biometry results.
There are two common reasons for the subject being placed out of focus:
Shallow depth of field (DOF)
it is the physical distance range inside which objects appear in focus. Note that the zoom lenses with greater focal distances have typically a shallow depth of field. A slight out of focus situation doesn’t pose a problem for the Video Processing Platform face-matching technology if the face size is sufficient. The suggested value is 50 pixels and higher.Dynamic changing of the focus
This happens with automatic focus control, therefore a fixed focus is typically preferable. This allows you to avoid issues related to the quality of the camera’s autofocus and its reaction to the current environmental conditions including the current lighting conditions.
Choose proper lenses to prevent perspective -low focal distance or other deformations such as the fish eye effect. Control the focal distance to maximize the eye distance, or to limit the area of interest (static focal distance vs zoom lenses).
Lighting conditions
Before we choose the proper camera, we need to consider the liming factors of the environment, especially the lightning:
Existing lighting condition in the surveillance area
The existing light might be useful but it also might be detrimental to your camera installation. Please consider the existing light sources when choosing your camera and where to place it. Generally speaking having any light source within the camera view is making the camera’s view worse.
There are two different types of light that can occur in your camera installation setup:
Natural light from windows or entrance doors
This one might be hard to avoid but considering proper camera placement can mitigate a lot of the existing issues. Having additional shades between the source of the light and the camera’s view might be helpful.
Natural light changes during the day and even year cycles, so it is unlikely natural light will be sufficient as the only source for your biometric needs.Internal artificial light installation
In some cases, the artificial light can be moved, turned off or covered. Please consider these options, when mounting your camera.
Lighting conditions are probably the most difficult part to control. In most cases, it’s the camera placement that can mitigate this issue.
Typical problematic and the most common negative lighting conditions:
Backlight
Prevent the camera from facing the light source
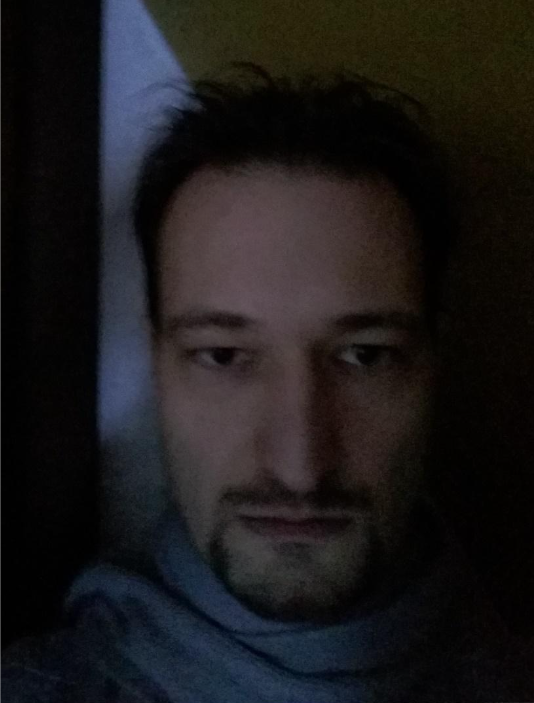
Low light
Low light conditions (typically in outdoor installations) usually cause exposure time to rise. The maximum exposure to prevent blurry images is 1/50 sec. Higher ISO settings on the other hand lower the signal-to-noise ratio. Having additional light sources might be the answer to the issues with a low-light environment.
Low signal noise ratio as per different ISO values:
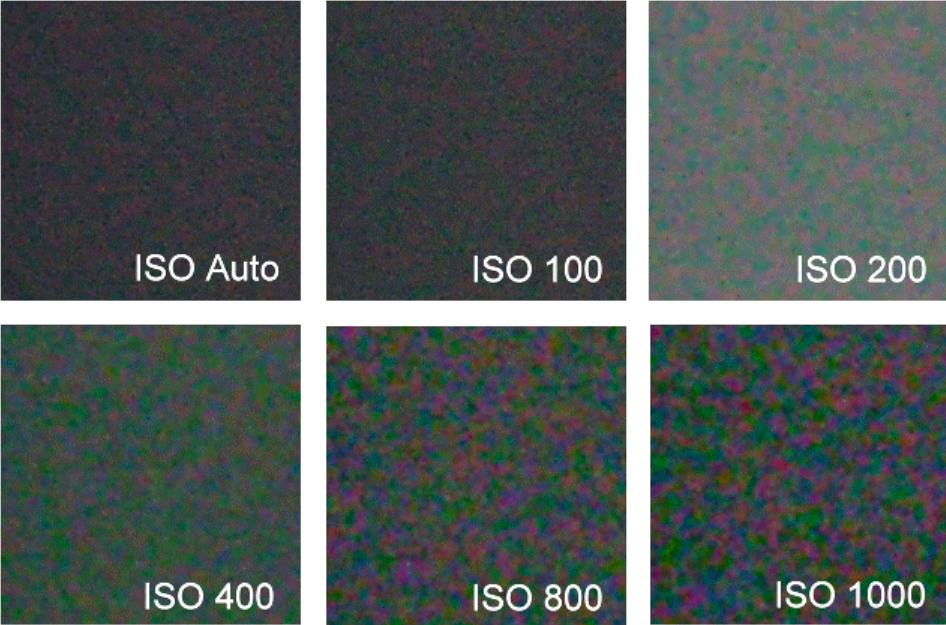
ISO Sensitivity is a standard set by the International Organization for Standardization (ISO) that represents sensitivity to light as a numerical value. A higher number indicates a higher sensitivity and a greater ability to capture light at the expense of reduced image quality in the form of more noticeable noise/grain. The ISO Sensitivity is set and changed in the shooting settings menu.
Overexposure
This is a consequence of the camera adjusting the exposure setting to the wrong part of the scene. Either zoom in to help camera software evaluate better according to the central part of the scene or eliminate the spotlights.

Changing light conditions
Natural light is changing throughout the day and the year as well. Internal artificial lighting can be controlled by people and can cause drastic changes in the scene illumination.
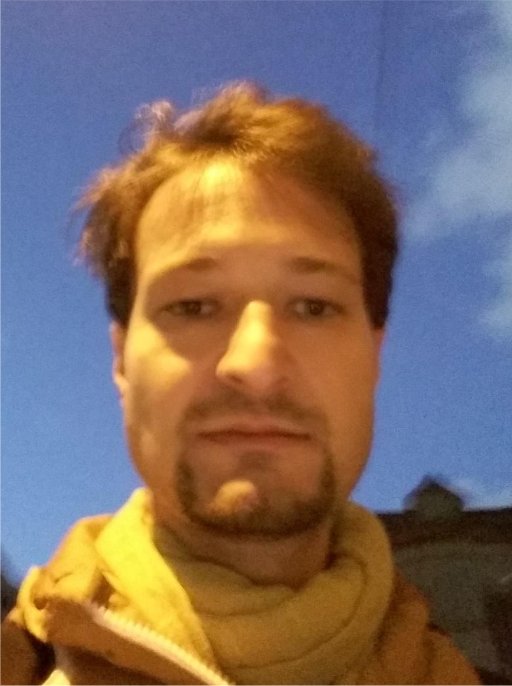
Warm colored light
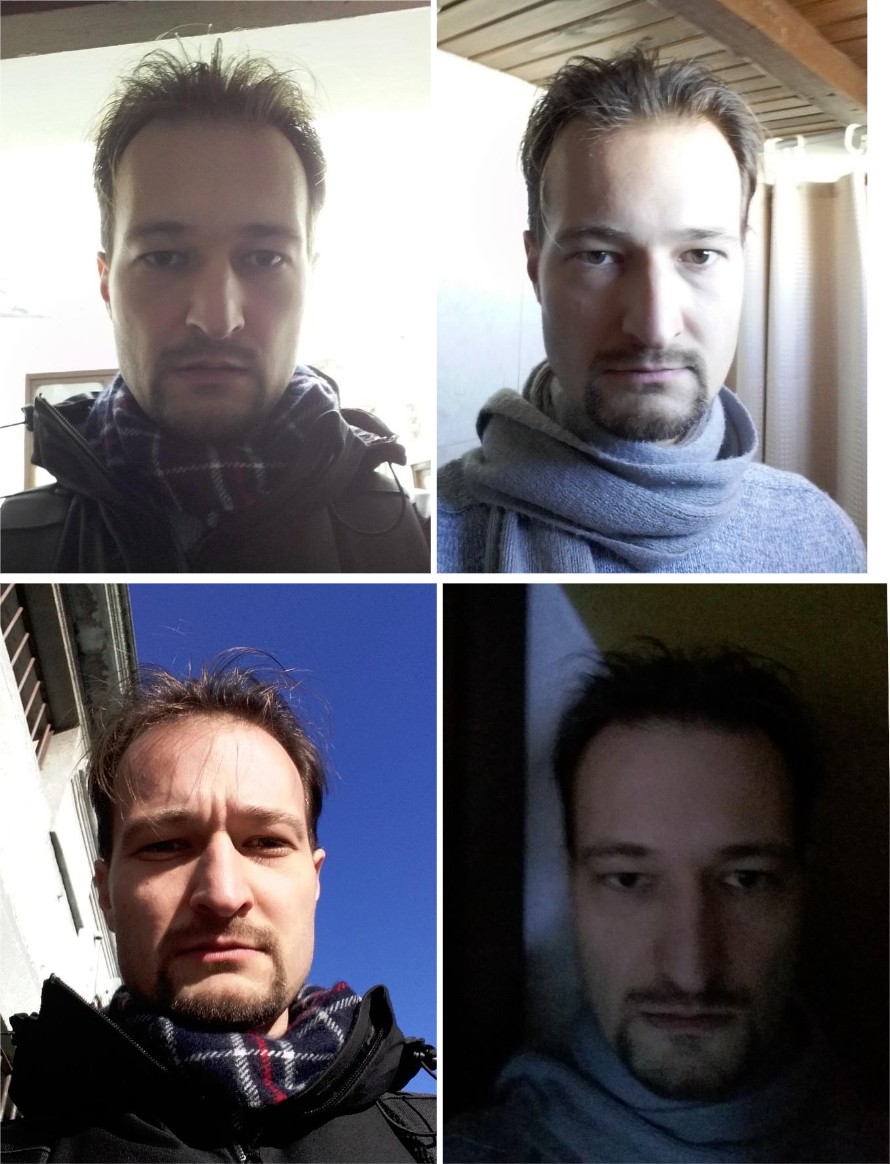
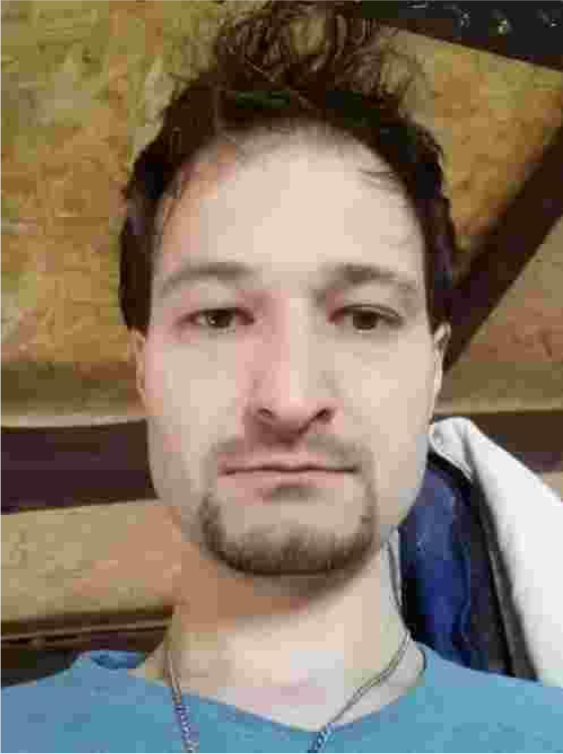
This can lower the contrast on the human skin and thus reduce the amount of information in the facial area for recognition.
Lighting from wrong angle
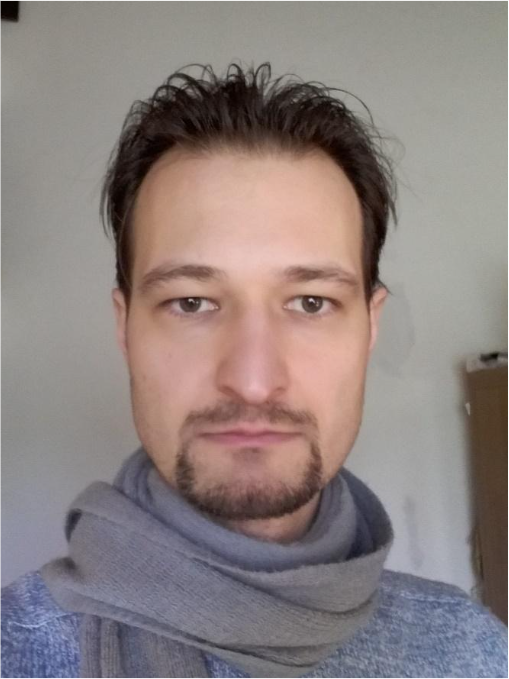
As you can see above, the frontal diffuse lighting provides clear view of the face without any darker spots or spotlights causing too much contrast.
Please avoid conditions, such as: no backlight, no sidelight, no top light or low light:
Choose camera to match the light
Collocate the camera with the primary (neutral – preferably white light) light source. For more information, please read about mounting a camera.
- Special camera HW/SW - in cases where we can’t avoid facing the light source, choose cameras supporting backlight compensation
- Low light cameras
- choose cameras with higher ISO number to maintain low exposure time (<1/50sec) and high enough framerate (>15fps)
- Alternatively use additional infrared light source with appropriate filter (blocking white light) and infrared corrected lens (or zero focus shift lens). Check the spectral sensitivity diagram of the camera sensor (wavelength 700+nm)
Extra light collocated with camera or camera built-in light source (white light, IR light) will greatly improve the lighting conditions and the results of the camera’s provided video and its quality. Please configure the camera properly for your use case, such as compression settings and exposure settings.
Spatial conditions of the surveillance area
It is important to consider the spacial conditions of the area and your use case. Generally speaking you want the camera to cover faces of the persons walking around. In the ideal case having a full frontal view. This might not be always possible so adapting to your conditions is necessarry. For some use cases, such as the access control use case, please consider such location and view of the camera, that it is helping towards seamless experience. This means the face should be clearly visible before the person steps into the physical barrier - tunrstile or gate.
Place the camera in a way to prevent improper lighting conditions and ensure good head rotation. For more information, please read about mounting a camera.
Face orientation
To provide a facial biometry service, the camera used for a facial biometry needs to have a face in it’s view. A frontal image is preffered. Monitoring entrances and narrow corridors is preferred as you can easily optimize the amount of cameras needed to cover all the important chokepoints. Having open big spaces require complementary cameras as it might be difficult to cover the whole area, especially if within your use case you want to gather faces of all the people within the area.
To assure the best conditions for the facial biometry, we suggest to work towards ensuring the best posible visibility of a face image used for a facial biometry - frontal face view. Practically the frontal face view will have some deviations. We suggest to keep the used angles within the suggested maximums:
- Roll in range <-15°, 15°>
- Pitch in range <-30°, 30°>
- Yaw in range <-30°, 30°>
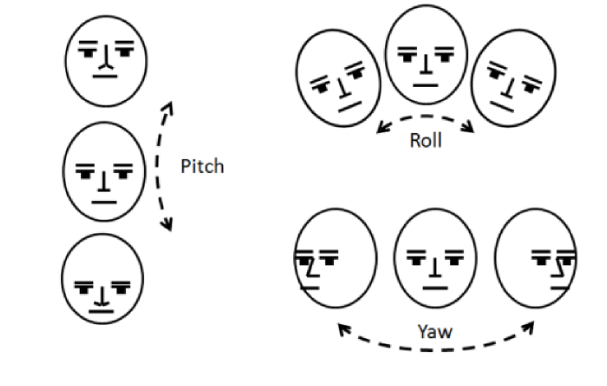
The Video Processing Platform can work with angles over the suggested maximum values, however using higher values will lower the quality of the facial biometry results.
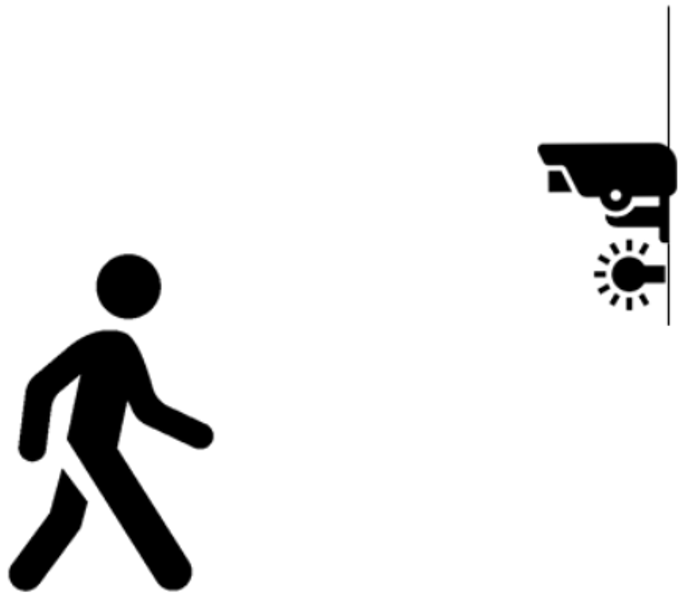
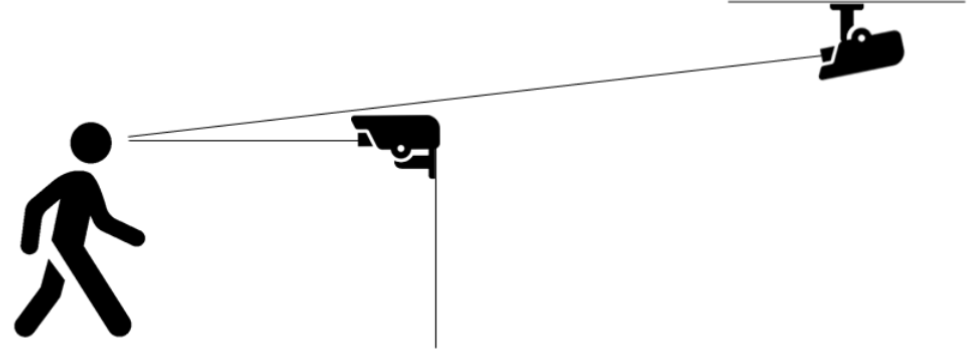
Suggested placement of the cameras is at the eye level preferably near the subject you want to cover by the facial biometry. If you have a higher placed camera, such as a ceiling mounted one, you need to look further to keep the angle between the face and the camera reasonable. Then a sufficient zoom is needed to keep the face size around and more than 50 pixels.
Video transmission
Video transmission is as crucial as video capture. To maximize the reliability of the face detection/tracking and face matching accuracy, follow the
- Frames per second (FPS) - a sufficient base camera framerate. Please note: that low light conditions can lower the base camera framerate. We would like to have 15+ fps at all times
- Video stream quality
- Compression
- recommended CBR (constant bitrate)
- recommended quality priority (not framerate)
- Compression
- Network bandwith
- stable and appropriate network
- sufficient network bandwidth: 4Mbps/2.5Mps per camera
- if the network environment can not provide sufficient network bandwith we suggest considering the usage of the Video Processing Platform Embedded Stream Processor as the network usage of using Smart cameras is significantly lower
When considering the network infrastructure, please calculate the maximum necessary cumulated bandwidth, so the framerate does not drop under 15 fps.
A high degree of compression and / or low network bandwidth might cause effects such as below:
Mounting a Camera
When mounting a camera the general rule is, that the Video Processing Platform can use only the information that is available in the camera view, therefore if the camera does not see it, the Video Processing Platform can not see it.
For example to detect a face, the face needs to be visible. The Video Processing Platform can detect and match a partial face, however the better the view, the better the matching works. If you provide only a small portion of a face, it is possible that no match will be found. Ideally we want to provide the full frontal view of the face.
This is not always possible and we need to find some optimal balance between few factors:
- target visibility
- distance
- lightning conditions
- mounting position that is safe for others
- mounting position that keeps the camera safe
Balancing these factors happens on an case to case basis and usually it is a trade off. It is not possible to give suggestions without knowing project needs and the environment.
We are aiming at a good Target visibility. We need to ensure we can see all our targets. The camera positioning will be likely different if we expect only adults to walk in front of the camera and it will be different if children faces should be detected too. Also the expected angles and distances beetween the faces and the camera will differ greatly depending on the use cases.
Access control use cases where the camera recognition allows door opening will differ from outdoor public security surveillance system. For allowing an entrance we need to be sure it is the correct person and likely we want to proceed with Liveness/Spoofcheck. To get good results we want a full frontal face view.
Distance from the target is limiting as the further away from the target the camera is, the smaller it appears and smaller resolution of the target is available. Please read more about the field of view. If you are using a zoom, we suggest to use only an optical zoom.
Another kind of distance that should be understood and taken care of is the distance between the camera and the other network devices as the cable length might a limiting factor. Please use a correct type of cable with sufficient shielding for your use. Avoid interferences in the cable by not putting it too close to a strong magnetic field.
Frontal face view for access control
For security use cases, being able to identify a possible match is the goal instead. A possible false match is not a problem, we can ease with the conditions, such as angles, face size or score threshold.
Surveillance at an angle
Light conditions are important as we are aiming at consistent lightning conditions, that do not change much during the day. Such changes can make a finely tuned system work improperly. Cameras have a lot of automatic tuning systems that try to adjust to the lighting conditions. This might adjust some parameters as the shutter speed or light gain. This might make the images too blurry, especially if you are trying to match or spoofcheck moving persons.
We do not recommend having any source of light or light mirroring surface within the camera’s field of view. This can alter the image coming from the camera sufficiently to render matching impossible or at least inconsistent.
If your scene has different lightning conditions it is possible to use a Wide Dynamic Range (WDR) functionality of the camera. However please be aware that the WDR brings image artefacts that do lower the Liveness Score for our passive spoof checks. We recommend using the Liveness/Spoofcheck functionality with the WDR turned off.
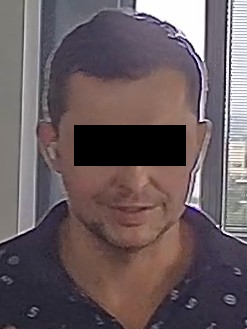
WDR artefacts on the edges of a face make it look like a presentation attack
When placing a camera for safety reasons we should be using a mounting position that is safe for others so no one accidentally hits the camera and gets hurt. We should also use a mounting position that keeps the camera safe, whether from the environmental conditions, such as rain or wind or from people who might want to damage or steal the camera. To keep it from vandals putting a camera higher, or using a stronger case might do the trick. It is not always possible so finding a better way to keep it safe might be needed. In some cases, it might help to put it out of reach behind a strong plastic glass or behind some bars.
POE and POE Injectors
Power over the Ethernet (POE) is a set of standards that allow a single cable to provide both data and power connection for your device. One ethernet cable will provide all the camera needs.
The power might come from POE enabled switches and routers, or from POE Injectors. POE Injector is a device where you can plug an ethernet cable coming from your network infrastructure, plug the device into an electrical outlet and then connect your camera and the injector with a second ethernet cable. Your device will then have electricity directly via the ethernet cable.
When deciding what device to use, please note the wattage required by your cameras and carefully consider what POE enabling devices to use. Ensure your camera devices have enough power. The POE devices differ and provide different amounts of power and slots available. Some models especially of less reputable brands might not be able to fulfill the declared wattage and this might cause problems with your installation. Different hard-to-troubleshoot and track issues might occur. A faulty POE device might be one of the causes.
Also please keep in mind that with their length cables tend to lose the capability to provide power. Please use quality cables according to the manufacturer’s recommendations.
Camera Masking
Sometimes the camera is positioned in the way that its view covers an area you do not want to observe or you do not want to have faces and pedestrians/objects to be detected on. That is fine as you can easily use privacy masking to avoid such areas being used.
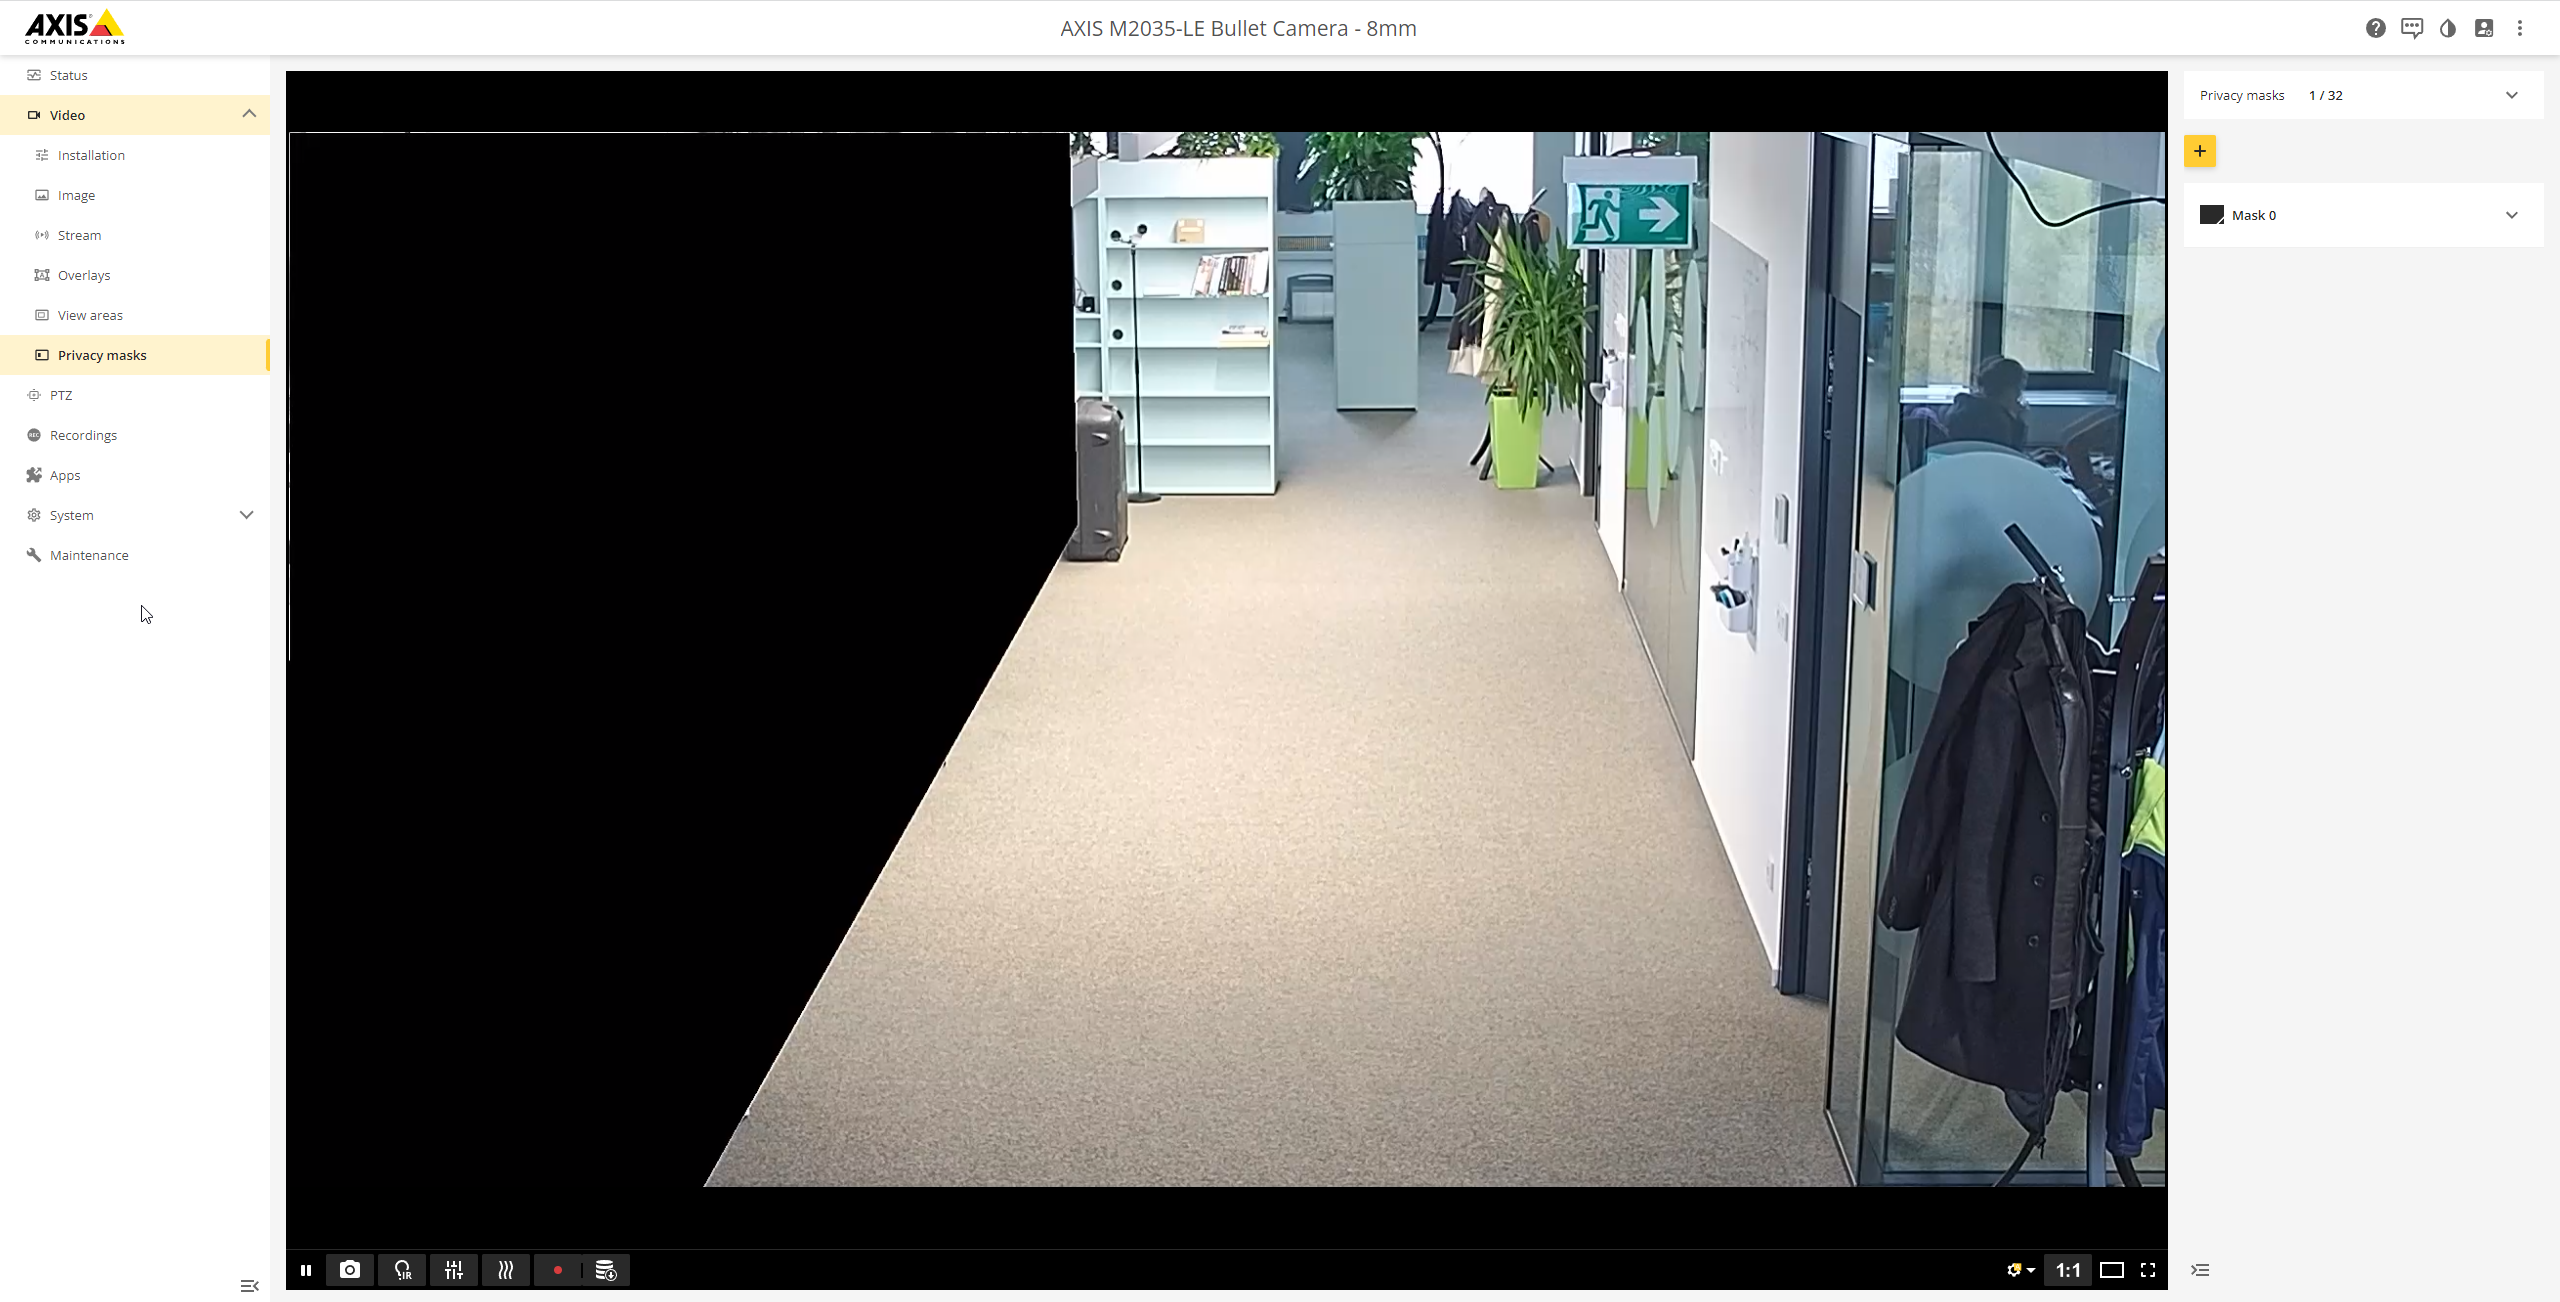
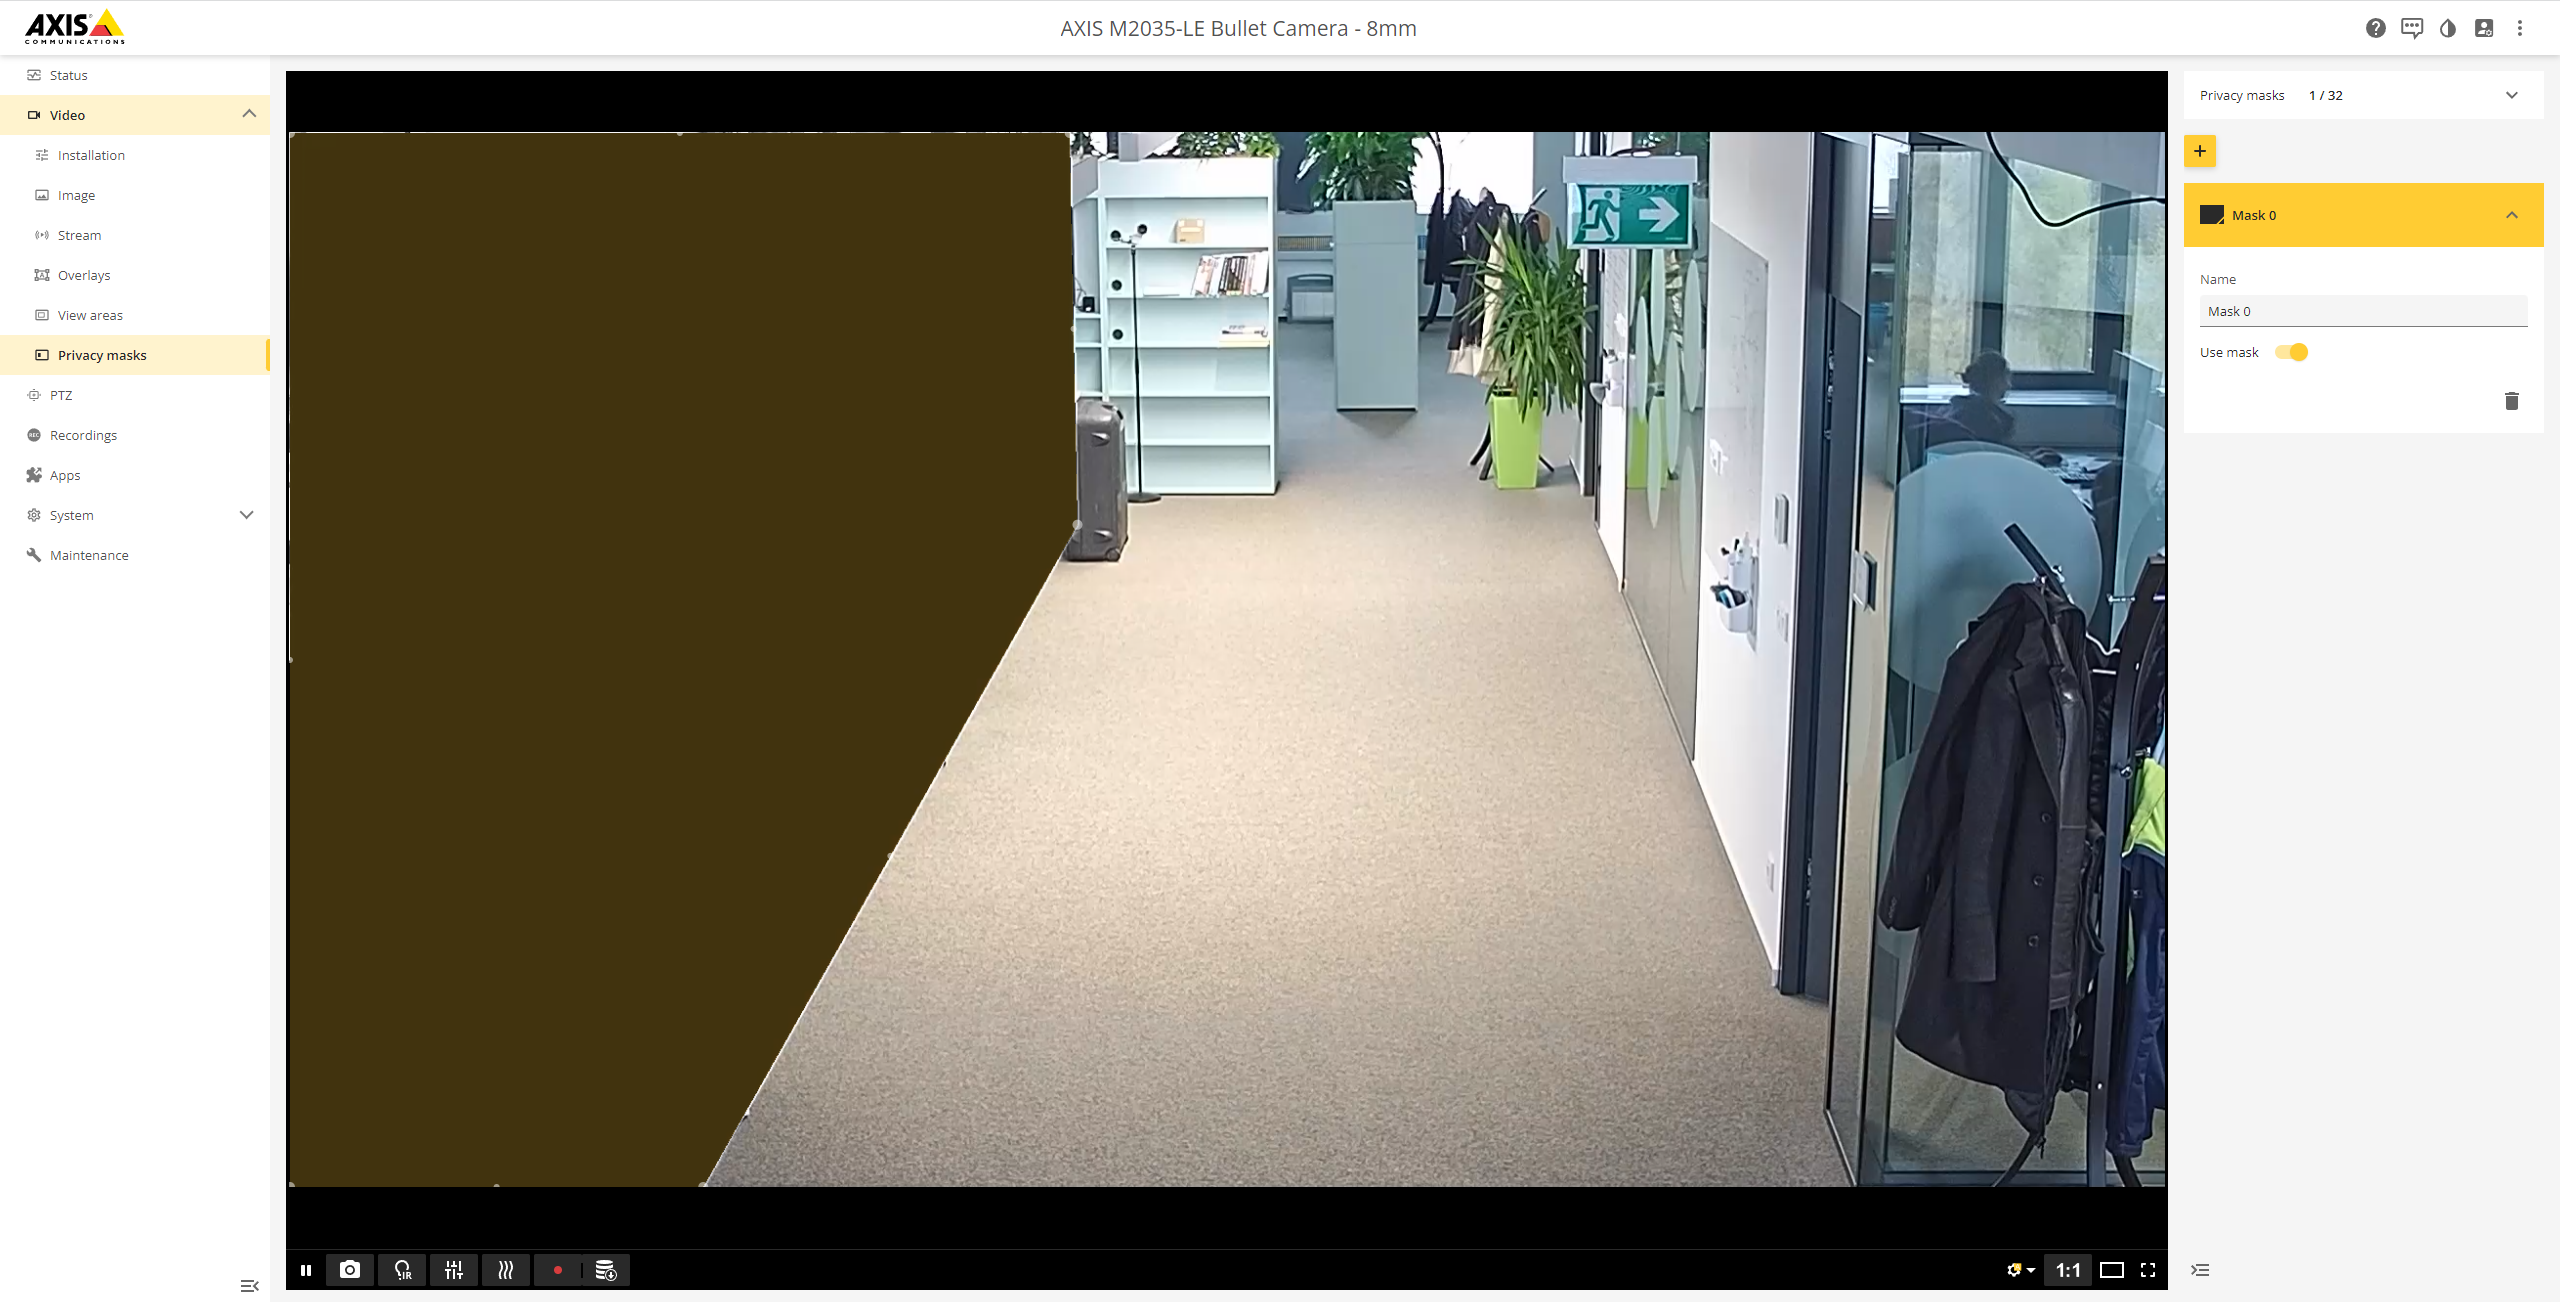
On a camera
Each camera manufacturer has its own way to achieve this, if a camera has this option it will be configurable from within its administration interface.
You can add, enable/disable and remove privacy masks within your camera's admin interface
In Video Processing Platform
However not all cameras support this feature or in some cases that might not be the way to go. For these cases the Video Processing Platform supports the privacy masking directly. You can set such mask using the REST API
on /api/v1/Cameras endpoint. Each camera has maskImagePath set as null per default. This can be adjusted to match the path of the masking image.
A sample masking image is a black and white image, in the case a png, where the white color represents the area that will be used for detections and the black color represents the area that will not be used. Please note that the masking image needs to have exactly the same dimensions as the resolution of the camera.

Sample masking.png image
Please note that the privacy mask defined directly in the Video Processing Platform is not visible in the Camera Preview in the Video Processing Platform Station. It will be used and not detect faces/pedestrians/objects from within the black colored area, this area will be ignored.
Adding the masking image path on Windows
For the Windows installation you need to adjust the value "maskImagePath": null, instead of null to use a full path, including the drive letter, such as C:\Program Files\Innovatrics\Video Processing Platform\masking.png.
Adding the masking image path on Docker
For the Docker installation you need to adjust the value "maskImagePath": null, instead of null to use a full path of the image from the point of view of the camera container.
To have such a full path we actually need to bind the volume information for each such camera in the docker-compose.yml file. Adding the line below under the volumes: section will use a file caled masking.png located in the same folder as the docker-compose.yml file internally for the container as if it was located in the /app folder.
- "./masking.png:/app/masking.png"
Full sample setup for a camera will look like below:
  sf-cam-3:
    image: ${REGISTRY}sf-cam:${SF_VERSION}
    container_name: SFCam3
    command: --serviceName SFCam3
    ports:
      - 30003:${CameraDefaults__PreviewPort}
    restart: unless-stopped
    environment:
      - RabbitMQ__Hostname
      - RabbitMQ__Username
      - RabbitMQ__Password
      - RabbitMQ__Port
      - ConnectionStrings__CoreDbContext
      - Database__DbEngine
      - AppSettings__Log_RollingFile_Enabled=false
      - AppSettings__USE_JAEGER_APP_SETTINGS
      - JAEGER_AGENT_HOST
      - S3Bucket__Endpoint
      - S3Bucket__BucketName
      - S3Bucket__AccessKey
      - S3Bucket__SecretKey
    volumes:
      - "./iengine.lic:/etc/innovatrics/iengine.lic"
      - "./masking.png:/app/masking.png"
We recommend applying the changes using the command:
docker-compose up -d
Now we have in our sample full path /app/masking.png that we can put on in the camera endpoint for the maskImagePath, so instead of "maskImagePath": null it will be "maskImagePath": "/app/masking.png".
Adding RTSP Streams Into Video Processing Platform
When you want to add a RTSP stream into the Video Processing Platform as a VIDEO SOURCE, you need to know what URL format to use. Each camera brand has its own and generally, you need to know the format to use directly from the brand/manufacturer, either via its web or documentation and the manual.
Generally, the format is as follows:
rtsp://<username>:<password>@<your-ip-address>:554/<stream-endpoint>
- rtsp:// stands for the rtsp protocol used
- <username> is the name of the user to log into the camera. The default username is mentioned in the documentation of each camera. Common usernames are
root,adminandAdmin. - <password> is the password to be used to log into the camera. The default password is mentioned in the documentation of each camera. It is recommended to change it during installation.
- <your-ip-address> is the IP address where the camera is available. Please ensure the server that runs Video Processing Platform has access to the camera via the network and vice versa. It is possible a firewall is not allowing the connection.
- 554 is the default port for the RTSP protocol.
- <stream-endpoint> is the camera-specific endpoint. This is something that differs greatly between camera brands and even between camera models within a brand. The name of the endpoint might contain additional information, such as what decoding to use. A camera might enable several different streams, generally, one stream has one endpoint address.
Examples of common camera URLs
The examples below might not match your camera model. Please look into the device’s documentation or contact the manufacturer directly if any questions arise.
- Axis
rtsp://<username>:<password>@<your-ip-address>:554/axis-media/media.amp - Polis
rtsp://<username>:<password>@<your-ip-address>:554/onvif/H.264/media.smp - DynaColor
rtsp://<username>:<password>@<your-ip-address>/stream1 - i-PRO
rtsp://<username>:<password>@<your-ip-address>/MediaInput/h265
Using a USB Camera as an RTSP Stream
You can use a USB camera as a video source. To know how to use USB Camera, read the Video Processing Platform Station Advanced Guide. Please note you can set the configuration for the Docker without using the Video Processing Platform station as you can update the source parameter via the REST API directly.