Video Processing Platform
How to optimize performance
The Video Processing Platform is a flexible and scalable system. To perform it functions it uses the resources available efficiently. To keep up with the demands we are able to optimize it in several ways to provide the best service possible.
Scaling up services
It was made in mind with scalable and distribute systems. If the amount of performed actions is higher, we can suggest scaling services.
Use GPU where helpful
Several of the Video Processing Platform services are capable of harnessing the support of graphics cards. For more information about how to setup the graphics card and enable the GPU support please see GPU Enablement.
Configuring services to use the GPU instead of CPU
Several of the services/containers available in the docker-compose.yml files have per default commented out several lines (the lines are starting with the # symbol). This includes lines, such as:
- Gpu__GpuEnabled=true
runtime: nvidia
To let the service use the GPU, please uncomment these lines and restart the service, either directly or by using the docker compose up -d command. It is recommended to update the name of the service and the container_name, so it is clear from the name itself whether the service is using GPU or not. Also this will allow you to set similar containers with distinct names using different configurations. Bellow is an example of the object detector service configured to use the GPU.
object-detector-GPU:
    image: ${REGISTRY}sf-object-detector:${SF_VERSION}
    container_name: SFObjectDetectorGpu
    restart: unless-stopped
    environment:
      - RabbitMQ__Hostname
      - RabbitMQ__Username
      - RabbitMQ__Password
      - RabbitMQ__Port
      - RabbitMQ__VirtualHost
      - RabbitMQ__UseSsl
      - AppSettings__Log_RollingFile_Enabled=false
      - AppSettings__USE_JAEGER_APP_SETTINGS
      - JAEGER_AGENT_HOST
      - Gpu__GpuEnabled=true
    volumes:
      - "./iengine.lic:/etc/innovatrics/iengine.lic"
    runtime: nvidia
Some of the services do support additional GPU configuration - the Tentors. The GPU card needs to support the tensors and needs to be properly configured. For more information please take a look at the GPU Enablement page. Please let the tensor to load properly after the service starts. This can cause the service to not work until the tensor mode is loaded. This might take several seconds up to few minutes depending on the configuration.
To enable the tensors, please uncomment two additional lines:
- Gpu__GpuNeuralRuntime=Tensor
- "/var/tmp/innovatrics/tensor-rt:/var/tmp/innovatrics/tensor-rt"
Below is an example of a service using GPU with the tensor as well.
pedestrian-detector-GPU:
    image: ${REGISTRY}sf-pedestrian-detector:${SF_VERSION}
    container_name: SFPedestrianDetectGpu
    restart: unless-stopped
    environment:
      - RabbitMQ__Hostname
      - RabbitMQ__Username
      - RabbitMQ__Password
      - RabbitMQ__Port
      - RabbitMQ__VirtualHost
      - RabbitMQ__UseSsl
      - AppSettings__Log_RollingFile_Enabled=false
      - AppSettings__USE_JAEGER_APP_SETTINGS
      - JAEGER_AGENT_HOST
      - Gpu__GpuEnabled=true
      - Gpu__GpuNeuralRuntime=Tensor
    volumes:
      - "./iengine.lic:/etc/innovatrics/iengine.lic"
      - "/var/tmp/innovatrics/tensor-rt:/var/tmp/innovatrics/tensor-rt"
    runtime: nvidia
Use only required video resolution
The RTSP stream from you cameras can be processed from various resolutions. However in the default configurations higher resolutions than the Full HD (1920pxx1080px) are bringing only diminishing returns. At the same time the processing requirements are increasing drastically. Therefore it is suggested to use the Full HD as a default resolution for the RTSP Streams being processed by the Video Processing Platform.
Redetection / extraction interval
The detection/redetection and the extraction are one of the repetetive actions that are resource demanding when being performed.
The detection (whether face, pedestrian or object detection) is being performed by the detector services. It’s purpose is to take an image (frame) and perform the detection action - find the face/pedestrian/object matching the detector’s configuration. Found faces/pedestrians/objects are then sent for further processing. For more information about detections, please take a look at the Processing features.
Extraction is a process of conversion of face features from the acquired digital image into a binary representation of the face, which is called a biometric template. For more information please take alook at Face extraction article.
Both detection and extraction intervals can be set. It is recommended to both have the same value, or the detection interval to be multiple of the extraction value, with a remainder of 0.
The default is set to 500ms for detection and 500ms for extraction. This means that both operations happen twice a second. For use cases where we need to ensure we catch each case that happens to be in front of the camera we need to make the numbers lower to have more detections per second. The default for an access control use case would be 250ms for both actions.
If we expect to have people/pedestrians/objects moving in front of the camera even faster, we need to lower the amount of miliseconds. Halving the amount each step would be generally the way to go.
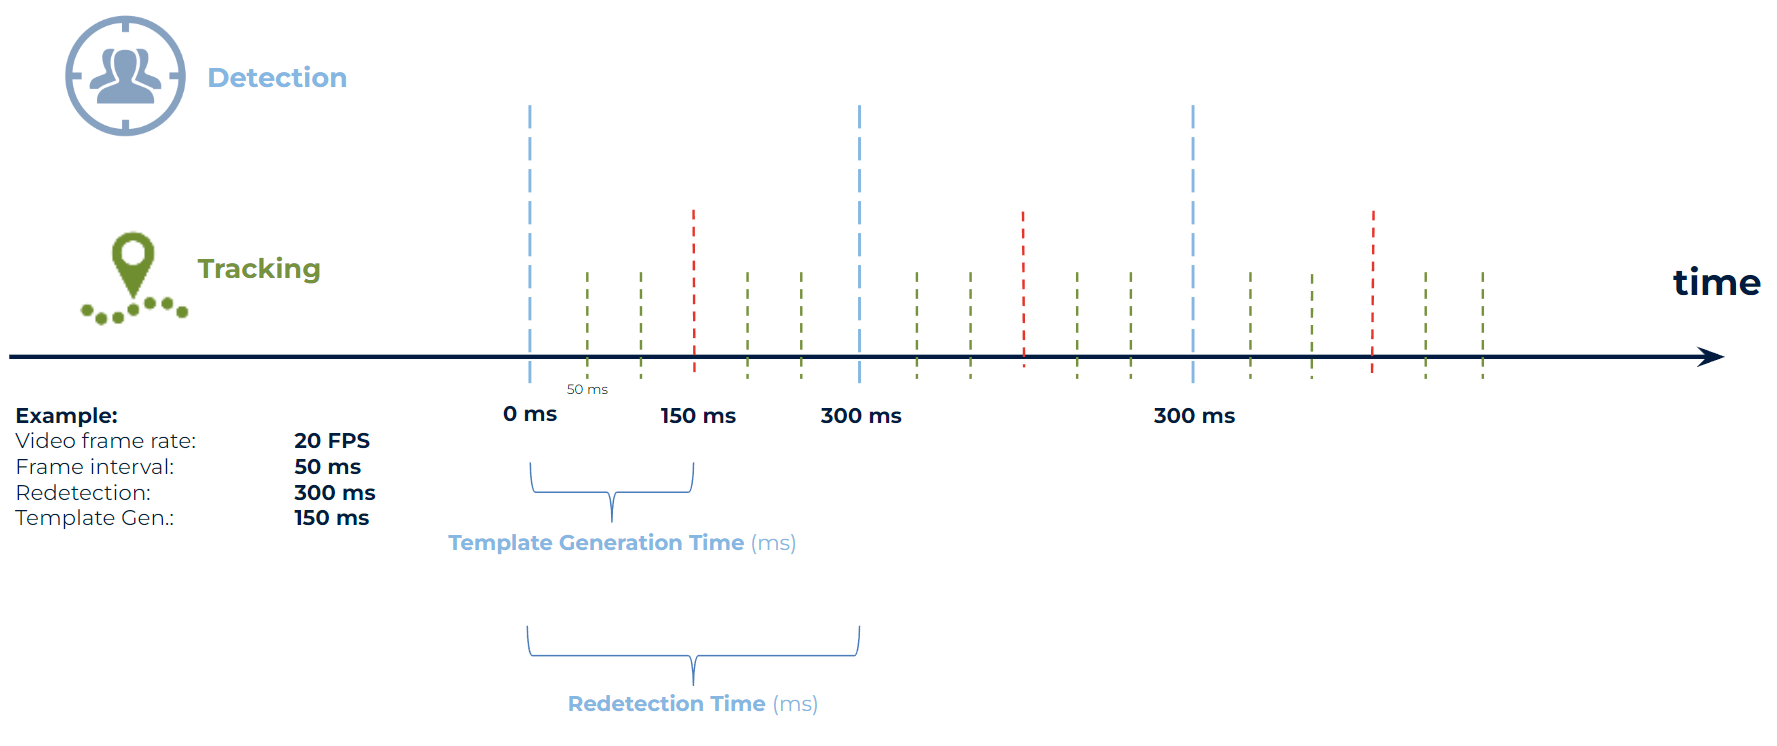
To avoid too many detection actions, that are very expensive, the Video Processing Platform Video Processing Platform only performs the tracking operation in the following frames ─ keeps track of the location of the detected faces. For more information about the tracking please look at the Tracking explained.
Turn off or minimize Camera Preview quality
The Camera preview visible in the Video Processing Platform Station might be using considerable amount of resources, especially on a low spec machine. In such cases it is reasonable to not use the preview unless needed and to customize the preview quality. The higher quality the higher specification for the machine resources is needed. The preview quality can be set in the Video Processing Platform Station as on the Camera configuration parameters.
- Low (height: 426 px, bit rate: 153,000)
- Medium (height: 640 px, bit rate: 450,000)
- High (height: 1280 px, bit rate: 1,400,000)
It is possible to set a custom value as well, hoever only via the REST API. For more information please read Camera preview settings.
Enable Visual Code support (QR codes)
To enable the support for the Visual Codes (TOTP QR codes) in the Video Processing Platform edit the file .env and add the line below:
Totp__QrCodeImageEndpointEnabled=true
Apply changes with command docker compose up -d.
To use the TOTP Visual Codes in the Video Processing Platform Station you need to enable this feature. For more information click here.
Changing Algorithms
The Video Processing Platform is used state of the art Neural Networks. In some cases we have more than one available for the same functionality. The different networks are specifically created to match different needs, especially to bring different answerrs to the tradeoffs between speed and accuracy. Some Neural Networks bring better results but at cost of lower efficiency and more demands on the CPU and memory of the hosting machine. That is why we offer more options for advanced users.
Changing Detection Algorithm
The Video Processing Platform is detecting faces from the face images. It can be done using both CPU and GPU services. We support two detection methods/algorithms: accurate, balanced. The balanced algorithm is the default. They can be changed as per camera in the REST API endpoints api/1/Cameras using the FaceDetectorResourceId parameter.
Each of them offers also it’s CPU version (value cpu), as the default is using a GPU (value gpu). The value any will let the system decide to use both CPU and GPU based on it’s own priority system.
Another option is to use the remove version of each of the parameters. Whe using the remote version, the detection is done in a standalone detector service, instead of the in camera service processing. The endpoint offers you these options:
nonecpugpuaccurate_cpuaccurate_gpucpu_remotegpu_remoteany_remoteaccurate_cpu_remoteaccurate_gpu_remoteaccurate_any_remote
Changing Extraction Algorithm
The Video Processing Platform is extracting data from the face images thus generating biometric templates. Currently there is only one service that performs extraction and it is working in both CPU (SFExtractCpu service) and GPU (SFExtractGpu service) modes. Several methods/algorithms to do the extraction are supported: fast, balanced, accurate, accurate_server, accurate_server_nist, accurate_server_nist_p1, accurate_mask, accurate_server_visa, accurate_server_wild, frte_1N_014.
The default algorithm used across the Video Processing Platform is balanced.
This can lead to the Video Processing Platform platform services not working. If you have already used a different extraction algorithm a template migration of all face templates is needed.
Template migration
Template migration process of migrating (converting) existing templates in system from one algorithm version to another. Required steps are documented here.
Template compatibility
The table below describes the version of different algorithms across Video Processing platform versions.
| Extraction algorithm | Notes | Template Version Used VPP >= 4.8 | Template Version Used VPP >= 4.19 | Template Version Used VPP >= 4.40 |
|---|---|---|---|---|
| fast | Fastest, mutually compatible | 1.36 | 1.36 | 52 |
| balanced | Mutually compatible | 1.39 | 1.39 | 53 |
| accurate | Mutually compatible | - | - | 54 |
| accurate_server | Mutually compatible | - | - | 55 |
| accurate_server_nist | Mutually compatible | - | - | 50 |
| accurate_server_nist_p1 | Should not be used standalone, only as part of frte_1N_014 | - | - | 51 |
| accurate_server_wild | - | - | 1.45 | 45 |
| accurate_server_visa | - | - | 1.44 | 44 |
| accurate_mask | - | 1.40 | 1.40 | 40 |
| frte_1N_014 | Combo of visa, nist, nist_p1 | - | - | - |
- extraction algorithm versions were changed from a semver format {major}.{minor} to a single number
- Some extraction algorithms are now mutually compatible. For example: Face Template extracted with
fastcan be matched to a Face Template extracted withaccurate.
For example when using the accurate algorithm, with a current version of the Video Processing Platform you should be using template version 54. If this is not a new installation and the database already holds some face templates, the migration is required. Backup of the databases is highly recommended and for a production requirement it is a must.
Changing the extraction algorithm on a Windows installation
On a Windows installation you can adjust the Video Processing Platform.RpcExtractor.appsettings.json located in your installation directory. In a default installation it is located in C:\Program Files\Innovatrics\Video Processing Platform. Choose another algorithm and write it instead of balanced.
"Extraction": {
    "Algorithm": "accurate_mask"
}
After a change you need to restart all the affected services.
Changing the extraction algorithm on a Linux/Docker installation
On a Docker/Linux installation you can easily adjust the extraction algorithm to be used in the docker-compose.yml file by adjusting the environment variable for the extraction service. To change the extraction algorithm into accurate mask, you can add this line:
- Extraction__Algorithm=accurate_mask
The outcome will be such as below:
extractor:
    image: ${REGISTRY}sf-extractor:${SF_VERSION}
    container_name: SFExtractCpu
    restart: unless-stopped
    environment:
      - RabbitMQ__Hostname
      - RabbitMQ__Username
      - RabbitMQ__Password
      - RabbitMQ__Port
      - AppSettings__Log_RollingFile_Enabled=false
      - AppSettings__USE_JAEGER_APP_SETTINGS
      - JAEGER_AGENT_HOST
      - Gpu__GpuEnabled=true
      - Gpu__GpuNeuralRuntime=Tensor
      - Extraction__Algorithm=accurate_mask
    volumes:
      - "./iengine.lic:/etc/innovatrics/iengine.lic"
      - "/var/tmp/innovatrics/tensor-rt:/var/tmp/innovatrics/tensor-rt"
    runtime: nvidia
To apply the changes you need to restart and/or update the extractor service. You can do so by running this command:
docker-compose up -d
Changing Object Detector Algorithm
Similarly you can adjust the object detector algorithm. The supported values are: balanced, fast, accurate. The default value is balanced.
Changing the object detection algorithm on a Windows installation
On a Windows installation you can adjust the Video Processing Platform.RpcObjectDetector.appsettings.json located in your installation directory. In a default installation it is located in C:\Program Files\Innovatrics\Video Processing Platform. Choose another algorithm and write it instead of balanced.
"Detection": {
    "Algorithm": "balanced"
}
After a change you need to restart the SFObjectDetectorCpu or SFObjectDetectorGpu service(s)
Changing the extraction algorithm on a Linux/Docker installation
On a Docker/Linux installation you can easily adjust the object detection algorithm to be used in the docker-compose.yml file by adjusting the environment variable for the extraction service. To change the object detection algorithm into accurate, you can add this line:
Detection__Algorithm=accurate
object-detector:
    image: ${REGISTRY}sf-object-detector:${SF_VERSION}
    container_name: SFObjectDetectorCpu
    restart: unless-stopped
    environment:
      - RabbitMQ__Hostname
      - RabbitMQ__Username
      - RabbitMQ__Password
      - RabbitMQ__Port
      - RabbitMQ__VirtualHost
      - RabbitMQ__UseSsl
      - AppSettings__Log_RollingFile_Enabled=false
      - AppSettings__USE_JAEGER_APP_SETTINGS
      - JAEGER_AGENT_HOST
      - Detection__Algorithm=accurate
      # - Gpu__GpuEnabled=true
    volumes:
      - "./iengine.lic:/etc/innovatrics/iengine.lic"
    #runtime: nvidia
To apply the changes you need to restart and/or update the extractor service. You can do so by running this command:
docker-compose up -d
Centralized Edge Camera Management (API)
Since the Video Processing Platform version 4.25, there is new centralized configuration for Edge cameras (Smart cameras using the Video Processing Platform Embedded Stream Processor plugins). This configuration can be done using the Video Processing Platform Station or via APIs. This guide focuses on the configuration via the REST API. To know more about how to configure the Edge cameras centrally using the Video Processing Platform Station, read here.
The configuration of the SFE Stream Processor can be accessed via an API endpoint /api/v1/EdgeStreams
It’s essential to understand the parameters required for configuration. Refer to the SFE Stream Processor configuration documentation for a comprehensive description of parameters.
Below is an example JSON file and a table outlining parameters and their possible values:
{
  "face_detection": {
    "enable": true,
    "max_detections": 10,
    "min_face_size": 20
    "max_face_size": 200
    "order_by": "DetectionConfidence",
    "tracking": {
      "output_threshold": 1500,
      "input_threshold": 1000,
      "stability": 85,
      "max_frames_lost": 25
    },
    "crop": {
      "enable": true,
      "max_size": 50.0,
      "image_format": "Raw",
      "image_quality": 0.85
    }
  },
  "face_extraction": {
    "enable": true,
  },
  "face_liveness_passive": {
    "enable": true,
    "strategy": "OnEachExtractedFace",
    "conditions": [
      {
        "parameter": "FaceSize",
        "lower_threshold": 30.0
      },
      {
        "parameter": "FaceRelativeArea",
        "lower_threshold": 0.009
      },
      {
        "parameter": "FaceRelativeAreaInImage",
        "lower_threshold": 0.9
      },
      {
        "parameter": "YawAngle",
        "lower_threshold": -20.0,
        "upper_threshold": 20.0
      },
      {
        "parameter": "PitchAngle",
        "lower_threshold": -20.0,
        "upper_threshold": 20.0
      },
      {
        "parameter": "Sharpness",
        "lower_threshold": 0.6
      }
    ]
  },
  "face_identification": {
    "enable": true,
    "threshold": 40
  }
  "messaging": {
    "enable": true,
    "strategy": "OnNewAndInterval",
    "interval": 250,
    "allow_empty_messages": false
  },
  "full_frame": {
    "image_width": null,
    "image_height": null,
    "image_format": "Raw",
    "image_quality": 0.85
  },
  "log": {
    "level": "Debug",
    "path": "dev.log"
  },
  "license": {
    "data": ""
  }
}
| Parameter name | Default value | Possible values |
|---|---|---|
| face_detection | ||
| .enable | false | true/false |
| tracking | ||
| .input_threshold | 1000 | <0, 10000> |
| .output_threshold | 1500 | <0, 10000> |
| .stability | 85 | <0, 100> |
| .max_frames_lost | 25 | <1, 65535> |
| crop | ||
| .enable | true | true/false |
| .size_extension | 2 | <0, 10> |
| .max_size | 50 | <0, 500> |
| .image_format | Jpeg | Raw/Png/Jpeg |
| .image_quality | 90 | <0, 100> |
| face_extraction | ||
| .enable | true | true/false |
| face_liveness_passive | ||
| .enable | false | true/false |
| .strategy | OnEachIdentifiedFace | OnEachExtractedFace /OnEachIdentifiedFace |
| face_liveness_passive.conditions.parameter | .FaceSize | lower_threshold: 30 | null / <1, max(int)> |
| .FaceRelativeArea | lower_threshold: 0.009 | null / <0.0, 1.0> |
| .FaceRelativeAreaInImage | lower_threshold: 0.9 | null / <0.0, 1.0> |
| .YawAngle | lower_threshold: -20.0upper_threshold: 20.0 | null / <-180.0, 180.0> |
| .PitchAngle | lower_threshold: -20.0upper_threshold: 20.0 | null / <-180.0, 180.0> |
| .RollAngle | lower_threshold: -20.0upper_threshold: 20.0 | null / <-180.0, 180.0> |
| .Contrast | not set | null / <0.0, 1.0> |
| .Brightness | not set | null / <0.0, 1.0> |
| .Sharpness | not set | null / <0.0, 1.0> |
| face_liveness_passive.conditions | ||
| .lower_threshold | not set | null / < min(float), max(float)> |
| .upper_threshold | not set | null / < min(float), max(float)> |
| face_identification | ||
| .enable | true | true/false |
| .candidate_count | 1 | <1, 100> |
| .threshold | 40 | <0.0, 100.0> |
| messaging | ||
| .enable | true | true/false |
| .format | Protobuf | Json/Protobuf/Yaml |
| .strategy | OnNewAndInterval | OnNewAndInterval/OnNewAndIntervalBest |
| .interval | 250 | <1, 65535> |
| .allow_empty_messages | false | true/false |
| full_frame | ||
| .enable | false | true/false |
| .image_width | null | <0, 5000> |
| .image_height | null | <0, 5000> |
| .image_format | Jpeg | Raw / Png / Jpeg |
| .image_quality | 90 | <0, 100> |
| log | ||
| .level | Info | Off/Error/Warn/Info/Debug/Trace |
| license | ||
| .data | null | available only for PUT |
Authentication
Video Processing Platform REST and GraphQL APIs support authentication through OAuth 2.0, an open and widely adopted industry standard for secure delegated access. OAuth 2.0 enables clients to obtain limited access to protected resources without directly sharing user credentials. This document focuses on how Video Processing Platform APIs integrate with OAuth 2.0 for authentication and authorization.
The configuration and management of HTTPS endpoints are also outside the scope of this documentation.
Configuration of Authentication for API services
Backend APi services (SFApi, SFGraphQLApi) support this configuration properties.| Environment variable name | Values | Description |
|---|---|---|
| Authentication__UseAuthentication | "true" or "false" | Whether authentication is enabled/required by backend API service. |
| Authentication__Authority | url | Specifies the base URL of the identity provider (authorization server) that issues and validates tokens. |
| Authentication__Audience | url | Not mandatory. Required by some authorization servers (e.g. OAuth). Identifies the intended recipient of the issued access token, typically the Video Processing Platform API itself, and ensures the token cannot be used for unintended services, or that another token intended for other service is not misused. |
Configuration for built-in Swagger Web UI
Following parameters are required for built-in Swagger web API client, typically used by developers during integration.
| Environment variable name | Values | Description |
|---|---|---|
| Authentication__SwaggerAuthConfig__ClientCredsTokenUrl | url | Endpoint where the client application directly requests an access token using only its client ID and client secret. |
| Authentication__SwaggerAuthConfig__AuthCodeTokenUrl | url | Endpoint where the client exchanges the authorization code (obtained after the user logs in via the authorize URL) for an access token. |
| Authentication__SwaggerAuthConfig__AuthCodeAuthorizeUrl | url | Endpoint to initiate the authorization flow. |