Advanced Features
To get the most ouf of the Video Processing Platform we provide you guides on how to use several advanced features that you might find useful.
Video Processing Platform Enhanced Preview for external use
The Video Processing Platform can produce enhanced video enriched with information about detected faces or objects; bounding boxes are rendered to original video. We call this the Enhanced Preview.
The Video Processing Platform enhances the RTSP stream from a camera and while it does it’s processing, such as detecting and matching faces, detecting and analysing pedestrians and objects, it also renders the information into the preview video. This enhanced information consists of bounding boxes for faces, pedestrians and objects and also it provides another information, such as the name of the matched person, age and gender estimation and many more. Such video is available in the Video Processing Platform Station.
We can actually use this enhanced video as an input into another systems and integrations. This might be useful for your VMS systems, streaming into monitoring systems or into your AR glasses. It generates a tcp stream with enhanced video preview for each stream from the Camera. The stream is encoded in MPEG-1 format.
Quality of encoded streams can be defined separately for each camera. If the stream is encoded, you can access it via defined port: tcp://<server_name>:<camera_preview_port>(e.g. tcp://localhost:30011/)
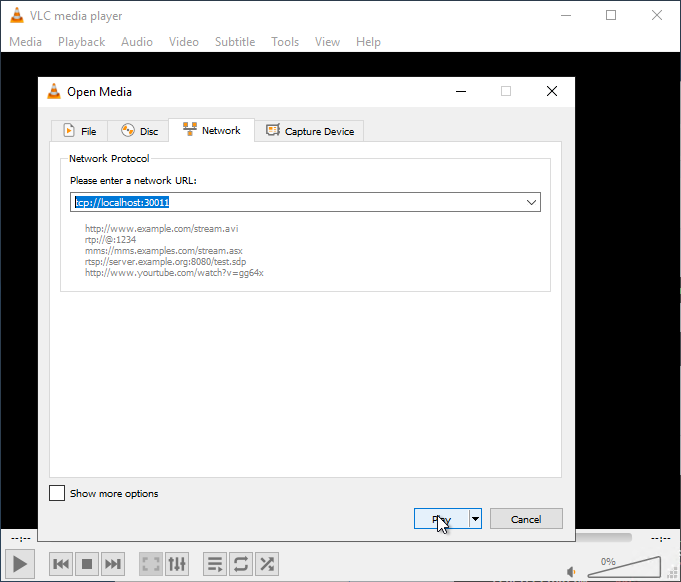
Use VLC player to preview the stream
For more information about how to use the VLC Player to watch the Enhanced Preview read here.
Camera stream preview configuration
To enable stream preview and define the quality of the stream, use the REST API PUT /api/v1/Cameras endpoint
Preview configuration in the camera definition
  {
    ...
      "mpeG1PreviewEnabled": true, 	// "true" or "false"
      "mpeG1PreviewPort": 30011,
      "mpeG1VideoBitrate": 1400000,
      "previewMaxDimension": 1280,
    ...
  }
| Parameter | Description | Value |
|---|---|---|
| mpeG1PreviewEnabled | Enhanced camera stream preview enabling. | Set true, to enable the preview. |
| mpeG1PreviewPort | TCP port where the stream will be available. | Default value is generated by the platform: 30000 + camera_number (e.g. for SFCam1 the preview port is set to 30001) |
| mpeG1VideoBitrate | Maximum bitrate for encoded preview stream. Lower value = lower quality. | Low quality: 153000Medium quality: 450000`` (default)<br>High quality: 1400000` |
| previewMaxDimension | Encoded preview stream resolution. Longer side of the input stream. | Low quality: 426pxMedium quality: 640px (default)High quality: 1280px |
When preview port is specified in the create/update camera request, then the enhanced preview will be available on this port.
When not specifying preview port in the create request, then REST API calculates the preview port based on Camera sequence number, starting at 30 001. That means that the first camera created will use preview port 30 001, the second will use 30 002 and so on. This mechanism is good for eliminating port collisions when Video Processing Platform runs natively on a single host (e.g. Windows deployment).
API can be configured to use a static port when creating new cameras with CameraDefaults configuration in Video Processing Platform.Api.appsettings.json :
"CameraDefaults": {
  "PreviewPort": null
},
Default value of PreviewPort is null and in this case, the REST API performs the Camera sequence calculation as described above. When any other value is provided, then the provided value is used for newly created cameras.
When running in containerized workflow (Docker installation) we don’t need to handle port collisions, and on the other hand a more predictable assigning ports to camera entities is useful for configuring the infrastructure. The preview port can also be configured by setting value to env variable CameraDefaults__PreviewPort
The inner port of the camera service is being exposed by setting the docker-compose.yml configuration for each camera. You can adjust the port being used adjusting the binded port to the ${CameraDefaults__PreviewPort} variable.
ports:
      - 30003:${CameraDefaults__PreviewPort}
The port is set as 30003 in the case above. The full settings for a camera would look like this:
  sf-cam-3:
    image: ${REGISTRY}sf-cam:${SF_VERSION}
    container_name: SFCam1
    command: --serviceName SFCam1
    ports:
      - 30003:${CameraDefaults__PreviewPort}
    restart: unless-stopped
    environment:
      - RabbitMQ__Hostname
      - RabbitMQ__Username
      - RabbitMQ__Password
      - RabbitMQ__Port
      - RabbitMQ__VirtualHost
      - RabbitMQ__UseSsl
      - ConnectionStrings__CoreDbContext
      - Database__DbEngine
      - AppSettings__Log_RollingFile_Enabled=false
      - AppSettings__USE_JAEGER_APP_SETTINGS
      - JAEGER_AGENT_HOST
      - S3Bucket__Endpoint
      - S3Bucket__BucketName
      - S3Bucket__AccessKey
      - S3Bucket__SecretKey
    volumes:
      - "./iengine.lic:/etc/innovatrics/iengine.lic"
Preview quality configuration in the Video Processing Platform Station
To enable the external preview we need to ensure the preview is allowed and we need to configure the resolution and bit rate for each camera. The PREVIEW QUALITY can be set directly in the Video Processing Platform Station for each camera in the camera configuration section.
There are 3 presets
- Low (height: 426 px, bit rate: 153,000)
- Medium (height: 640 px, bit rate: 450,000)
- High (height: 1280 px, bit rate: 1,400,000).
You can set it also manually via the REST API using the /api/v1/Cameras endpoint. Please ensure it is enabled using the mpeG1PreviewEnabled parameter being true. Specifying the mpeG1VideoBitrate, previewMaxDimension allows you to set a custom preview configuration.
Object bounding box color
In the Video Processing Platform enhanced camera stream preview, different bounding boxes can appear:
- detected face bounding box - default color is yellow (#ECEC5E)
- identified person bounding box - default color is green (#4ADF62)
- identified person from restricted watchlist bounding box - default color is red (#57514C)
- detected pedestrian bounding box - default color is blue (#80B5FF)
- detected common object bounding box - default color is purple (#E638D3)
To change default color for detected faces, pedestrians and common objects bounding boxes, use REST API endpoint: /api/v1/Setup/Preview
  {
    "faceBoundingBoxColor": "#ecec5e",
    "pedestrianBoundingBoxColor": "#80b5ff",
    "objectBoundingBoxColor": "#e638d3"
  }
To change the default color value for an identified person from the watchlist, use the REST API PUT /api/v1/Watchlist endpoint
Identified person bounding box color in watchlist definition:
  ...
  "previewColor": "#4adf62",
  ...
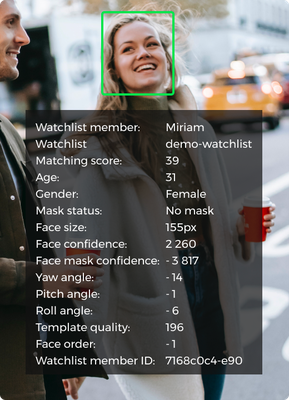
Preview attributes
In addition to bounding boxes, the Video Processing Platform can display different object attributes on a semitransparent placeholder. You can define separately, what attributes will be displayed for each camera stream preview.
To set the font size and each attribute visibility in the stream preview, use REST API endpoint: /api/v1/Cameras
Preview attributes visibility configuration in the camera definition (default values):
  {
    ...
    "previewAttributesConfig": {
      "textFontSize": 12,
      "order": false,      // "true" or "false"
      "size": false,
      "quality": false,
      "yawAngle": false,
      "pitchAngle": false,
      "rollAngle": false,
      "watchlistMemberId": false,
      "watchlistMemberName": true,
      "watchlistName": true,
      "matchingScore": true,
      "age": false,
      "gender": false,
      "templateQuality": false,
      "faceMaskStatus": false,
      "faceMaskConfidence": false
    }
    ...
  }
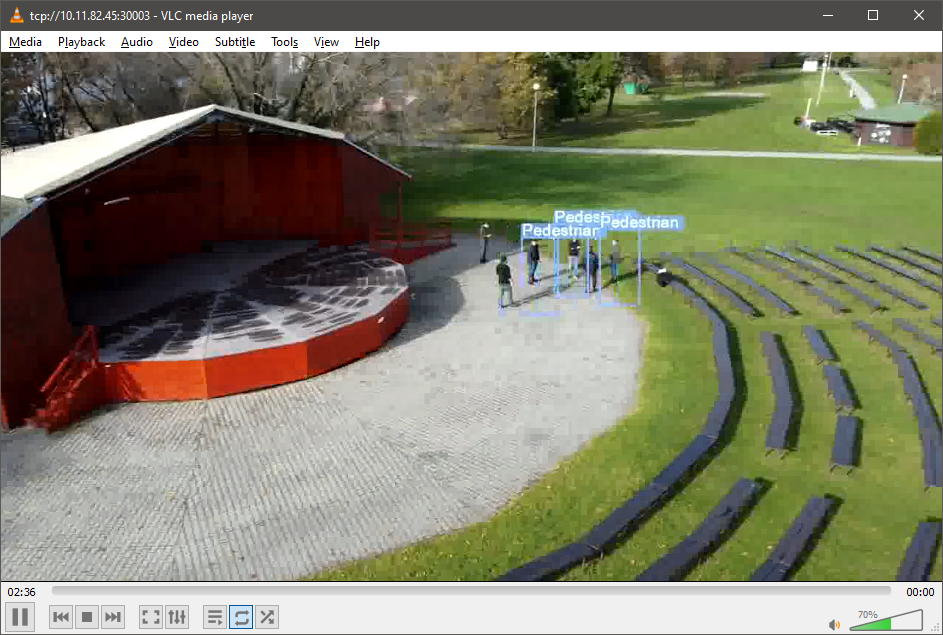
Watching the Enhanced Preview in VLC
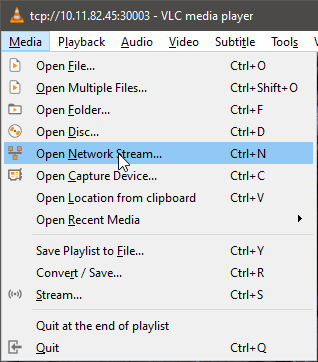
Once we have ensured the preview is generated and camera service runs, we can use the knowledge of the port in an external application, such as VLC.
In the VLC, click on Media, then Open Network Stream.
Please enter a network URL: use the tcp:// protocol as a prefix to your URL. Such as the sample value tcp://10.11.82.45:30003.
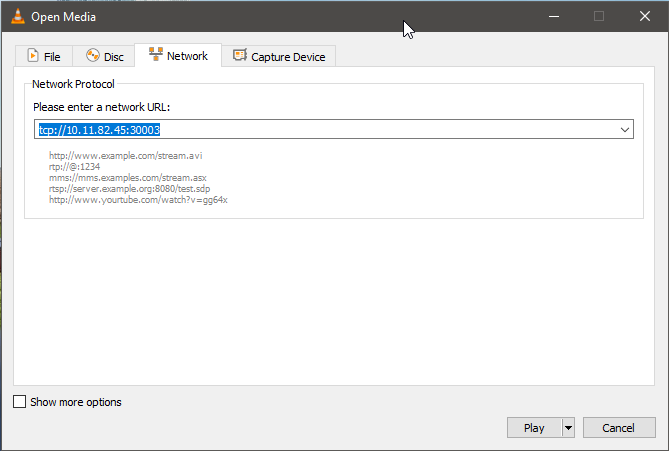
This will load the data directly into VLC, you can observe an enhanced video stream.
This way you can add the enhanced video into your own applications, such as your favourite VMS.
Body Parts Detection
As of version Video Processing Platform v5_4.26 we do not provide the Body Parts Detection anymore. This feature is deprecated. If more information is needed, please contact us.
Face Search
The Face Search is an advanced feature of the Video Processing Platform. You can read more about it here.
Face search request
To perform Face Search on all detected faces you need to make a face matching request through REST API via endpoint: POST /api/v1/Faces/Search
Example of a search request:
{
  "image": {
    "data": "base64 encoded image"
  },
  "threshold": 40,
  "faceDetectorConfig": {
    "minFaceSize": 30,
    "maxFaceSize": 500,
    "confidenceThreshold": 600
  },
  "faceDetectorResourceId": "cpu",
  "templateGeneratorResourceId": "cpu"
}
For the faceDetectorResourceId parameter you can use “cpu” or “gpu” or “accurate_cpu” or “accurate_gpu” options. For templateGeneratorResourceId parameter you can use “cpu” or “gpu”.
Example of search response:
{
  "searchSessionId": "3fa85f64-5717-4562-b3fc-2c963f66afa6"
}
The response contains SearchSessionId which can be used to query data via GraphQL API.
All match results are stored in the database, and each search request will create:
- SearchSession object in database, which identifies each search by its searchSessionId.
- SearchSessionObject for each matched face above requested threshold
Querying face search results
Only GraphQL can be used to query for results of face search functionality. You can either traverse SearchSessionObjects and its linked Faces or vice versa.
Example of GraphQL query:
query {
  faces (where: { searchSessionObjects: { some: { searchSessionId: { eq:"3fa85f64-5717-4562-b3fc-2c963f66afa6"}}}}) {
    items {
      imageDataId
      age
      gender
      createdAt
    }
  }
}
Deleting face search results data
The face search feature can produce large amounts of SearchSessionObjects data, which can lead to reduced performance when querying data.
You can setup cleanup process of this data by making request through REST API via endpoint: /api/v1/Setup/SearchSessionsCleanup
Example of search results cleanup process configuration request:
{
  "enabled": true,
  "maxItemsCount": 100000000,
  "maxSessionAge": "7.00:00:00",
  "interval": "01:00:00"
}
| Property | Property type | Property summary | Valid values | Default values |
|---|---|---|---|---|
| Interval | TimeSpan or null | The interval of cleanup. | 01:00:00 | |
| MaxSessionAge | TimeSpan or null | The maximum age of Search sessions which will be stored. When the cleanup runs, all Search sessions older than MaxSessionAge will be removed. | 7.00:00:00 | |
| MaxItemsCount | integer or null | The maximum count of Search sessions items (associations between search session and matched face) for which the Search sessions will be stored. When the cleanup runs, the count of Search sessions to delete to meet this constraint is computed and afterwards these Search sessions will be removed. releases:
| Greater than zero or null | 100000000 |
Grouping
The Grouping is an advanced feature of the Video Processing Platform. You can read more about it here.
On a single Video Processing Platform node one or many Groupings can be continously performed with different configuration each. One Grouping can contain one or many cameras.
Start with Grouping
Create Grouping
In order to start your first Grouping, you need to define at least one Grouping (group of cameras). Execute request through REST API via endpoint: POST /api/v1/LiveGroupings
Example of a request:
{
  "config": {
    "step": 600,
    "slidingWindow": 3600,
    "threshold": 0
  },
  "description": "string"
}
| Property | Property type | Property summary |
|---|---|---|
step | seconds | Defines how often grouping will be executed |
slidingWindow | seconds | Defines how far from history should grouping consider existing faces/individuals from database to grouping |
threshold | Number | Defines grouping threshold which represent similarity threshold for faces to be considered as part of same group if their matching score is above this threshold. |
Request above will create a Grouping that executes every 600 seconds (every 10 minutes) and aggregates all faces detected in last 3600 seconds (1 hour) and merges them into new Individuals or Individials created within 3600 seconds (1 hour).
Add cameras to Grouping
Take the ID of Grouping you created in the previous step and link required camera(s) to it with request through REST API via endpoint: POST /api/v1/LiveGroupings/{groupingId}/LinkCameras
Example of a request:
{
  "ids": [
    "3fa85f64-5717-4562-b3fc-2c963f66afa6",
    "fe1f28f0-9426-11ee-b9d1-0242ac120002"
  ]
}
| Property | Property type | Property summary |
|---|---|---|
ids | Array[] | Array of Camera IDs |
Get Grouping results
An one or more Individuals are results of each Grouping. The list of Individuals can be retrieved with request through REST API via endpoint: GET /api/v1/LiveGroupings/{groupingId}/Individuals
Global Configuration
Live grouping is executed inside Grouping service: SFGroup on Windows or sf-group service in Docker. A global grouping configuration that applies for each Grouping is available. Configurable properties:
| Property | Property type | Property summary |
|---|---|---|
UpdateTimeMs | Miliseconds | Defines how often will grouping worker thread check whether it should execute groupings. |
DelayOffsetMs | Miliseconds | Defines delay time to add before each execution of individual grouping. More info about why this delay is needed and why is necessary is explained in section below. |
Global grouping configuration on a Windows
On a Windows installation you can adjust the Video Processing Platform.Grouping.appsettings.json located in your installation directory. In a default installation it is located in C:\Program Files\Innovatrics\Video Processing Platform. Choose another algorithm and write it instead of balanced.
"LiveGrouping": {
  "UpdateTimeMs": 15000,
  "DelayOffsetMs": 30000
},
After a change you need to restart the SFGroup service
Global grouping configuration on a Linux/Docker
On a Docker/Linux installation you can easily adjust the configuration in the docker-compose.yml file by adjusting the environment variable for the grouping service
LiveGrouping__UpdateTimeMs=15000
LiveGrouping__DelayOffsetMs=30000
  sf-group:
    image: ${REGISTRY}sf-grouping:${SF_VERSION}
    container_name: SFGroup
    command: --serviceName SFGroup
    restart: unless-stopped
    environment:
      - RabbitMQ__Hostname
      - RabbitMQ__Username
      - RabbitMQ__Password
      - RabbitMQ__Port
      - RabbitMQ__VirtualHost
      - RabbitMQ__UseSsl
      - ConnectionStrings__CoreDbContext
      - Database__DbEngine
      - AppSettings__Log_RollingFile_Enabled=false
      - AppSettings__USE_JAEGER_APP_SETTINGS
      - JAEGER_AGENT_HOST
      - S3Bucket__Endpoint
      - S3Bucket__BucketName
      - S3Bucket__AccessKey
      - S3Bucket__SecretKey
      - NoSqlDataStorageDisabled
      - LiveGrouping__UpdateTimeMs=15000
      - LiveGrouping__DelayOffsetMs=30000
    volumes:
      - "./iengine.lic:/etc/innovatrics/iengine.lic"
To apply the changes you need to restart and/or update the extractor service. You can do so by running one of these commands:
docker-compose up -d
Limitations of Grouping
Due to asynchronous nature of how Video Processing Platform handles events and RMQ communication, few problems may occur in LiveGrouping process. Events from RMQ about detected faces may either :
- Be posted to queue with delay (due to process connectivity issue to RMQ broker)
- Be processed from queue with slight delay that is defined in message itself time of detection (processing + insertion to database may take some time)
- There can be slight system time synchronization differences between individual nodes (in multinode setup)
Due to these problems it is recommended to set some additional delay via setting DelayOffsetMs to grouping process to eliminate cases when grouping is executed before all events are written and present into database. If for some reason event will be inserted into database later than specified delay, we currently do not guarantee that this face will be included into account in LiveGrouping properly.