Loading...
Searching...
No Matches
Enrollment
Overview
The library for applicant enrollment. The main purpose is to process images of print, iris, face modalities in various formats and create Applicant object suitable for further processing. The library provides following features to create Applicant:
Some features of library can be extended/adapted to user needs via implementation of provided interfaces of features. All available interfaces that can be used to customize are described in Extending SDK.
We provides wrappers for
The SDK can execute functionality in same process in which it is used or in provided server. The following functionalities can be executed on server:
Runtime Requirements
Linux
- The glibc version MUST be 2.17 or higher (e.g., CentOS 7 and above).
- The processor MUST support the AVX2 instruction set.
- The system architecture MUST be x86_64 (64-bit).
- The libusb MUST be installed
Windows
- The minimum supported version is Windows Vista SP2 or Windows Server 2008 SP2.
- The processor MUST support the AVX2 instruction set.
- The system architecture MUST be x86_64 (64-bit) or x86 (32-bit).
- Note
- In the case of x86 (32-bit) architecture, the Iris, Face and Print Embedding functionalities are NOT supported.
Android
- The Android version MUST be 5.0 or higher, which corresponds to API level 21.
Installation
We provide isolated installation. All necessary shared libraries are installed with Enrollment SDK. The libraries are available only for Enrollment SDK and do not influence other SDKs. Also other SDKs do not influence Enrollment SDK installation.
We provide more variants of Enrollment SDK. Only one variant can be installed on device/PC. It is ensured by installation process.
Reducing installation size
The Enrollment SDK installation package includes large binary files *.solver, *.nnkitsolver that can be removed if they are not in use. For more details, refer to section Solvers.
Linux
- Isolated installation
- We use rpath to isolate Enrollment SDK.
The RPM installation uses ldconfig to add installed library into cache that is used by the run-time linker, ld.so or ld-linux.so.
- Variant
- On Linux package name is different between SDK variants. The variant is part of package name. In rpm specification file all variants provide the same name on which they all conflict. It ensures that only one variant can be installed in system. The maintainer MUST manually uninstall previous variant when he/she needs to install other one. The same variant can be updated without problem.
Let assume that maintainer already installed Enrollment SDK in DEV variant with commandand he/she needs to install other variant, general oneyum install innovatrics-enrollment-sdk-devthen yum will report erroryum install innovatrics-enrollment-sdkto fix error maintainer MUST remove previous variant manuallyError: innovatrics-enrollment-sdk conflicts with innovatrics-enrollment-sdk-dev-7.0.3-1.el7.x86_64Error: innovatrics-enrollment-sdk-dev conflicts with innovatrics-enrollment-sdk-7.0.3-1.el7.x86_64yum remove innovatrics-enrollment-sdk-dev
Windows
- Isolated installation
- We use concepts of isolated applications to achieve isolated Enrollment SDK. The dependant libraries contains embedded manifest to force windows to use assembly search sequence instead of dll search order to locate dependant DLLs. For troubleshooting use sxstrace.exe:
- sxstrace Trace -logfile:log.bin -nostop
- run investigated application
- sxstrace Stoptrace
- sxstrace Parse -logfile:log.bin -outfile:log.log
- Variant
- On Widows all variants have same GUID. Windows installer will ensure that only one installation is presented on system.
Initialization
The Enrollment SDK initialization can be
- automatic
- manual
Once automatic initialization is applied then manual initialization is not possible. Automatic initialization is done on library load when all prerequisites are fulfilled
- iengine.lic license file is found
- solvers (neural network models) exist at
iface/modelsnext to the loaded library; see Solvers for package layout and discovery
To suppress automatic initialization even if all prerequisites are satisfied set INNO_ENROLLMENT_SDK_MANUAL_INITIALIZATION to one of these case-insensitive values: 1, true, on, manual, enable, enabled before your application starts.
It is uncommon for all prerequisites to be fulfilled at application startup on Android. However, if this is your use case, you can suppress automatic initialization by calling:
android.system.Os.setenv("INNO_ENROLLMENT_SDK_MANUAL_INITIALIZATION", "1", true);
before invoking:
enrollment.LoadLibrary();
A valid reason to disable automatic initialization is to gain full control over when the Enrollment SDK is initialized. This allows you to provide a custom configuration instead of relying on the default configuration used during automatic initialization.
By default, the Enrollment SDK initializes itself automatically when the shared library is loaded.
If you need to control OpenCV or ONNX Runtime thread counts before the SDK loads its models, suppress auto-init and explicitly initialize the SDK with a custom configuration. Automatic initialization may not be suitable when some prerequisites are unavailable at startup or when full control over the SDK configuration is required. In such cases, initialize the SDK explicitly using either Initialize(std::vector<uint8_t> license, std::string modelsPath) or Initialize(const InitializerConfig& config). The initialization functions can only be called once during the lifetime of the process. The Enrollment SDK also provides the helper functions DefaultModelsDirectory() and FindLicenseFile(), which can be used to populate the default paths in the initialization configuration.
For Java-specific initialization requirements (loading native libraries before any SDK call), see the initialization section of the Java binding documentation.
-
c++const auto cfg = inno::InitializerConfigBuilder().SetLicensePath(inno::FindLicenseFile()).SetModelsPath(inno::DefaultModelsDirectory()).SetFaceIrisOpencvThreads(4).SetFaceIrisOrtIntraThreads(4).SetFaceIrisOrtInterThreads(1).Build();inno::Initialize(cfg);// SDK is now fully initialised with the requested thread counts.// Proceed with normal face / iris / fingerprint operations.
-
java EnrollmentInitializer.LoadNativeLibrary(()-> new InitializerConfigBuilder().SetLicensePath(enrollment.FindLicenseFile()).SetModelsPath(enrollment.DefaultModelsDirectory()).SetFaceIrisOpencvThreads(4).SetFaceIrisOrtIntraThreads(4).SetFaceIrisOrtInterThreads(1).Build());// SDK is now fully initialized with the requested thread counts.// Proceed with normal face / iris / fingerprint operations.
-
csharp using (var builder = new InitializerConfigBuilder()){var cfg = builder.SetLicensePath(enrollment.FindLicenseFile()).SetModelsPath(enrollment.DefaultModelsDirectory()).SetFaceIrisOpencvThreads(4).SetFaceIrisOrtIntraThreads(4).SetFaceIrisOrtInterThreads(1).Build();enrollment.Initialize(cfg);}// SDK is now fully initialised with the requested thread counts.// Proceed with normal face / iris / fingerprint operations.
Licensing
The license file iengine.lic prerequisite must be added into one of following directories to be possible to initialize SDK on load time:
- Linux
- Per Application: current working directory
- Per User: ~/.innovatrics/
- Per System: /etc/innovatrics/
- Windows
- Per Application: current working directory
- Per User: %LOCALAPPDATA%/Innovatrics/
- Per System: C:/ProgramData/Innovatrics/
The search follows this priority:
- Application directory
- User directory
- System directory
Otherwise user MUST provide content of license via function Initialize(). The HWID for generating license can be obtained by SDK function HardwareID().
Dongle license
If you are using dongle-based licensing, you will receive a license file that is paired with one or more dongles.
The dongle must be connected before starting the application or calling the Initialize() function. It must remain connected throughout the entire runtime of the application.
Applicant
Applicant represent enrolled person. It holds person biometric data, images, qualities. Once you finished Applicant enrollment you can save its ModalitiesTemplate for further processing. For details see Store,Load Applicant biometrics representations.
Prints
We can add Fingerprints/fingertips from SlapCapture,Thumbs/Palms.
-
c++const auto dpi = 1000;// Segment SlapAlgorithmicSegmentation segmentation(AlgorithmicSegmentation::Config::Default());// Create Applicant and fill it with segmented PrintsApplicant applicant;// Create ICSExtractor for calculating Template for segmented printsICSExtractor extractor;for (auto& segment : slap->SegmentWith(segmentation)){if (not segment->HasPosition()){// Set position manually. May be ask operator for position.// It is not possible to create Print without position.// In this example all segments have position.}// create fingerprintauto fp = segment->ToPrint();// Put segmented fingers into applicant with their template}applicant.AddSlap(slap);
-
java final int dpi = 1000;Image img = Image.Decode(BinaryFile.ReadAll("assets/slap.png"), dpi);SlapCapture slap = SlapCapture.Create(img, HandPosition.RIGHT);// Segment SlapAlgorithmicSegmentation segmentation = new AlgorithmicSegmentation();// Create Applicant and fill it with segmented PrintsApplicant applicant = new Applicant();// Create ICSExtractor for calculating Template for segmented printsICSExtractor extractor = new ICSExtractor();for (PrintSegment segment : slap.SegmentWith(segmentation)) {if (segment.HasPosition() == false) {// Set position manually. May be ask operator for position.// It is not possible to create Print without position.// In this example all segments have position.}// create fingerprintPrint fp = segment.ToPrint();// Put segmented fingers into applicant with their template}applicant.AddSlap(slap);
-
csharp uint dpi = 1000;Image img = Image.Decode(BinaryFile.ReadAll("assets/slap.png"), dpi);SlapCapture slap = SlapCapture.Create(img, HandPosition.RIGHT);// Segment SlapAlgorithmicSegmentation segmentation = new AlgorithmicSegmentation();// Create Applicant and fill it with segmented PrintsApplicant applicant = new Applicant();// Create ICSExtractor for calculating Template for segmented printsICSExtractor extractor = new ICSExtractor();{{// Set position manually. May be ask operator for position.// It is not possible to create Print without position.// In this example all segments have position.}// create fingerprintPrint fp = segment.ToPrint();// Put segmented fingers into applicant with their template}applicant.AddSlap(slap);
Print flattening
We provide check for wrong enrollment. Print is valid in following scenarios:
- When has same position and Similarity Score is above or equal Similarity Threshold given in constructor for same position
- When has different position and Similarity Score is below or equal Similarity Threshold given in constructor for different position.
-
c++auto enrolled = applicant.AddUniquePrint(enrolling);if (enrolled != nullptr){// The print is invalidauto enrolledPos = enrolled->print->position;auto enrollingPos = enrolling->print->position;if (enrolledPos == enrollingPos){std::cout << " Dissimilar print on same position " << enrolledPos<< std::endl;}else{std::cout << " Similar print on position " << enrolledPos<< " with position " << enrollingPos << std::endl;}}
-
java ExtractedPrint enrolled = applicant.AddUniquePrint(enrolling);if (enrolled != null) {// The print is invalidPrintPosition enrolledPos = enrolled.getPrint().getPosition();PrintPosition enrollingPos = enrolling.getPrint().getPosition();if (enrolledPos == enrollingPos) {System.out.println(" Dissimilar print on same position " + enrolledPos);} else {System.out.println(" Similar print on position " + enrolledPos+ " with position " + enrollingPos);}}
-
csharp ExtractedPrint enrolled = applicant.AddUniquePrint(enrolling);if (enrolled != null){// The print is invalidPrintPosition enrolledPos = enrolled.print.position;PrintPosition enrollingPos = enrolling.print.position;if (enrolledPos == enrollingPos){System.Console.WriteLine(" Dissimilar print on same position " +enrolledPos);}else{System.Console.WriteLine(" Similar print on position " + enrolledPos +" with position " + enrollingPos);}}
Custom Print validation
The SDK provides possibility to add only Print that pass client specific Print validation. The client can implement interface ApplicantPrintValidation and use it in Applicant::AddValidPrint.
Faces
We can add multiple faces to applicant.
-
c++auto fc = FaceCapture::Create(std::move(img));FaceDetector fd;// Detect faceauto faces = fc->DetectWith(fd);Applicant applicant;// Put face into applicantif (not faces.empty()){applicant.AddFace(faces[0]->Extract());}
-
java Image img = Image.Decode(BinaryFile.ReadAll("assets/face.png"));FaceCapture fc = new FaceCapture(img);FaceDetector fd = new FaceDetector();// Detect faceFaces faces = fc.DetectWith(fd);Applicant applicant = new Applicant();// Put face into applicantif (faces.size() > 0) {applicant.AddFace(faces.get(0).Extract());}
-
csharp Image img = Image.Decode(BinaryFile.ReadAll("assets/face.png"));FaceCapture fc = new FaceCapture(img);FaceDetector fd = new FaceDetector();// Detect faceFaces faces = fc.DetectWith(fd);Applicant applicant = new Applicant();// Put face into applicantif (faces.Count > 0){applicant.AddFace(faces[0].Extract());}
Custom Face validation
The SDK provides possibility to add only Face that pass client specific Face validation. The client can implement interface ApplicantFaceValidation and use it in Applicant::AddValidFace.
-
c++class CustomFaceValidation : public ApplicantFaceValidation{public:bool Validate(const std::shared_ptr<ExtractedFace>& probe,const std::vector<std::shared_ptr<ExtractedFace>>& /* gallery */) final{// probe is valid when all attributes pass ICAO checkICAOReliability icao;return icao.Validate(probe->face).empty();}};static void ApplicantIcaoReliability(){auto face = ExtractFace();auto applicant = Applicant();auto faceValidation = CustomFaceValidation();if (not applicant.AddValidFace(face, faceValidation)){std::cout << " Face does not fullfil ICAO requirement" << std::endl;}}
-
java class CustomFaceValidation extends ApplicantFaceValidation {public boolean Validate(ExtractedFace probe, ExtractedFaces gallery) {// probe is valid when all attributes pass ICAO checkICAOReliability icao = new ICAOReliability();return icao.Validate(probe.getFace()).isEmpty();}};public void ApplicantIcaoReliability() {ExtractedFace face = ExtractFace();Applicant applicant = new Applicant();CustomFaceValidation faceValidation = new CustomFaceValidation();System.out.println(" Face does not fullfil ICAO requirement");}}
-
csharp class CustomFaceValidation : ApplicantFaceValidation{public override bool Validate(ExtractedFace probe, ExtractedFaces gallery){// probe is valid when all attributes pass ICAO checkICAOReliability icao = new ICAOReliability();}};public void ApplicantIcaoReliability(){ExtractedFace face = ExtractFace();Applicant applicant = new Applicant();CustomFaceValidation faceValidation = new CustomFaceValidation();{System.Console.WriteLine(" Face does not fullfil ICAO requirement");}}
Irises
We can add multiple irises to applicant.
-
c++IrisDetector id;// Detect irisauto iris = ic->DetectWith(id)->iris;auto irisTemplate = iris->Extract();Applicant applicant;// Put iris into applicantapplicant.AddIris(irisTemplate);
-
java Image img = Image.Decode(BinaryFile.ReadAll("assets/eye_L.png"));IrisCapture ic = new IrisCapture(img, IrisPosition.LEFT_EYE);IrisDetector id = new IrisDetector();// Detect irisIrisSegment segment = ic.DetectWith(id);Applicant applicant = new Applicant();// Put iris into applicantif (segment != null) {applicant.AddIris(segment.getIris().Extract());}
-
csharp Image img = Image.Decode(BinaryFile.ReadAll("assets/eye_L.png"));IrisCapture ic = new IrisCapture(img, IrisPosition.LEFT_EYE);IrisDetector id = new IrisDetector();// Detect irisIrisSegment segment = ic.DetectWith(id);Applicant applicant = new Applicant();// Put iris into applicantif (segment != null){}
Verification
The probe and gallery Applicant can be verified by
- convenient function Applicant::SimilarWith() - it is not efficient when it is used to verify more applicants because it always create ModalitiesTemplate.
- converting probe and gallery Applicant to ModalitiesTemplate and using this templates for verification. Use function Applicant::ToTemplate() to prepare ModalitiesTemplate for matching. For details see 1 to 1 Modalities Verification.
You can verify Applicant with any combinations of modalities (e.g. only prints).
-
c++ICSExtractor extractor;auto extractedPrint1 = extractor.Extract(print1);Applicant probe;probe.AddPrint(extractedPrint1);auto extractedPrint2 = extractor.Extract(print2);Applicant gallery;gallery.AddPrint(extractedPrint2);ModalitiesVerifyMatcher matcher;auto scores = probe.SimilarWith(gallery, matcher);<< scores.GetFaceScore() << ", irises " << scores.GetIrisScore()<< std::endl;
-
java Image printImg1 = Image.Decode(BinaryFile.ReadAll("assets/s1_li.png"));Print print1 = new Print(printImg1, PrintPosition.LEFT_INDEX);ICSExtractor extractor = new ICSExtractor();ExtractedPrint extractedPrint1 = extractor.Extract(print1);Applicant probe = new Applicant();probe.AddPrint(extractedPrint1);Image printImg2 = Image.Decode(BinaryFile.ReadAll("assets/s2_li.png"));Print print2 = new Print(printImg2, PrintPosition.LEFT_INDEX);ExtractedPrint extractedPrint2 = extractor.Extract(print2);Applicant gallery = new Applicant();gallery.AddPrint(extractedPrint2);ModalitiesVerifyMatcher matcher = new ModalitiesVerifyMatcher();ModalityScore scores = probe.SimilarWith(gallery, matcher);
-
csharp var printImg1 = Image.Decode(BinaryFile.ReadAll("assets/s1_li.png"));var print1 = new Print(printImg1, PrintPosition.LEFT_INDEX);var extractor = new ICSExtractor();var extractedPrint1 = extractor.Extract(print1);var probe = new Applicant();probe.AddPrint(extractedPrint1);var printImg2 = Image.Decode(BinaryFile.ReadAll("assets/s2_li.png"));var print2 = new Print(printImg2, PrintPosition.LEFT_INDEX);var extractedPrint2 = extractor.Extract(print2);var gallery = new Applicant();gallery.AddPrint(extractedPrint2);var matcher = new ModalitiesVerifyMatcher();var scores = probe.SimilarWith(gallery, matcher);System.Console.WriteLine(" prints " + scores.GetPrintScore() + ", faces " +scores.GetFaceScore() + ", irises " +scores.GetIrisScore());
You can verify Applicant with all modalities.
-
c++ICSExtractor extractor;auto extractedPrint = extractor.Extract(print);auto faceCapture = FaceCapture::Create(std::move(faceImg));FaceDetector faceDetector;auto face = faceCapture->DetectWith(faceDetector)[0];auto extractedFace = face->Extract();auto irisCapture =IrisCapture::Create(std::move(irisImg), IrisPosition::LEFT_EYE);IrisDetector irisDetector;auto irisSegment = irisCapture->DetectWith(irisDetector);auto extractedIris = irisSegment->iris->Extract();Applicant probe;probe.AddPrint(extractedPrint);probe.AddFace(extractedFace);probe.AddIris(extractedIris);Applicant gallery;gallery.AddPrint(extractedPrint);gallery.AddFace(extractedFace);gallery.AddIris(extractedIris);ModalitiesVerifyMatcher matcher;auto scores = probe.SimilarWith(gallery, matcher);<< scores.GetFaceScore() << ", irises " << scores.GetIrisScore()<< std::endl;
-
java Image printImg = Image.Decode(BinaryFile.ReadAll("assets/finger.png"));Print print = new Print(printImg, PrintPosition.LEFT_INDEX);ICSExtractor extractor = new ICSExtractor();ExtractedPrint extractedPrint = extractor.Extract(print);Image faceImg = Image.Decode(BinaryFile.ReadAll("assets/faces.png"));FaceCapture faceCapture = new FaceCapture(faceImg);FaceDetector faceDetector = new FaceDetector();Face face = faceCapture.DetectWith(faceDetector).get(0);ExtractedFace extractedFace = face.Extract();Image irisImg = Image.Decode(BinaryFile.ReadAll("assets/eye_L.png"));IrisCapture irisCapture = new IrisCapture(irisImg, IrisPosition.LEFT_EYE);IrisDetector irisDetector = new IrisDetector();IrisSegment irisSegment = irisCapture.DetectWith(irisDetector);ExtractedIris extractedIris = irisSegment.getIris().Extract();Applicant probe = new Applicant();probe.AddPrint(extractedPrint);probe.AddFace(extractedFace);probe.AddIris(extractedIris);Applicant gallery = new Applicant();gallery.AddPrint(extractedPrint);gallery.AddFace(extractedFace);gallery.AddIris(extractedIris);ModalitiesVerifyMatcher matcher = new ModalitiesVerifyMatcher();ModalityScore scores = probe.SimilarWith(gallery, matcher);
-
csharp var printImg = Image.Decode(BinaryFile.ReadAll("assets/finger.png"));var print = new Print(printImg, PrintPosition.LEFT_INDEX);var extractor = new ICSExtractor();var extractedPrint = extractor.Extract(print);var faceImg = Image.Decode(BinaryFile.ReadAll("assets/faces.png"));var faceCapture = new FaceCapture(faceImg);var faceDetector = new FaceDetector();var face = faceCapture.DetectWith(faceDetector)[0];var extractedFace = face.Extract();var irisImg = Image.Decode(BinaryFile.ReadAll("assets/eye_L.png"));var irisCapture = new IrisCapture(irisImg, IrisPosition.LEFT_EYE);var irisDetector = new IrisDetector();var irisSegment = irisCapture.DetectWith(irisDetector);var extractedIris = irisSegment.iris.Extract();var probe = new Applicant();probe.AddPrint(extractedPrint);probe.AddFace(extractedFace);probe.AddIris(extractedIris);var gallery = new Applicant();gallery.AddPrint(extractedPrint);gallery.AddFace(extractedFace);gallery.AddIris(extractedIris);var matcher = new ModalitiesVerifyMatcher();var scores = probe.SimilarWith(gallery, matcher);System.Console.WriteLine(" prints " + scores.GetPrintScore() + ", faces " +scores.GetFaceScore() + ", irises " +scores.GetIrisScore());
Store,Load Applicant biometrics representations
Any type of biometric representation does not contains images or other attributes of applicant such as qualities.
- Note
- It is recommend also to store images for Applicant to be possible to re-extract biometric data when better extractors (by means of speed/accuracy) will be provided.
- Modalities ICS Template
- It is possible to convert Applicant to ModalitiesICSTemplate. It contains all modalities templates gathered during Applicant enrollment. It can be stored and loaded to be able to use biometric representation of enrolled applicant for print verification or for getting information about minutiae in the future.
- Note
- ICS Template does not contains even position of fingers/irises templates and it is not possible to use it for multi verification. It is recommend to save position together with template. Or you can use ModalitiesTemplate.
-
c++Applicant app;app.AddPrint(extractedPrint);// Save Applicant as ICS templateauto tmpl = app.ToICSTemplate();BinaryFile::WriteAll("output/applicant.ics",tmpl->GetModalitiesICSTemplateData());// Load Applicant as ICS templateauto loadedTmpl =ModalitiesICSTemplate(BinaryFile::ReadAll("output/applicant.ics"));
-
java Applicant app = new Applicant();app.AddPrint(extractedPrint);// Save Applicant as ICS templateModalitiesICSTemplate tmpl = app.ToICSTemplate();BinaryFile.WriteAll("output/applicant.ics", tmpl.GetModalitiesICSTemplateData());// Load Applicant as ICS templateModalitiesICSTemplate loadedTmpl = new ModalitiesICSTemplate(BinaryFile.ReadAll("output/applicant.ics"));
-
csharp var app = new Applicant();app.AddPrint(extractedPrint);// Save Applicant as ICS templatevar tmpl = app.ToICSTemplate();BinaryFile.WriteAll("output/applicant.ics", tmpl.GetModalitiesICSTemplateData());// Load Applicant as ICS templatevar loadedTmpl =new ModalitiesICSTemplate(BinaryFile.ReadAll("output/applicant.ics"));
- Modalities Template
- It is possible to convert Applicant to ModalitiesTemplate. It can be stored and loaded to be able to use enrolled applicants biometric representation for any sdk operations including Identification. It contains all modalities templates gathered during Applicant enrollment. The differences against Modalities ICS Template are:
- It contains also positions of fingers/irises templates.
- It contains data necessary for Identification.
The size is little bit bigger as Modalities ICS Template. The ModalitiesTemplate can be converted to ModalitiesICSTemplate, but ModalitiesICSTemplate cannot be converted into ModalitiesTemplate.
- Note
- it is recommended to store biometric representation of Applicant in this format.
-
c++Applicant app;app.AddPrint(extractedPrint);// Save Applicant as templateauto tmpl = app.ToTemplate();BinaryFile::WriteAll("output/applicant.tmpl", tmpl->GetModalitiesTemplateData());// Load Applicant as templateauto loadedTmpl =ModalitiesTemplate::Create(BinaryFile::ReadAll("output/applicant.tmpl"));
-
java Applicant app = new Applicant();app.AddPrint(extractedPrint);// Save Applicant as templateModalitiesTemplate tmpl = app.ToTemplate();BinaryFile.WriteAll("output/applicant.tmpl", tmpl.GetModalitiesTemplateData());// Load Applicant as templateModalitiesTemplate loadedTmpl = ModalitiesTemplate.Create(BinaryFile.ReadAll("output/applicant.tmpl"));
-
csharp var app = new Applicant();app.AddPrint(extractedPrint);// Save Applicant as templatevar tmpl = app.ToTemplate();BinaryFile.WriteAll("output/applicant.tmpl", tmpl.GetModalitiesTemplateData());// Load Applicant as templatevar loadedTmpl =ModalitiesTemplate.Create(BinaryFile.ReadAll("output/applicant.tmpl"));
Extraction
The extraction is transformation of biometric sample into template suitable for further processing e.g. Verification, Identification. The library provides extraction for
The table below lists the enrollment SDK versions and their corresponding template versions. Use this table to determine template compatibility for Verification and Identification according to the rules described in Template Compatibility Rules.
| sdk version | print ics | face balanced | face accurate | face accurate server | face fast | iris accurate | iris fast |
|---|---|---|---|---|---|---|---|
| v28.2.0 | 2.3 | 53.1 | 54.1 | - | 52.1 | 10.1 | 8.1 |
| v28.1.0 | 2.3 | 53.1 | 54.1 | - | 52.1 | - | - |
| v28.0.0 | 2.3 | 53.1 | 54.1 | - | 52.1 | - | - |
| v27.5.0 | 2.3 | 53.1 | 54.1 | - | 52.1 | - | - |
| v27.4.1 | 2.3 | 48.1 | 49.1 | - | 47.1 | - | - |
| v27.4.0 | 2.3 | 48.1 | 49.1 | - | 47.1 | - | - |
| v27.3.0 | 2.3 | 48.1 | 49.1 | - | 47.1 | - | - |
| v27.2.1 | 2.3 | 48.1 | 49.1 | - | 47.1 | - | - |
| v27.2.0 | 2.3 | 48.1 | 49.1 | - | 47.1 | - | - |
| v27.1.0 | 2.3 | 48.1 | 49.1 | - | 47.1 | - | - |
| v27.0.1 | 2.3 | 48.1 | 49.1 | - | 47.1 | - | - |
| v27.0.0 | 2.3 | 48.1 | 49.1 | - | 47.1 | - | - |
| v26.4.0 | 2.3 | 48.1 | 49.1 | - | 47.1 | - | - |
| v26.3.1 | 2.3 | 48.1 | 49.1 | - | 47.1 | - | - |
| v26.3.0 | 2.3 | 48.1 | 49.1 | - | 47.1 | - | - |
| v26.2.1 | 2.3 | 48.1 | 49.1 | - | 47.1 | - | - |
| v26.2.0 | 2.3 | 48.1 | 49.1 | - | 47.1 | - | - |
| v26.1.0 | 2.3 | 48.1 | 49.1 | - | 47.1 | - | - |
| v26.0.0 | 2.3 | 48.1 | 49.1 | - | 47.1 | - | - |
| v25.0.0 | 2.3 | 48.1 | 49.1 | - | 47.1 | - | - |
| v24.2.0 | 2.3 | 48.1 | 49.1 | - | 47.1 | - | - |
| v24.1.0 | 2.3 | 48.1 | 49.1 | - | 47.1 | - | - |
| v24.0.0 | 2.3 | 48.1 | 49.1 | - | 47.1 | - | - |
| v23.0.1 | 2.3 | 48.1 | 49.1 | - | 47.1 | - | - |
| v23.0.0 | 2.3 | 48.1 | 49.1 | - | 47.1 | - | - |
| v22.0.2 | 2.3 | 48 | 49 | 44 | 47 | - | - |
| v22.0.1 | 2.3 | 48 | 49 | 44 | 47 | - | - |
| v22.0.0 | 2.3 | 48 | 49 | 44 | 47 | - | - |
| v21.0.1 | 2.3 | 48 | 49 | 44 | 47 | - | - |
| v21.0.0 | 2.3 | 48 | 49 | 44 | 47 | - | - |
| v20.0.1 | 2.3 | 1.39 | 1.33 | 1.44 | 1.36 | - | - |
| v20.0.0 | 2.3 | 1.39 | 1.33 | 1.44 | 1.36 | - | - |
| v19.1.2 | 2.3 | 1.39 | 1.33 | 1.44 | 1.36 | - | - |
| v19.1.1 | 2.3 | 1.39 | 1.33 | 1.44 | 1.36 | - | - |
| v19.1.0 | 2.3 | 1.39 | 1.33 | 1.44 | 1.36 | - | - |
| v19.0.0 | 2.3 | 1.39 | 1.33 | 1.44 | 1.36 | - | - |
| v18.0.2 | 2.3 | 1.39 | 1.33 | 1.44 | 1.36 | - | - |
| v18.0.1 | 2.3 | 1.39 | 1.33 | 1.44 | 1.36 | - | - |
| v18.0.0 | 2.3 | 1.39 | 1.33 | 1.44 | 1.36 | - | - |
| v17.6.2 | 2.3 | 1.39 | 1.33 | 1.44 | 1.36 | - | - |
| v17.6.1 | 2.3 | 1.39 | 1.33 | 1.44 | 1.36 | - | - |
| v17.6.0 | 2.3 | 1.39 | 1.33 | 1.44 | 1.36 | - | - |
| v17.5.1 | 2.3 | 1.39 | 1.33 | 1.44 | 1.36 | - | - |
| v17.4.2 | 2.3 | 1.39 | 1.33 | 1.44 | 1.36 | - | - |
| v17.4.1 | 2.3 | 1.39 | 1.33 | 1.44 | 1.36 | - | - |
| v17.4.0 | 2.3 | 1.39 | 1.33 | 1.44 | 1.36 | - | - |
| v17.3.1 | 2.3 | 1.39 | 1.33 | 1.44 | 1.36 | - | - |
| v17.3.0 | 2.3 | 1.39 | 1.33 | 1.44 | 1.36 | - | - |
| v17.2.2 | 2.3 | 1.39 | 1.33 | 1.44 | 1.36 | - | - |
| v17.2.1 | 2.3 | 1.39 | 1.33 | 1.44 | 1.36 | - | - |
| v17.2.0 | 2.3 | 1.39 | 1.33 | 1.44 | 1.36 | - | - |
| v17.1.1 | 2.3 | 1.39 | 1.33 | 1.44 | 1.36 | - | - |
| v17.1.0 | 2.3 | 1.39 | 1.33 | 1.44 | 1.36 | - | - |
| v17.0.1 | 2.3 | 1.39 | 1.33 | 1.44 | 1.36 | - | - |
| v17.0.0 | 2.3 | 1.39 | 1.33 | 1.44 | 1.36 | - | - |
| v16.0.0 | 2.3 | 1.39 | 1.33 | 1.44 | 1.36 | - | - |
| v15.0.0 | 2.3 | 1.39 | 1.33 | 1.44 | 1.36 | - | - |
| v14.1.0 | 2.3 | 1.39 | 1.33 | 1.44 | 1.36 | - | - |
| v14.0.0 | 2.3 | 1.39 | 1.33 | 1.44 | 1.36 | - | - |
| v13.0.0 | 2.3 | 1.39 | 1.33 | 1.44 | 1.36 | - | - |
| v12.1.0 | 2.3 | 1.39 | 1.33 | 1.44 | 1.36 | - | - |
| v12.0.0 | 2.3 | 1.39 | 1.33 | 1.44 | 1.36 | - | - |
| v11.1.1 | 2.3 | 1.39 | 1.33 | 1.44 | 1.36 | - | - |
| v11.1.0 | 2.3 | 1.39 | 1.33 | 1.44 | 1.36 | - | - |
| v11.0.1 | 2.3 | 1.39 | 1.33 | 1.44 | 1.36 | - | - |
| v11.0.0 | 2.3 | 1.39 | 1.33 | 1.44 | 1.36 | - | - |
| v10.1.1 | 2.3 | 1.39 | 1.33 | 1.44 | 1.36 | - | - |
| v10.1.0 | 2.3 | 1.39 | 1.33 | 1.44 | 1.36 | - | - |
| v10.0.0 | 2.3 | 1.39 | 1.33 | 1.44 | 1.36 | - | - |
| v9.1.0 | 2.3 | 1.39 | 1.33 | 1.44 | 1.36 | - | - |
| v9.0.3 | 2.3 | 1.39 | 1.33 | 1.44 | 1.36 | - | - |
| v9.0.2 | 2.3 | 1.39 | 1.33 | 1.44 | 1.36 | - | - |
| v9.0.1 | 2.3 | 1.39 | 1.33 | 1.44 | 1.36 | - | - |
| v9.0.0 | 2.3 | 1.39 | 1.33 | 1.37 | 1.36 | - | - |
| v8.0.0 | 2.3 | 1.39 | 1.33 | 1.37 | 1.36 | - | - |
| v7.0.2 | 2.3 | 1.39 | 1.33 | 1.37 | 1.36 | - | - |
| v7.0.1 | 2.3 | 1.39 | 1.33 | 1.37 | 1.36 | - | - |
| v7.0.0 | 2.3 | 1.39 | 1.33 | 1.37 | 1.36 | - | - |
| v6.0.0 | 2.3 | 1.39 | 1.33 | 1.37 | 1.36 | - | - |
| v5.0.0 | 2.3 | 1.39 | 1.33 | 1.37 | 1.36 | - | - |
| v4.0.0 | 2.3 | 1.39 | 1.33 | 1.37 | 1.36 | - | - |
| v3.4.0 | 2.3 | 1.39 | 1.33 | 1.37 | 1.36 | - | - |
| v3.3.6 | 2.3 | 1.39 | 1.33 | 1.37 | 1.36 | - | - |
| v3.3.5 | 2.3 | 1.39 | 1.33 | 1.37 | 1.36 | - | - |
| v3.3.4 | 2.3 | 1.39 | 1.33 | 1.37 | 1.36 | - | - |
| v3.3.3 | 2.3 | 1.39 | 1.33 | 1.37 | 1.36 | - | - |
| v3.3.2 | 2.3 | 1.39 | 1.33 | 1.37 | 1.36 | - | - |
| v3.3.1 | 2.3 | 1.39 | 1.33 | 1.37 | 1.36 | - | - |
| v3.3.0 | 2.3 | 1.39 | 1.33 | 1.37 | 1.36 | - | - |
| v3.2.0 | 2.3 | 1.39 | 1.33 | 1.37 | 1.36 | - | - |
| v3.1.2 | 2.3 | 1.39 | 1.33 | 1.37 | 1.36 | - | - |
| v3.1.1 | 2.3 | 1.39 | 1.33 | 1.37 | 1.36 | - | - |
| v3.0.1 | 2.3 | 1.39 | 1.33 | 1.37 | 1.36 | - | - |
| v3.0.0 | 2.3 | 1.39 | 1.33 | 1.37 | 1.36 | - | - |
| v2.0.0 | 2.3 | 1.39 | 1.33 | 1.37 | 1.36 | - | - |
| v1.0.0 | 2.3 | 1.39 | 1.33 | 1.37 | 1.36 | - | - |
Template Compatibility Rules
Face Templates
Enrollment SDK versions up to and including 27.4.1
Face templates generated in different modes (Fast / Balanced / Accurate) are not mutually compatible. Templates can be used for verification and identification only if they have the same template version.
Enrollment SDK version 27.5.0 and later
Face templates generated in Fast / Balanced / Accurate modes are mutually compatible and can be used interchangeably for verification and identification.
Although each mode produces a different template version number, these templates belong to the same compatibility group and can be matched together.
This compatibility remains valid across different enrollment SDK versions, as long as they produce templates belonging to the same compatibility group.
If a future enrollment SDK version introduces a new compatibility group, templates from that group are mutually compatible with each other, but not compatible with templates from previous compatibility groups.
Print Templates
Print modality templates can be used for verification or identification only if they have the same template version. No cross-version compatibility is supported for print templates.
Verification
1 to 1 Verification
The library compares biometric samples of each modality and calculates their similarity scores. The result of verification is similarity score. The library provides verification for
- Print - provides PrintSimilarityScore
- Face - provides FaceSimilarityScore
- Iris - provides IrisSimilarityScore
1 to 1 Modalities Verification
Use function ModalitiesVerifyMatcher::Match(). It takes previously stored or actually created (from current enrolling Applicant) ModalitiesTemplate. The result of verification is ModalitiesScore that provides scores per each modality
- print - print templates on same biometric position in probe and gallery are compared with each other. The provided score is average of maximal score per biometric position. A template can have also unknown position e.g when it was loaded with no biometric position info. The unknown position is treated as special biometric position. When the probe template has unknown position it is compared with all gallery templates. When the gallery template has unknown position then each probe template with any position is compared against this template.
- face - each probe face template is compared with each gallery face template. The maximal score of all scores is provided.
- iris - the calculation is same as print calculation.
Identification
The SDK provides IndexedModalitiesGallery and ModalitiesGallery for identification. They differ in usage convenience and performance.
IndexedModalitiesGallery
- Note
- The number of references in any IndexedModalitiesGallery is limited by license. You can have more created galleries in your code. The number limits overall references in all galleries.
The IndexedModalitiesGallery stores only the data necessary for identification. Relevant data from ModalitiesTemplate is copied into the gallery using the IndexedModalitiesGallery::Add() function.
The IndexedModalitiesGallery::IdentifyModalities() function returns reference index identifiers to the user.
Adding data to the gallery can be faster in higher-level language bindings and consumes less memory, as only the essential identification data is stored compared to ModalitiesGallery. However, the user must maintain a mapping between their reference representation and the identifier provided to IndexedModalitiesGallery::Add().
It is recommended to use IndexedModalitiesGallery for performance- and memory-critical use cases and to prefer it over the more convenient ModalitiesGallery.
-
c++// Recreate your own data types from data stored during enrollmentauto templates =std::unordered_map<size_t, std::shared_ptr<ModalitiesTemplate>>{};templates.emplace(1, ModalitiesTemplate::Create(BinaryFile::ReadAll("output/1.tmpl")));templates.emplace(2, ModalitiesTemplate::Create(BinaryFile::ReadAll("output/2.tmpl")));// Create a gallery and add users.auto gallery = IndexedModalitiesGallery::Create({});gallery->Add(1, templates[1]);gallery->Add(2, templates[2]);auto probe = templates[1];// Identify a probe in the gallery.constexpr size_t MaxCandidates = 2; // size of result set of candidatesauto result = gallery->IdentifyModalities(probe, MaxCandidates);// Output identification results.for (const auto& id : result->GetPrintIdentifiers()){std::cout << " Found Id is " << id << std::endl;}
-
java // Recreate your own data types from data stored during enrollmentHashMap<Long, ModalitiesTemplate> templates= new HashMap<Long, ModalitiesTemplate>();templates.put(1L, ModalitiesTemplate.Create(BinaryFile.ReadAll("output/1.tmpl")));templates.put(2L, ModalitiesTemplate.Create(BinaryFile.ReadAll("output/2.tmpl")));ModalitiesTemplate probe = templates.get(1L);// Create a gallery and add users.IndexedModalitiesGallery gallery = IndexedModalitiesGallery.Create(new IndexedModalitiesGalleryConfig());gallery.Add(1, templates.get(1L));gallery.Add(2, templates.get(2L));// Identify a probe in the gallery.long maxCandidates = 2; // size of result set of candidatesIndexedModalitiesGallery.ModalitiesIdentifiers result = gallery.IdentifyModalities(probe, maxCandidates);// Output identification results.System.out.println(" Found Id is " + id);}
-
csharp // Recreate your own data types from data stored during enrollmentvar templates = new Dictionary<uint, ModalitiesTemplate>();templates.Add(1, ModalitiesTemplate.Create(BinaryFile.ReadAll("output/1.tmpl")));templates.Add(2, ModalitiesTemplate.Create(BinaryFile.ReadAll("output/2.tmpl")));var probe = templates[1];// Create a gallery and add users.var gallery =IndexedModalitiesGallery.Create(new IndexedModalitiesGalleryConfig());gallery.Add(1, templates[1]);gallery.Add(2, templates[2]);// Identify a probe in the gallery.var maxCandidates = 2U; // size of result set of candidatesvar result = gallery.IdentifyModalities(probe, maxCandidates);// Output identification results.foreach (uint id in result.GetPrintIdentifiers()){System.Console.WriteLine(" Found Id is " + id);}
Once the candidates are identified, you can use ModalitiesGallery::Consolidate() static function to get unique list of candidates with scores.
-
c++// Create print candidates for consolidationauto printCandidates = std::vector<std::shared_ptr<ModalitiesGalleryReference>>{};for (const auto& id : result->GetPrintIdentifiers()){printCandidates.push_back(std::make_shared<ModalitiesGalleryIndexedTemplate>(id, templates[id]));}// Create type that holds all necessary information for consolidation.auto consolidationCandidates =std::make_shared<ModalitiesGallery::ModalitiesCandidates>(std::move(printCandidates),std::vector<std::shared_ptr<ModalitiesGalleryReference>>{},std::vector<std::shared_ptr<ModalitiesGalleryReference>>{},probe);// Consolidateauto candidates = ModalitiesGallery::Consolidate(consolidationCandidates, 2);// Output identification results.for (const auto& c : candidates){std::cout << " Id is " << c.GetCandidate()->GetIndex() << " score is ["<< c.GetScore().GetPrintScore() << ", "<< c.GetScore().GetFaceScore() << ", "<< c.GetScore().GetIrisScore() << "]" << std::endl;}
-
java // Create print candidates for consolidationArrayList<ModalitiesGalleryReference> printCandidates= new ArrayList<ModalitiesGalleryReference>();printCandidates.add(new ModalitiesGalleryIndexedTemplate(id, templates.get(id)));}// Create type that holds all necessary information for consolidation.ModalitiesGallery.ModalitiesCandidates consolidationCandidates= new ModalitiesGallery.ModalitiesCandidates(printCandidates,new ArrayList<ModalitiesGalleryReference>(),new ArrayList<ModalitiesGalleryReference>(), probe);// ConsolidateArrayList<ModalitiesGallery.Candidate> candidates = ModalitiesGallery.Consolidate(consolidationCandidates, maxCandidates);// Print resultfor (ModalitiesGallery.Candidate c : candidates) {System.out.println(" Id is " + c.GetCandidate().GetIndex() + " score is ["+ c.GetScore().GetPrintScore() + ", "+ c.GetScore().GetFaceScore() + ", "+ c.GetScore().GetIrisScore() + "]");}
-
csharp // Create print candidates for consolidationvar printCandidates = new List<ModalitiesGalleryReference>();foreach (uint id in result.GetPrintIdentifiers()){printCandidates.Add(new ModalitiesGalleryIndexedTemplate(id, templates[id]));}// Create type that holds all necessary information for consolidation.var consolidationCandidates = new ModalitiesGallery.ModalitiesCandidates(printCandidates, new List<ModalitiesGalleryReference>(),new List<ModalitiesGalleryReference>(), probe);// Consolidatevar candidates = ModalitiesGallery.Consolidate(consolidationCandidates, 2);// Print resultforeach (ModalitiesGallery.Candidate c in candidates){System.Console.WriteLine(" Id is " + c.GetCandidate().GetIndex() +" score is [" + c.GetScore().GetPrintScore() +", " + c.GetScore().GetFaceScore() + ", " +c.GetScore().GetIrisScore() + "]");}
ModalitiesGallery
- Note
- The number of references in any ModalitiesGallery is limited by license. You can have more created galleries in your code. The number limits overall references in all galleries.
The ModalitiesGallery stores ModalitiesGalleryReference objects for later identification. Adding data to this gallery in higher-level language bindings is less efficient than in IndexedModalitiesGallery. This inefficiency arises because it creates objects derived from C++ interfaces while also maintaining references to the original high-level language objects.
These high-level language references are necessary because objects returned from the C++ implementation lose their original type information. To address this, the gallery remaps types based on the ID from ModalitiesGalleryReference. However, this approach consumes more memory, as it stores both the identification related data and a reference to the user object.
Despite the increased memory usage, this gallery is more convenient to use as IndexedModalitiesGallery. Since the entire user object is stored within the gallery, users do not need to manually map objects to their identifiers in their code or reload ModalitiesTemplate for consolidation. However, users should be mindful of their object size. The object itself is not required for IdentifyModalities, only the Index and ModalitiesTemplate provided by ModalitiesGalleryReference are used. The relevant identification data is copied from ModalitiesTemplate.
Once a ModalitiesGalleryReference is added to the gallery, its associated ModalitiesTemplate is no longer relevant until consolidation. If memory usage is a critical concern, users can implement ModalitiesGalleryReference::GetModalitiesTemplates() in such a way that the function loads the template on each call instead of storing the object in memory or use IndexedModalitiesGallery.
Each ModalitiesGalleryReference contains a ModalitiesTemplate used for identification. The ModalitiesGallery::Identify() function returns this reference to the SDK user, who can then downcast it to their custom type to retrieve additional information.
Possible approaches for adding custom types to the gallery include:
- Inheritance: Extend ModalitiesGalleryReference to include custom data.
- Composition: Store a reference to a custom object within ModalitiesGalleryReference.
- Inheritance
- You can inherit our ModalitiesGalleryReference in your types.
- Composition
- You can embed your type into adapter of ModalitiesGalleryReference.
The identification (ModalitiesGallery::Identify()) has two phases
- searching in gallery for best candidates per modality (details in ModalitiesGallery::IdentifyModalities()).
- merging lists of candidates per modality into final candidates list (details in ModalitiesGallery::Consolidate()).
The enrollment SDK provides following types of gallery
- Print identification based on ICSTemplate
-
c++// Recreate your own data types from data stored during enrollmentauto johnTemplate =ModalitiesTemplate::Create(BinaryFile::ReadAll("output/john.tmpl"));auto john = std::make_shared<UserType>(0, "john", johnTemplate);auto markTemplate =ModalitiesTemplate::Create(BinaryFile::ReadAll("output/mark.tmpl"));auto mark = std::make_shared<UserType>(1, "mark", markTemplate);// Create a gallery and add users.auto gallery = ModalitiesGallery::Create();gallery->Add(john);gallery->Add(mark);// Identify a probe in the gallery.constexpr size_t MaxCandidates = 2; // size of result set of candidatesauto result = gallery->Identify(johnTemplate, MaxCandidates);// Output identification results.for (const auto& c : result){auto user = std::dynamic_pointer_cast<UserType>(c.GetCandidate());std::cout << " Name is " << user->name << " score is ["<< c.GetScore().GetPrintScore() << ", "<< c.GetScore().GetFaceScore() << ", "<< c.GetScore().GetIrisScore() << "]" << std::endl;}
-
java // Recreate your own data types from data stored during enrollment.ModalitiesTemplate johnTemplate = ModalitiesTemplate.Create(BinaryFile.ReadAll("output/john.tmpl"));UserType john = new UserType(0, "john", johnTemplate);ModalitiesTemplate markTemplate = ModalitiesTemplate.Create(BinaryFile.ReadAll("output/mark.tmpl"));UserType mark = new UserType(1, "mark", markTemplate);// Create a gallery and add users.ModalitiesGallery gallery = ModalitiesGallery.Create();gallery.Add(john);gallery.Add(mark);// Identify a probe in the gallery.long maxCandidates = 2; // size of result set of candidatesArrayList<ModalitiesGallery.Candidate> result = gallery.Identify(johnTemplate, maxCandidates);// Output identification results.for (ModalitiesGallery.Candidate c : result) {UserType user = (UserType) c.GetCandidate();System.out.println(" Name is " + user.name + " score is ["+ c.GetScore().GetPrintScore() + ", "+ c.GetScore().GetFaceScore() + ", "+ c.GetScore().GetIrisScore() + "]");}
-
csharp // Recreate your own data types from data stored during enrollmentvar johnTemplate =ModalitiesTemplate.Create(BinaryFile.ReadAll("output/john.tmpl"));var john = new UserType(0, "john", johnTemplate);var markTemplate =ModalitiesTemplate.Create(BinaryFile.ReadAll("output/mark.tmpl"));var mark = new UserType(1, "mark", markTemplate);// Create a gallery and add users.var gallery = ModalitiesGallery.Create();gallery.Add(john);gallery.Add(mark);// Identify a probe in the gallery.var maxCandidates = 2U; // size of result set of candidatesvar result = gallery.Identify(johnTemplate, maxCandidates);// Output identification results.foreach (ModalitiesGallery.Candidate c in result){var user = c.GetCandidate() as UserType;System.Console.WriteLine(" Name is " + user.name + " score is [" +c.GetScore().GetPrintScore() + ", " +c.GetScore().GetFaceScore() + ", " +c.GetScore().GetIrisScore() + "]");}
-
c++
Similarity Score
Due to variations in positioning, deformations, lighting conditions, sensor characteristics, and biometric-specific factors such as facial expressions, eye occlusion, finger humidity, or random noise, it is impossible for two biometric samples of the same person, acquired in different sessions, to match exactly. To address this, a matching algorithm calculates a global similarity score between two biometric samples. This similarity score is then compared to a predefined similarity threshold. If the similarity score exceeds the threshold, the system considers the two samples to be from the same individual. However, biometric systems are not perfect, and matching results can sometimes be incorrect. The two primary system errors are measured in terms of:
- FAR (False Acceptance Rate) - The frequency of fraudulent accesses due to impostors claiming a false identity
- FRR (False Rejection Rate) - The frequency of rejections relative to people who should be correctly verified
FAR and FRR depend on the similarity threshold, which is set to obtain the desired security level. FAR and FRR are strictly related to each other. More precisely, FRR is an increasing function of the similarity threshold and FAR is a decreasing function of the similarity threshold. If the similarity threshold setting is increased to make it harder for impostors to gain access (lower FAR), some authorized people may find it harder to gain access (higher FRR).
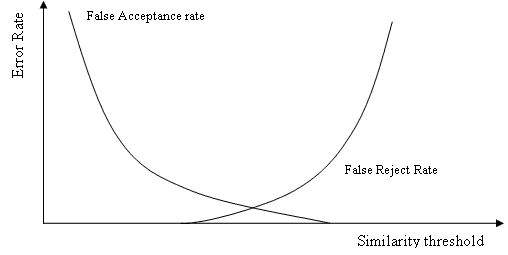
FAR/FRR
The range of returned similarity scores is from 0 (no similarity) to 1000 (highest similarity) for print and iris modality templates, and from 0 to 100 for face templates (see Modality Similarity Score). The correspondence between biometric templates is generally indicated by similarity scores greater than a default similarity threshold, which varies by modality (e.g., 40 for prints, which roughly corresponds to FAR = 10^-4). For more information, please refer to FAR and Threshold (see False Acceptance Rate).
Modality Similarity Score
Each biometric modality has its own similarity score scale and progression characteristics:
Print Similarity Score
It is similarity score between print Templates.
Score is 0-1000 where 1000 represents most similar templates.
The correspondence between print templates is generally reflected by similarity scores greater than default similarity threshold (40). For more information please refer to FAR and Threshold (see False Acceptance Rate). Default similarity threshold value (40) roughly corresponds to FAR=10^-4. Depending on the type of scanner, the size of print images, the size of the database and the desired security level of your application, you may need to select a different threshold.
See Similarity Score.
Iris Similarity Score
It is similarity score between iris Templates.
Score is 0-1000 where 1000 represents most similar templates.
Scores in range <0, 60> are computed based on FAR analysis. Scores above this range are approximated with linear slope to 1000. Therefore very similar irises can have matching score near maximal 1000.
See Similarity Score.
Face Similarity Score
It is similarity score between face Templates.
Score is 0-100 where 100 represents most similar templates.
When the matching score is higher then certain score threshold then the face images belongs to the same person with high probability. The matching score range is <0, 100>. Its values can be interpreted as follows:
- Low values of the score, i.e. range <0, 60>, are normalized using FAR values and this formula score_L=-10*log(FAR). It means that score 30 is related to FAR=1:1000=10^-3, score 50 is related to FAR=1:100000=10^-5 (evaluated on our large testing non-matching pairs dataset).
- High values of the score, i.e. range <80, 100>, are normalized using FRR values and this formula score_H=100/3*(FRR + 2). It means that score 80 is related to FRR=0.4, score 90 is related to FRR=0.7 (evaluated on our large testing matching pairs dataset).
Scores values in range (60, 80) are weighted average of score_L and score_H. This normalization help the users to select the score threshold according their needs. If it is too low e.g. score threshold is 30, then the chance of false accepted non-matching faces is quite high (FAR=10^-3). When it is too high e.g. score threshold is 90, then the chance of false rejected matching faces is quite high (FRR=0.7). For face recognition following recommendations are given:
- minimum face size - inter eye-pupils distance at least 40 pix
- optimal face size - inter eye-pupils distance at least 100 pix
- optimal image - sharp, contrast, frontal facial image with standard lighting conditions
- the more similar are conditions when the matched faces are captured the higher is the matching accuracy
- complex robust feature extraction invariant to partial faces occlusions / poor lighting / blurriness / etc is done. So, no further preprocessing is necessary.
See Similarity Score.
False Acceptance Rate
False Acceptance Rate (FAR) describes probability at which matching algorithm makes false acceptance errors. Similarity scores returned by this library are normalized. More precisely, approximate relationship between similarity score and False Acceptance Rate (sometimes called also False Match Rate) is given by the following formula:
\( similarity score = -10 * \log_{10} (FAR) \)
Please note that the normalization formula is only approximation. Score distribution can vary depending on various factors such as scanner surface area, finger placement, finger quality, finger positions (index fingers tend to give higher scores compared to little fingers, etc..)
- Note
- False Acceptance Rate (FAR) is one of several accuracy ratings that can be calculated for matching algorithm. False acceptance error is when matching algorithm identifies matching print in database for some probe print even though the two prints do not belong to the same person. FAR depends predominantly on the threshold selected. Increasing threshold reduces FAR, but it can also increase FRR see Similarity Scores. FAR is influenced by quality of the database being searched and quality of the probe print.
False Rejection Rate
FRR describes probability at which matching algorithm makes false rejection errors.
- Note
- False Rejection Rate (FRR) is one of several accuracy ratings that can be calculated for matching algorithm. False rejection error is when matching algorithm fails to identify a probe user (print, face or iris) in database even though the database contains user with biometric data (print, face or iris) of the same person. FRR primarily depends on quality of the database being searched and quality of probe biometric data. FRR is somewhat influenced by threshold. Decreasing threshold reduces FRR, but it can increase FAR significantly.
Similarity Threshold
Similarity threshold defines minimum similarity score that is considered a match.
- Note
- While similarity score provides degree of certainty information that is in line with probabilistic algorithms of biometrics, most applications eventually have to decide whether particular similarity score means a match or not. Similarity threshold is used to divide the similarity spectrum into matching and non-matching range. Default threshold setting is suitable for most applications. You can adjust the threshold to control FAR and FRR. There is an approximate mapping between FAR and threshold (see False Acceptance Rate).
Quality
The library provides fingerprint/iris/face qualities for evaluation of a image whether is suitable for further processing.
Server
The SDK can use provided server to execute its functionality. To use server you need to run server enrolment_server endpoint e.g. enrollment_server 127.0.0.1:50051. Then it is necessary to use server executor in appropriate classes or setup global executor.
Example of usage server executor in class constructor:
-
c++auto fc = FaceCapture::Create(std::move(img));auto executor = std::make_shared<GrpcFaceExecutor>("127.0.0.1:50051");FaceDetector fd(executor);
-
java Image img = Image.Decode(BinaryFile.ReadAll("assets/face.png"));FaceCapture capture = new FaceCapture(img);GrpcFaceExecutor executor = new GrpcFaceExecutor("127.0.0.1:50051");FaceDetector detector = new FaceDetector(executor);
-
csharp Image img = Image.Decode(BinaryFile.ReadAll("assets/face.png"));FaceCapture capture = new FaceCapture(img);GrpcFaceExecutor executor = new GrpcFaceExecutor("127.0.0.1:50051");FaceDetector detector = new FaceDetector(executor);
Example of usage global server executor:
-
c++GlobalFaceExecutor::Set(std::make_shared<GrpcFaceExecutor>("127.0.0.1:50051"));auto fc = FaceCapture::Create(std::move(img));FaceDetector fd;
-
java FaceExecutor executor = new GrpcFaceExecutor("127.0.0.1:50051");GlobalFaceExecutor.Set(executor);Image img = Image.Decode(BinaryFile.ReadAll("assets/face.png"));FaceCapture capture = new FaceCapture(img);FaceDetector detector = new FaceDetector();
-
csharp FaceExecutor executor = new GrpcFaceExecutor("127.0.0.1:50051");GlobalFaceExecutor.Set(executor);Image img = Image.Decode(BinaryFile.ReadAll("assets/face.png"));FaceCapture capture = new FaceCapture(img);FaceDetector detector = new FaceDetector();
Design
Header and Binary parts
The library is has header part and binary part. The interface to binary is "C" due to better compatibility across different compilers. The headers forwards functionality to binary, when we need to hide implementation details. The interface between headers and binary can be
- functions
- primitive data types and its pointers
- plain old structures with pragma pack 1 for compatibility between binary and compiled client code. We do not know what pragma pack is used/available in client compiler. We use 1 that is implemented in each compiler and architecture even if it is not optimal.
We are using C++20 standard. In binary part the pointer to implementation is casted to appropriate objects, and we can work with inheritance. The header part is used only to define API and transform error to exceptions.
The disadvantage is that we need copy data created in binary into vector to use safe containers. Later we can implement something similar to std::span or std::string_view.
C++
- We use SWIG tool code generator to convert C++ classes into Java / C# classes.
- We can write safe library due to containers, smart pointers and RAII principle.
- We use open/closed principle to extend our library with client implementation e.g logging, serialization.
Disadvantage
- Creating a library with a C++ interface is not feasible due to complications with the STL, #pragma pack directives, and various other issues. Therefore, we use a "C" interface for the library.
- The C wrapper MUST be implemented when we will need some other language as Java / C#
- It is not possible to use multiple interface inheritance, because swig implements interfaces as usual implementation classes due to director feature. Then Ruby and C# are not able to inherit multiple implementation classes.
- It is not possible to create nested classes, because SWIG does not support it for Ruby
Quality
To achieve better quality we use
- clang-format for formatting code
- clang-tidy for static analysis
- clang sanitizers for dynamic analysis
- address sanitizer for detecting memory leaks and overflows
- memory sanitizer for detecting use of unutilized memory
- thread sanitizer for detecting race conditions
- undefined sanitizer for detecting undefined behavior
- valgrind for unit, integration tests, and c++ example application
- ABI compliance checker to know impact of our changes regarding to previous SDK versions.
- unit tests with Google test framework
- warnings are set to the strictest level and treated as error
- CI pipeline for various architectures
- accurate documentation generated by doxygen
- C++ because of automatic memory management using smart pointers and RAII idiom
Extending SDK
The SDK can be extended by implementation of provided interfaces. See Extending SDK for list of customizable interfaces.