{project} Technical Documentation 1.64.0
<style> #face-size-table dl dt { font-weight: normal; } </style>
v1.64.0
Overview
{project} enables two main features:
- Customer onboarding
- Face biometrics
- Palm biometrics
Customer onboarding is the basic use-case of DOT. A selfie and photos of identity card should be provided by the customer, and a liveness check should have passed. Provided data can be checked for inconsistencies, and based on the checked result, the client decides if the customer will be onboarded.
The biometric processing of face images allows the client to support specific use-cases with the need for face biometrics.
In addition to face biometrics, palm biometrics can be leveraged, offering benefits such as enhanced accuracy and privacy.
API Reference
The {project} API reference is published https://innovatrics.github.io/dot-digital-identity-service/?url=https://raw.githubusercontent.com/innovatrics/dot-digital-identity-service/1.64.0/api/swagger.json[here, window="_blank"]
Distribution package contents
The distribution package can be found in our older https://crm.innovatrics.com/login[CRM portal] or in the new https://customerportal.innovatrics.com/products/12[Customer portal]. It contains these files:
Your sales representative will provide credentials for the CRM login.
config– The configuration folderapplication.yml– The application configuration file, see application configurationlogback-spring.xml– The logging configuration file
doc– The documentation folderInnovatrics_DOT_Digital_Identity_Service_1.64.0_Technical_Documentation.html– Technical documentationInnovatrics_DOT_Digital_Identity_Service_1.64.0_Technical_Documentation.pdf– Technical documentationswagger.json– Swagger API fileEULA.txt- The license agreement
docker– The Docker folderDockerfile– The text document that contains all the commands to assemble a Docker image, see dockerroot-user.Dockerfile- The alternativeDockerfileto assemble a Docker image with {project} running as a root userentrypoint.sh– The entry point script
libs– The libraries folderlibdot-sam.so– The Innovatrics OCR library- NOTE: before version {project} 1.43.0, the library was named
libsam.so
- NOTE: before version {project} 1.43.0, the library was named
libiface.so– The Innovatrics IFace librarylibinnoonnxruntime.so,libonnxruntime.so– The Innovatrics runtime librarieslibsfe_palm.so,libsfe_object.so,libsfe_core.so- The Innovatrics Palm librariessolvers– The Innovatrics IFace library solvers
dot-digital-identity-service.jar– The executable JAR file, see how-to-runInnovatrics_DOT_Digital_Identity_Service_1.64.0_postman_collection.json– Postman collection
[[installation]]
Installation
System requirements
While the following requirements are minimal (e.g.: we require some disk space for the app itself, logging and configuration), please refer to the https://developers.innovatrics.com/digital-onboarding/technical/performance/[performance measurements] page for detailed results on varying configurations.
- Rocky Linux 9.x (64-bit)
- A CPU supporting the AVX2 instruction set
- Unless agreed otherwise, the machine hosting the {project} needs to be able to access the URL innovatrics.count.ly.
Minimal system requirements
- CPU: 2 vCPU
- RAM: 7 GB
- DISK: 4 GB
Minimal Redis requirements
Version: 7.x.x
We recommend two nodes with the following configuration:
- CPU: 2 vCPU
- RAM: 3 GB
Minimal Memcached requirements
We recommend two nodes with the following configuration:
- CPU: 2 vCPU
- RAM: 3 GB
Steps
- Install the following packages:
--
-
Eclipse Temurin 21 Runtime Environment (Headless JRE) (
temurin-21-jre) *** NOTE: If the package is not available in your Linux distribution, you can follow the instructions on the https://adoptium.net/installation/linux/[Temurin website] to install the JRE. -
userspace USB programming library (
libusb;libusbx) -
GCC OpenMP (GOMP) support library (
libgomp1) -
Locales (
glibc-langpack-en) -
JEmalloc (
jemalloc) - recommended for production environments1. yum install -y temurin-21-jre libusb libusbx libgomp glibc-langpack-en jemalloc1. --
- Set the locale
-- 1. sed -i '/en_US.UTF-8/s/^# //g' /etc/locale.gen && locale-gen export LANG=en_US.UTF-8; export LANGUAGE=en_US:en; export LC_ALL=en_US.UTF-8 1. --
-
Extract the {project} distribution package to any folder.
-
Link the application libraries:
-
1. ldconfig /local/path/to/current/dir/libs1. +
Replace the path /local/path/to/current/dir in the command with your current path. Keep /libs as a suffix in the path.
Activate the DOT license
For {project} version 1.20.0 and above
Starting from {project} version 1.20.0, a new method for retrieving licenses is available. To obtain a license, please contact your sales representative or email sales@innovatrics.com to gain access to the customer portal where the license can be obtained. Once you have received the license, deploy it as described below the next paragraph in the [Deploying the obtained license](#Deploying the obtained license) section.
For the {project} version 1.19.0 and below
When using a license generated via the customer portal in versions 1.19.0 and earlier of the {project}, the application will start up, but consistently return HTTP 401 Unauthorized. Please contact your sales representative or sales@innovatrics.com to give you license for your specific version. Once you get the license, please deploy it as described below in the [Deploying the obtained license](#Deploying the obtained license) section.
Deploying the obtained license
Copy your license file iengine.lic for Innovatrics IFace SDK 6.23.0 into \{DOT_DIGITAL_IDENTITY_SERVICE_DIR}/license/
[[how-to-run]]
How to run
As {project} is a stand-alone Spring Boot application with an embedded servlet container, there is no need for deployment on a pre-installed web server.
{project} needs a running redis or memcached. redis or memcached must be configured via the externalized configuration first.
{project} can be run from the application folder:
     1. java -Dspring.config.additional-location=file:config/application.yml -Dlogging.config=file:config/logback-spring.xml -DLOGS_DIR=logs -Djna.library.path=libs/ -jar dot-digital-identity-service.jar
     1. Embedded Tomcat web server will be started and the application will be listening on the port 8080 (or another configured port).
[[docker]]
Docker
To build a Docker image, use the Dockerfile and the entrypoint.sh script. A Dockerfile example and Entrypoint.sh script example can also be found in the Appendix.
Multi-arch Docker image
Since version 1.40.0, the Dockerfile(s) for {project} have been modified to support building multi-architecture Docker images. The same Dockerfile can be used to build images for both linux/amd64 and linux/arm64 (also known as AArch64) platforms.
The linux/arm64 binaries that are included in the distribution package (packaged with the -arm64 suffix) are not meant for production use at this moment (i.e.: unsupported), and are there for testing or development purposes only.
The linux/arm64 binaries are built for the ARM64 architecture and are not optimized for performance.
For production use, please use the x86 (linux/amd64 - packaged with the -amd64 suffix) binaries.
The ARM64 Docker container is also supported on MacOS computers with Apple Silicon chips natively (without using QEMU or Rosetta 2 emulation).
Building the Docker image
Due to the nature of multi-arch Docker images, the directory structure may differ (linux/amd64 or linux/arm64).
The Docker image should be built as follows:
docker build \
    --build-arg="JAR_FILE=dot-digital-identity-service.jar" \
    --build-arg="SAM_OCR_LIB=libdot-sam.so" \
    --build-arg="IFACE_LIB=libiface.so" \
    --build-arg="INNOONNXRUNTIME_LIB=libinnoonnxruntime.so.*" \
    --build-arg="SFE_PALM_PALM_LIB=libsfe_palm.so" \
    --build-arg="SFE_PALM_OBJ_LIB=libsfe_object.so" \
    --build-arg="SFE_PALM_CORE_LIB=libsfe_core.so" \
    --build-arg="ONNX_RUNTIME_LIB=libonnxruntime.so" \
    --build-arg="ADDITIONAL_LIBS=" \
    -t dot-digital-identity-service \
    .
The Docker image will now take into account the --platform flag and build the image for the specified platform. The --platform flag is optional and can be omitted if you want to build the image for the platform you are currently using.
In the ADDITIONAL_LIBS build argument, you can set space-separated names of additional linux libraries that should be included in the Docker image.
For instance, if you want to include curl and wget linux libraries, you can set ADDITIONAL_LIBS like this:
--build-arg="ADDITIONAL_LIBS=curl wget" \
{project} needs a running redis or memcached. Redis or Memcached must be configured via the externalized configuration first.
Run the container according to the instructions below:
docker run -v /local/path/to/license/dir/:/srv/dot-digital-identity-service/license -v /local/path/to/config/dir/:/srv/dot-digital-identity-service/config -v /local/path/to/logs/dir/:/srv/dot-digital-identity-service/logs -p 8080:8080 dot-digital-identity-service
Replace the path /local/path/to/license/dir/ in the command with your local path to the license directory.
Replace the path /local/path/to/config/dir/ in the command with your local path to the config directory (from the distribution package).
Important Replace the path /local/path/to/logs/dir/ in the command with your local path to the logs directory (you need to create the directory mounted to a persistent drive). The volume mount into the docker is mandatory, otherwise the application will not start successfully.
Important The {project} running inside the container, built from Dockerfile, runs under dot-dis user and not as root user. This may cause issues with files and directories mounted from outside the docker container (e.g. logs directory). To overcome this issue, you must ensure that the user's UID (User ID) on the host machine, who owns the file or directory, matches the UID of the dot-dis user, which is 1000. Alternatively, you have the option to build the Docker container using the root-user.Dockerfile, which runs {project} under the root user and does not have this limitation, but is less secure.
Rocky linux as a base in the {project} version 1.32.0 and above
From version 1.32.0 the {project} is using a Rocky Linux 9 distribution as a base image instead of Ubuntu 22.04. As a result of this change, the Docker image now contains only mandatory Linux packages. Packages that are commonly preinstalled and used by the user such as the package manager are now not installed. This change was implemented mainly to minimise the amount of external binaries, resulting in fewer security patches needed.
Pull Docker Container from Innovatrics Registry
Alternatively, you can pull pre-built images from our container registry. To obtain your login and password credentials, contact your sales representative. After that, follow these steps to login into the registry:
docker login registry.dot.innovatrics.com
After a successful login you can now pull a DIS image, e.g.:
docker pull registry.dot.innovatrics.com/dot/dis:1.44.0
Docker Compose
The project distribution bundle also contains a Docker Compose file that can be used to run the application in a root Docker container along with a Redis instance.
The Docker Compose file is located in the root of the distribution package and is intended for development and testing purposes only.
Before launching the Docker Compose file, you must ensure that the license and logs directories are present in the directory (the config directory is already present). These can be created as follows:
mkdir -p license
mkdir -p logs
Your license file (iengine.lic) must be placed in the license directory.
The Docker Compose file then can be run as follows:
docker-compose up -d
The Docker Compose file also exposes the application on port 8080.
The Docker Compose file inherits the system architecture from the host machine (linux/amd64 or linux/arm64). If you want to run the application on a different architecture from your own, you must modify the docker-compose.yml and append the platform key to the digital-identity-service section.
Logging
{project} logs to the console and also writes the log file (dot-digital-identity-service.log). The log file is located at a directory defined by the LOGS_DIR system property. Log files rotate when reaching 5 MB size, maximum history is by default set to 7 days or logs size of 1GB.
As this is a Spring Boot application, debug logging can be turned on by setting the logging.level.root property to DEBUG in the application.yml file.
Docker: Persisting log files in local filesystem
When {project} is run as a Docker container, log files may be accessed even after the container no longer exists. This can be achieved by using Docker volumes. To find out how to run a container, see docker.
Monitoring
Information as build or license info can be accessed on /api/v1/info. Information about available endpoints can be viewed under /swagger-ui/index.html.
The health endpoint accessible under /api/v1/health provides information about the application health and the Innovatrics Tracking Service status.
This feature can be used by an external tool such as Spring Boot Admin, etc.
The application also supports exposing metrics in standardized prometheus format. These are accessible under /api/v1/prometheus. This endpoint can be exposed in your configuration:
[source,yaml] -``` management: endpoints: web: exposure: include: health, info, prometheus
For more information, see https://docs.spring.io/spring-boot/docs/3.4.10/reference/html/actuator.html#actuator.endpoints[Spring Boot documentation, sections Endpoints and Metrics].
Spring Boot Actuator Documentation also provides info about other monitoring endpoints that can be enabled.
### Monitor the metrics via Prometheus
To scrape \{project} metrics, the Prometheus configuration must be set as follows
.prometheus.yml
[source,yaml]
-```
scrape_configs:
- job_name: 'digital_identity_service'
scrape_interval: 2h # Set this up to your preferred scraping interval
metrics_path: '/api/v1/prometheus'
scheme: https # Define the protocol scheme used for requests
static_configs:
- targets: ['dis.hostname:port'] # Configure the hostname and port of your application
```-
If you do not wish to use static configuration for the target application, consider dynamically discovering the target via supported service-discovery mechanisms.
For more information on how to set up service discovery configuration refer to https://prometheus.io/docs/prometheus/latest/configuration/configuration/#scrape_config[Prometheus documentation].
If you wish to configure Prometheus alerts, you must define `prometheus.rules.yml` file and reference it in the Prometheus configuration:
.prometheus.yml
[source,yaml]
-```
rule_files:
- prometheus.rules.yml # Reference to Prometheus rules file if you want to use alerts
```-
Prometheus can be configured to regularly send alert state information to https://prometheus.io/docs/alerting/latest/alertmanager/[Alertmanager], which handles dispatching of notifications to Slack, email, or other specified destinations.
### Monitor license expiration
The \{project} exposes a `dis_license_expiration_remaining_days` metric that tracks the remaining days until the expiration of the DOT license.
You can monitor the expiration via Prometheus and set up alerting for timely notifications.
To access the current value of the metric, use Prometheus' expression browser (http://localhost:9090/) under the Graph tab with the query `dis_license_expiration_remaining_days`.
.DOT license expiration metric in Prometheus browser

To configure alerting for DOT license expiration, define the Prometheus rule configuration as follows:
.prometheus.rules.yml
[source,yaml]
-```
groups:
- name: digital-identity-service
rules:
- alert: DISLicenseIsAboutToExpire
expr: dis_license_expiration_remaining_days \< 30
annotations:
summary: "DOT License for Digital Identity Service will expire in \{\{ $value }} days."
```-
The configuration instructs Prometheus to trigger an alert when there's less than 30 days remaining before the license expiration.
Access the alert under Alert tab in the Prometheus browser. Currently, the alert is inactive since there are more than 30 days remaining until expiration. However, it will transition to the "Firing" state when the license is about to expire.
.DOT license expiration alert in Prometheus browser

## Tracing
https://docs.micrometer.io/tracing/reference/glossary.html[Micrometer tracing] with https://opentelemetry.io[OpenTelemetry] API is used to collect traces.
Data is exported via gRPC using OTLP format, to the configured collector (e.g.: Jaeger) defined by the `management.tracing.endpoint` property (default: `http://localhost:4317`).
By default, OpenTelemetry tracing uses `W3C` format for context propagation.
To enable tracing propagation using the `B3` format, the `management.tracing.propagation.type` property can be set to `b3`.
Tracing is disabled by default. It can be enabled by the following property:
[source,yaml]
-```
management:
tracing:
enabled: true
```-
### Collect traces via Jaeger
For quick local testing, you can utilize the https://hub.docker.com/r/jaegertracing/all-in-one[Jaeger All-in-One image], which incorporates Jaeger UI as well. Otherwise, please consult the https://www.jaegertracing.io/docs/1.55/deployment/[Jaeger documentation] for guidance on configuring your preferred setup.
If you are running Jaeger collector locally, it accepts OTLP format via gRPC under `http://localhost:4317`. This endpoint corresponds to the default value of the `management.tracing.endpoint` property in \{project} configuration.
To view exported traces, access the Jaeger UI at `http://localhost:16686`, then select the `dot-digital-identity-service` from the list of services. The UI displays all traces and spans. If you want to filter out traces generated by HTTP endpoints, look for those starting with "http".
.Traces in Jaeger UI

By clicking on a trace, you can access all associated nested spans, allowing you to monitor the duration of each relevant call.
.Trace overview in Jaeger UI

## Architecture
\{project} is a semi-stateful service. It temporarily retains intermediate results and images in an external cache.
This enables the exposed API to flexibly use only the methods needed for a specific use case, without repeating expensive operations.
Another advantage is that the user can provide data when available, without the need to cache on the user's side.
The \{project} can be horizontally scaled. Multiple instances of the service can share the same cache or a cache cluster.
.Horizontal scaling of \{project} with a cache cluster

The services of \{project} are better suited for shorter-time processes. The cache can nevertheless be configured to support various use cases and processes.
## Cache
The \{project} currently supports Redis and Memcached as cache options. For development and test purposes, embedded EhCache is also available. However, please note that this option is not suitable for production or an environment with multiple \{project} instances. The table below describes configuration options for switching between these options:
|===
h|Property h| Description
2+| **innovatrics.dot.dis.persistence**
.^a|* **type**[[property-cache-type]]
a|Type of cache implementation to use.
Possible values: `redis`, `memcached` or `ehcache`
|===
Various tools exist to monitor the performance of your Redis or Memcached server, and we recommend using one to ensure the cache is performing as expected.
### Common cache record expiration configuration
Every cache option supports setting the expiration time for all records (customer, face, palm, etc.) The expiration time can be configured independently for all of these resources.
The configuration is described in the table below:
|===
h|Property h| Description
2+| **innovatrics.dot.dis.persistence.cache**
.^a|* **customer-expiration**[[property-cache-onboarding-expiration]]
a|The time in seconds to persist all data created and used by Onboarding API.
Example value: 1800
.^a|* **face-expiration**[[property-cache-face-expiration]]
a|The time in seconds to persist face records created and used by Face API.
Example value: 600
.^a|* **palm-expiration**[[property-cache-palm-expiration]]
a|The time in seconds to persist all data created and used by Palm API.
Example value: 600
.^a|* **session-expiration**[[property-cache-session-expiration]]
a|The time in seconds to persist session records created and used by Session Management API.
Example value: 1800
|===
### EhCache
Cache option intended for **development** and **test** purposes only. Each instance of \{project} runs its own embedded EhCache, which is not shared between other instances. This means that running multiple \{project} instances in cluster mode may lead to unexpected behavior.
#### Configuration
Maximum size of memory which can be allocated by embedded cache may be configured via configuration properties. Both Java heap and off-heap memory are supported. In general, heap memory is faster in terms of I/O operations, but comes with performance cost due to Java garbage collection. In the scope of \{project}, this performance difference should be negligible.
If no `off-heap-size` property is set, the cache will solely rely on Java heap memory.
In case of exceeding configured memory EhCache will remove records even before configured TTL.
|===
h|Property h| Description
2+|**innovatrics.dot.dis.persistence.ehcache.resource-pool**
.^a|* **heap-size**[[property-ehcache-resource-pool-heap-size]]
a| Maximum number of records which can be allocated in Java heap memory.
Example value: 200
.^a|* **off-heap-size**[[property-ehcache-resource-pool-off-heap-size]]
a| Maximum size in MB which can be allocated in Java off-heap memory.
Example value: 800
|===
#### System requirements
Have in mind that embedded cache share resources with \{project}, so to ensure the smooth operation, it is crucial to allocate appropriate resources that cater to both the application itself and its embedded cache.
### Redis
The \{project} also supports Redis as a cache option in various setups which depend on the configuration of your environment. The **Lettuce** client is used for communication with Redis.
**An eager initialization has been configured, so the client will attempt to connect to the Redis server on startup. If the connection fails, the application will fail to start.**
We require the Redis server to be of version 7.x.x. Using older versions or a higher major version may result in an unexpected behavior.
Starting with \{project} 1.60.0, Valkey is also supported as a Redis-compatible cache engine.
The Redis configuration properties can also be used for Valkey setup, as the integration is currently interchangeable at the configuration level.
The following Redis environment setups are supported:
- [Standalone](#redis-standalone)
- [Master/Replica](#redis-master-replica)
- [Cluster](#redis-cluster)
The individual setups and their configurations are described in the following sections. The application will also fail to start if one of the setups
has been configured incorrectly or is incomplete.
The option to configure the usage of SSL/TLS is also available. The SSL/TLS is optional and can be configured via application properties.
For redis authentication use username and password configured via application properties.
If left empty, no authentication will be used.
The timeout for all Redis operations has been configured to 10 seconds. This can be overridden via application properties.
The table below describes configuration options common to all Redis setups:
|===
h|Property h| Description
2+|**innovatrics.dot.dis.persistence.redis**
.^a|* **key-prefix**[[property-redis-key-prefix]]
a| A String prefix for grouping the key/values. This is useful when multiple applications share the same Redis instance.
This property is optional.
A `:` is appended automatically to the prefix if it is not empty.
Example value: `innovatrics:dis`
.^a|* **setup**[[property-redis-setup]]
a| Setup of your Redis environment.
Possible values: `STANDALONE`, `MASTER_REPLICA`, `CLUSTER`
.^a|* **use-ssl**[[property-redis-use-ssl]]
a| Indicates whether to use SSL/TLS for communication with Redis.
This property is optional.
Possible values: `true` or `false` *(default)*
.^a|* **credentials.username**[[property-redis-credentials-username]]
a| The username for authentication to your Redis environment.
This property is optional.
Example value: `user`
.^a|* **credentials.password**[[property-redis-credentials-password]]
a| The password for authentication to your Redis environment.
This property is optional.
Example value: `pass`
.^a|* **timeout**[[property-redis-credentials-password]]
a| The timeout for all Redis operations in milliseconds.
This property is optional.
Example value: `10000` *(default)*
|===
#### Configuration
##### Standalone
The standalone mode is the simplest mode of operation. It is suitable for development and testing environments.
The following configuration properties are available:
|===
h|Property h| Description
2+|**innovatrics.dot.dis.persistence.redis**
.^a|* **hostname**[[property-redis-hostname]]
a| The hostname of the Redis server.
Example: `localhost`
.^a|* **port**[[property-redis-port]]
a| The port of the Redis server.
Example: `6379`
|===
##### Master/Replica
The master/replica mode is suitable for production environments. The client is configured in a way where **the reads are set to be preferred on the replicas**.
The master/replica mode does not provide automatic failover.
The following configuration properties are available:
|===
h|Property h| Description
2+|**innovatrics.dot.dis.persistence.redis**
.^a|* **hostname**[[property-redis-hostname]]
a| The hostname of the Redis server.
Example: `localhost`
.^a|* **port**[[property-redis-port]]
a| The port of the Redis server.
Example: `6379`
.^a|* **master-replica.info-command-used**[[property-redis-master-replica-info-command-used]]
a| Indication whether your environment uses the `INFO` command to retrieve the master/replica information. This results in a different configuration to be used.
Possible values: `true` *(default)* or `false`
.^a|* **master-replica.replicas**[[property-redis-master-replica-replicas]]
a| List of Redis replica nodes. Each replica is defined by its `hostname` and `port`.
|===
.Example configuration for Redis Master/Replica setup
```yaml
redis:
hostname: \<redis-master-hostname>
port: \<redis-master-port>
setup: MASTER_REPLICA
master-replica:
info-command-used: true
replicas:
- hostname: \<replica1-hostname>
port: \<replica1-port>
- hostname: \<replica2-hostname>
port: \<replica2-port>
Cluster
The cluster mode is suitable for high-performance production environments with the need for automatic failover.
The application will automatically discover the cluster topology and will use it for communication.
In the case of a primary node failure, the application will automatically failover to a new primary node and will continue to operate normally. The application will attempt to reconnect to the cluster in case of a failure.
The topology refresh interval has been configured to 60 seconds. This can be overridden via application properties. If the topology refresh interval is not set, the topology will not be refreshed.
The following configuration properties are available:
|=== h|Property h| Description 2+|innovatrics.dot.dis.persistence.redis.cluster .^a|* nodes[[property-redis-cluster-nodes]] a| The hostname of the Redis cluster.
Individual nodes are delimited by a comma, however we recommend to provide hostname of the cluster entrypoint (e.g.: AWS ElastiCache cluster configuration endpoint) as opposed to individual nodes.
Example: clustercfg.your-redis-instance:6379 (recommended) or node1.your-redis-instance:6379,node2.your-redis-instance:6379
.^a|* topology-refresh-interval[[property-redis-cluster-topology-refresh-interval]]
a| Topology refresh interval in milliseconds. If unset, the topology will not be refreshed.
This property is optional.
Example: 60000
|===
It should be noted that a minimal cluster that works as expected is required to contain at least three master nodes. For deployment, a six-node cluster, with three masters and three replicas, is strongly recommended.
.Example configuration for Redis Cluster setup
redis:
  setup: CLUSTER
  cluster:
    nodes: \<redis-node1:port>, \<redis-node2:port>, \<redis-node3:port>, \<redis-node4:port>, \<redis-node5:port>, \<redis-node6:port>
    topology-refresh-interval: 60000
Memcached (deprecated)
Configuration
The cache is configurable via the externalized configuration.
It can be configured either with the AWS Elastic Cache, or a list of hosted memcached servers can be used.
Efficient memory usage
For optimal performance, the expiration of records must be configured according to the nature of the implemented process:
- Short expiration time causes smaller memory usage and higher throughput of short requests.
- Long expiration time enables longer processing of cached records and higher memory requirements.
Memory consumption for longer processes can be lowered by cleaning records once no longer needed. The API provides deletion methods for each resource.
The expiration of records can be configured independently for the onboarding API and for face operations.
|=== h|Property h| Description 2+|innovatrics.dot.dis.persistence.memcached .^a|* aws-elastic-cache-config-endpoint[[property-memcached-aws-elastic-cache-config-endpoint]] a| The host and port of aws elastic cache config endpoint.
Format: host:port
.^a|* servers[[property-memcached-servers]]
a| The list of host and port pairs to the memcached instances. Only used if aws elastic cache config endpoint is not configured.
Format: host1:port1 host2:port2
.^a|* read-timeout[[property-memcached-read-timeout]]
a| The memcached read timeout in milliseconds.
Example value: 2000 .^a|* write-timeout[[property-memcached-write-timeout]] a| The memcached write timeout in milliseconds.
Example value: 2000 .^a|* operation-timeout[[property-memcached-operation-timeout]] a| The memcached operation timeout in milliseconds.
Example value: 5000 |===
Authentication and authorization
The {project} API is secured with an API Key authentication, hence an HTTP Authorization header needs to be sent with every request.
The header must contain a Bearer token, which is a UTF-8 Base64 encoded string that consists of two parts, delimited by a colon:
|=== h|Token part h| Description .^a|* API Key a|A unique identifier that is received with your license .^a|* API Secret a|A unique string that is received with your license |===
The server will return a HTTP 401 Unauthorized response for every request that either does not contain the Authorization header, or if the header contents are invalid (e.g.: malformed Base64 or invalid API Key or Secret).
Some endpoints are not secured by design (such as /metrics, /health or /info) and do not require any authentication
Authorization header creation
For the {project} version 1.20.0 and above
Credentials for the {project} can be retrieved from the customer portal. The Api Key & Secret contains 3 values, as shown in the figure below:
.Api Key & Secret pop-up window
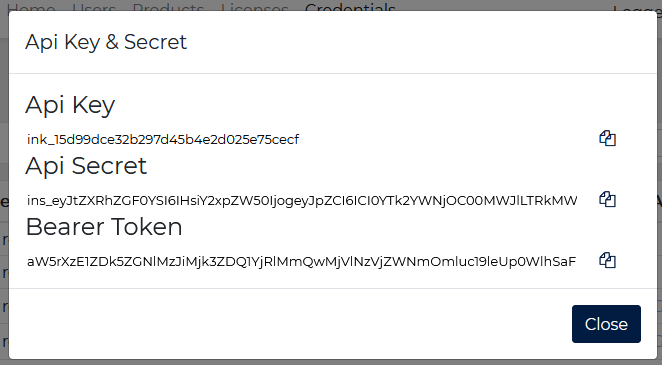 Each request must contain the
 Authorization header which consists of the Bearer keyword and the Bearer Token value, e.g.:
Bearer aW5rXzcwYTJjOTg4Omluc19XRjBhVzl1WDNScGJJQ0l3TURJeklERXhPV1ZCVDBpZlE9PQ==
For the {project} version 1.19.0 and below
In the {project} version 1.19.0, the process for creating an API token differs. It requires getting both the key and secret from the license. Below is an example snippet illustrating the structure of the API key and secret within the license file:
[source,json] -``` { "contract": { "dot": { "authentication": { "apiKeyAndSecrets": [ { "key": "some-api-key", "secret": "mb7DZQ6JwesRHkWPbjKVDgGHXxrAHFd6" } ] } }, ... }, ... }
You will need to encode the `key` and `secret` parts into a valid `UTF-8` `Base64` string (those two parts, delimited by a colon), e.g.:

`some-api-key:mb7DZQ6JwesRHkWPbjKVDgGHXxrAHFd6`

The encoding can be performed by the user via the bash command below:

[source,bash]
-```
echo 'some-api-key:mb7DZQ6JwesRHkWPbjKVDgGHXxrAHFd6' | base64 -w 0
```-

Once the aforementioned token has been encoded into Base64, each request must contain the `Authorization` header which consists of the `Bearer` keyword and encoded key and secret:

`Bearer c29tZS1hcGkta2V5Om1iN0RaUTZKd2VzUkhrV1BiaktWRGdHSFh4ckFIRmQ2`

### Data isolation
The resources created with one API key are accessible **only** with that particular API key. This is to prevent any unauthorized access by isolating the created resources in the cache.

## Image Data Downloader
The \{project} API supports two ways to provide an image in its requests:

- base64 encoded data
- url to the remote image

Images provided are downloaded by the Image Data Downloader.

The Image Data Downloader is enabled by default and can be disabled via the configuration to prevent downloading images from remote URLs. The data downloader
can also be configured to allow or block only specific URLs to be downloaded from. See the [Server-side request forgery (SSRF) protection](#server-side-request-forgery-ssrf-protection-optional) section for more details.

The [connection timeout](#property-innovatrics.dot.data-downloader-connection-timeout) and the [read timeout](#property-innovatrics.dot.data-downloader-read-timeout)
for the Image Data Downloader are configurable via properties.

|===
h|Property h| Description
2+| **innovatrics.dot.dis.data-downloader**
.^a|* **enabled**[[property-innovatrics.dot.data-downloader-enabled]]
a|Indicates whether the Image Data Downloader is enabled. If false, submitting data via URLs is not allowed.

Default value: true

.^a|* **connection-timeout**[[property-innovatrics.dot.data-downloader-connection-timeout]]
a|The connection timeout for image data downloader in milliseconds.

Default value: 2000
.^a|* **read-timeout**[[property-innovatrics.dot.data-downloader-read-timeout]]
a|The read timeout for image data downloader in milliseconds.

Default value: 30000
|===

### Server-side request forgery (SSRF) protection - Optional
If needed, the Image Data Downloader can be protected against https://owasp.org/Top10/A10_2021-Server-Side_Request_Forgery_%28SSRF%29/[SSRF] attacks.

The URLs can be either configured as absolute URLs or as regular expressions. The regular expressions can be enclosed in `.*` and can contain any number of characters.

If the `whitelist` property is configured, only the URLs matching the configured URLs will be allowed (any other will be blocked).

If the `blacklist` property is configured, only the URLs matching the configured URLs will be blocked (any other will be allowed).

Configuring both properties is not allowed, also configuring them with wildcards `\\**` or `.**` is not allowed. The following configuration properties are available:

|===
h|Property h| Description
2+| **innovatrics.dot.dis.data-downloader.ssrf-protection**
.^a|* **whitelist**[[property-innovatrics.dot.data-downloader-ssrf-whitelist]]
a|The list of allowed hosts for the Image Data Downloader.

This property is optional.

Example:
```yaml
whitelist:
  - 'https://example.com'
  - '.**example.org.**'
.^a|* blacklist[[property-innovatrics.dot.data-downloader-ssrf-blacklist]] a|The list of disallowed hosts for the Image Data Downloader.
This property is optional.
Example:
blacklist:
  - 'https://example.com'
  - '.**example.org.**'
|===
Logging Transactions via the Innovatrics Transaction Counting System (TCS)
For billing purposes, all performed transactions must be reported by any running instance of the {project}.
The {project} is configured to periodically report count of executed transactions to the Innovatrics' TCS. No sensitive details are collected.
If it is not possible to configure the deployment to communicate online with the Innovatrics tracking service, the TCS is required to run locally. Transactions can then be reported by exporting them from TCS and importing them into the Customer Portal. When running the service as a Docker container, refer to persisting log files in the local filesystem for details.
Use the api/v1/health endpoint to verify the successful connectivity of the {project} with TCS. Upon success, the expected JSON response should include components.transactionCountingSystem.status set to UP:
[source,json] -``` { "status": "UP", "components": { "transactionCountingSystem": { "status": "UP" } } }
For additional details on how \{project} verifies transactions, please refer to the https://developers.innovatrics.com/digital-onboarding/technical/transactions/[Transaction Tracking and Charging]
:::danger
The reporting URL is configured as https://tcs.innovatrics.com[tcs.innovatrics.com] (previously https://innovatrics.count.ly[innovatrics.count.ly]) by default. In case a customer runs a local instance of TCS, the reporting URL needs to be set accordingly via property `innovatrics.dot.transaction-reporting.client-settings.service-url`. Read more about running TCS on prem in the [TCS section of Deployment Recommendations page](/technical/dot-digital-identity-service-deployment-recommendation-documentation#_transaction_counting_system_tcs).
:::
### Proxy server configuration
If your deployment is behind a proxy server, it must be configured to allow communication with the Innovatrics TCS.
This can be done by setting the following properties in the `application.yml` file:
|===
h|Property h| Description
2+|**innovatrics.dot.dis.proxy**
.^a|* **host**[[property-proxy-host]]
a| The hostname of your proxy server.
Example: `squid.example.com`
.^a|* **port**[[property-proxy-port]]
a| Available port of your proxy server.
Example: `8088`
|===
If either of the aforementioned properties is not set, the proxy server will not be used.
## Multiple options for image uploads
The \{project} API supports multiple ways to provide an image during the onboarding process:
1. a direct upload of the image data as a base64 encoded string
1. providing a URL to the remote image
1. an octet-stream upload of the image data produced by the Innovatrics Web components or Mobile SDKs
- this option provides more security than the base64 encoded string upload, enabling detection of any tampering of the image data or potential spoof
The requests must contain only one of the above options as the image source. Combining multiple options in one request is not allowed.
Examples of these options are included in the Postman collection.
## Customer Onboarding
The Customer Onboarding API enables a fully digital process to remotely verify identity to enroll a new customer.
During the onboarding, a person registers with a company or government entity.
They provide their identity document, and one or more selfies to prove their identity.
With a digital onboarding process powered by \{project}, a company can easily and securely convert a person into a trusted customer.
### Standard Onboarding Flow
The recommended customer onboarding process looks like this:
1. [Create a customer](#create-customer)
1. [Add a selfie and liveness photos](#add-selfie)
1. [Perform a liveness check](#liveness-check)
1. [Create a customer document](#create-document) and [provide photos of the document's pages](#add-document-page)
1. [Request gathered data about the customer](#get-customer-data)
1. [Inspect the consistency of gathered data about the customer](#inspect-customer)
1. [Inspect the genuineness of a provided document](#inspect-document)
To use any part of the Customer Onboarding API, [create a customer](#create-customer) must be called first.
The customer will be persisted for a configurable amount of time (see config section). Once created, additional actions can be performed while the record is persisted.
The data-gathering steps (2-4) can be performed in any order. Extracted data can be deleted or replaced by repeating the same action with different inputs.
The results of the get customer request (5) or inspection steps (6-7) depend on data previously gathered.
Once the onboarding has been completed, the customer can be deleted to reduce required memory.
Deleting a customer will remove any related data, such as selfies and document pages.
Otherwise, the data will expire after a configured amount of time.
Actions for onboarding a customer have to be performed sequentially, parallel processing of the same customer is not allowed.
If there are concurrent requests on any resource belonging to the same customer resource, only one such request will succeed and the rest will end with an error (409 Conflict).
For example, the front and back page of the document cannot be uploaded in parallel.
### Create Customer
To create a customer, a `POST /customers` request must be made.
The response will contain a link to the newly created customer resource, as well as the ID of the customer.
### Add Selfie
To provide a selfie for a customer, a `PUT /selfie` request must be made on the customer resource.
If a liveness selfie or liveness image data were already uploaded via [Create Liveness Record request](#create-liveness-record), the reference to the liveness selfie can be specified in the payload instead.
A successful response will contain the position of the detected face in the input image, the confidence, and a link to the newly-created customer selfie resource.
The response may also contain a list of warnings.
An unsuccessful response will contain an error code.
The face position is represented by the face rectangle.
The detection confidence contains a score from the interval \<0.0,1.0>. Values near 1.0 indicate high confidence that a human face was detected.
Each customer can have max one selfie. An existing selfie can be replaced by adding a new selfie.
Once the face has been detected, you can:
- Access the selfie via a `GET /selfie` request on the provided selfie link
- [Compare biometric data from the selfie](#inspect-customer) with data extracted from other sources
- Get any extracted biometric information from the selfie via the [Get Customer request](#get-customer-data)
If the binary data was uploaded, successful response might include [a video recording](#video-recording-for-identity-proofing) of the face during the selfie capture.
#### Face Detection Configuration
Face detection on a customer’s selfie is configurable. The speed, accuracy, and other aspects can be adjusted according to needs and available resources.
Find more details about [image requirements](#image-requirements), [face detection speed-accuracy modes](#face-detection-speed-accuracy-mode), and [face size ratio](#face-size-ratio) in the Face API section of this document.
### Liveness Check
Liveness check allows verification of interaction with a live, physically present person.
It can distinguish live faces from photos, videos, 2D/3D masks, and other attacks.
The Digital Identity Service provides various approaches to verify liveness:
- [Passive Liveness Check](#Passive Liveness Check)
- [Eye-gaze Liveness Check](#Eye-gaze Liveness Check)
- [Smile Liveness Check](#Smile Liveness Check)
- [MagnifEye Liveness Check](#MagnifEye Liveness Check)
- [Deepfake Liveness Check](#Deepfake Liveness Check)
- [Multi-Range Liveness Check](#Multi-Range Liveness Check)
The liveness check generally comprises the 3 following steps:
1. [Creation of liveness check](#create-liveness-check)
1. Providing liveness selfies.
- [Adding selfie/selfies to liveness check](#add-selfie-to-liveness-check)
1. Or providing a liveness record.
- [Creating liveness record/records](#create-liveness-record)
1. [Evaluation of liveness](#evaluate-liveness)
#### Create Liveness Check
To create a liveness check, a `PUT /liveness` request must be made on the customer resource.
The response will contain a link to the newly-created customer’s liveness resource.
#### Add Selfie to Liveness Check
This alternative of creating the liveness check is done by using one or multiple images (selfies) in standard JPG or PNG format.
To add a selfie, a `POST /liveness/selfies` request must be made on the customer’s liveness resource.
If a selfie that was already added as a customer’s selfie is required for use, its reference can be specified in the payload instead of uploading it again.
For each selfie added to the liveness check, the **assertion** must be specified.
The provided assertion will determine if and how the selfie will be used for the selected liveness method evaluation in the next step.
The successful response will be empty.
If the quality of the selfie does not fully match the requirements for evaluation, the response will contain a warning.
If this happens, this selfie can still be used to evaluate the liveness, but the result is not guaranteed to be reliable. In the case of not wishing to proceed with this selfie, then delete the liveness resource, and start again by creating a new one.
If the selfie was not accepted, the response will contain an error code.
Multiple selfies can be added to one liveness check.
The \{project} will try to detect a face on every selfie provided.
The configuration of face detection on selfies is explained in [this chapter](#face-detection-configuration).
:::danger
Providing liveness selfies using this option is only supported for the [Passive Liveness Check](#Passive Liveness Check), [Eye-gaze Liveness Check](#Eye-gaze Liveness Check) and [Smile Liveness Check](#Smile Liveness Check).
:::
#### Create liveness record
This alternative of creating the liveness check is done by using the binary file produced only by Innovatrics web component or mobile SDKs.
To create a liveness record, a `POST /liveness/records` request must be made on the customer's liveness resource.
A successful response will contain the position of the detected face on the liveness selfie, represented by the face rectangle.
The response also contains the detection confidence, a score from the interval \<0.0,1.0>, where values near 1.0 indicate high confidence that a human face was detected.
A successful response also contains a link to the newly-created liveness record selfie resource.
Successful response might also include [a video recording](#video-recording-for-identity-proofing) of the face during the liveness selfie capture.
An unsuccessful response will contain an error code and liveness record will not be created.
Once the liveness record has been successfully created, you can:
- Access the liveness selfie via a `GET` request on the provided liveness record selfie link
- Use the liveness selfie as a customer selfie via the [Add Selfie request](#add-selfie) referencing the liveness record selfie link from the response
#### Evaluate Liveness
To evaluate liveness, a `POST /liveness/evaluation` request must be made on the customer’s liveness resource.
The **type** of liveness check to be evaluated must be specified.
A successful response will contain a score from the interval \<0.0,1.0>.
Values towards 1.0 indicate higher confidence that the associated selfies contained a live person. The score has to be compared to a threshold to determine the liveness.
See the documentation page dedicated to the active and passive liveness for recommended thresholds.
An unsuccessful response will contain an error code.
The evaluation can be repeated for different types of liveness on the same liveness resource.
Only selfies with a relevant assertion will be used for a given type of liveness.
##### Evaluate Liveness On Multiple Resources
Certain types of liveness checks are not restricted to a specific type of resource and can be evaluated across multiple liveness resources independently.
To evaluate liveness on multiple resources, a `POST /liveness/evaluation/extended` request must be made on the customer's liveness resource.
The **type** of liveness check to be evaluated must be specified, along with the collection of liveness resources to be included in the evaluation.
If a specified resource is unavailable, the evaluation for that resource will be skipped.
The response will provide the aggregated evaluation scores, grouped by the liveness resource on which the evaluation was conducted.
If a liveness resource is missing, the response will exclude the evaluation for that resource.
A successful evaluation will contain a score from the interval \<0.0,1.0>.
Values towards 1.0 indicate higher confidence that the associated selfies contained a live person.
#### Retrieving Liveness Selfies
To retrieve the liveness selfies, a `POST /liveness/selfies/retrieve` request can be made on the customer’s liveness resource.
The **type** of liveness must be provided to retrieve the selfies for the specific type of liveness.
The response will include two lists of selfies. The first list contains selfies of the specified liveness type that were uploaded via the `POST /liveness/selfie endpoint`, if any are available. The second list includes selfies uploaded via the `POST /liveness/records endpoint`, if any exist.
#### Passive Liveness Check
The passive liveness check is a process of determining whether the presented face is a real person without requiring the user to perform any additional actions.
It is recommended to perform this check on the customer`s selfie.
A user can add the existing customer’s selfie to the liveness check by providing a reference to it.
To add a selfie for a passive liveness evaluation, the assertion must be set to `NONE`.
Only selfies with this assertion will be evaluated for passive liveness.
To evaluate passive liveness, the type of liveness needs to be specified as `PASSIVE_LIVENESS`.
Passive liveness can be evaluated once at least a single selfie with the correct assertion was added.
If there are multiple selfies with the corresponding assertion, the returned score will be the average of all of them.
:::note
There are two modes of passive liveness evaluation (`UNIVERSAL` and `STANDARD`), which can be configured via a [property](#property-iface-passive-liveness-mode). The default is `UNIVERSAL`.
:::
#### Eye-gaze Liveness Check
Eye-gaze liveness check is the process of determining whether the presented faces belong to a real person, by requiring the user to follow an object displayed on the screen with their eyes.
This check is recommended for applications where security is paramount, and is recommended as an additional step after performing the passive liveness check.
Follow these steps to implement the eye-gaze liveness check:
1. generate object movement instructions randomly on your application server
1. send these instructions to the client and ask the customer to follow the movement of the object with his/her eyes
1. capture photos of the customer while he/she follows the object, and add them to the liveness with a corresponding assertion
Selfies for eye-gaze liveness need to have one of the following assertion values:
`EYE_GAZE_TOP_LEFT`, `EYE_GAZE_TOP_RIGHT`, `EYE_GAZE_BOTTOM_LEFT`, `EYE_GAZE_BOTTOM_RIGHT`
Each of these assertions corresponds to the position of the object at the moment the photo was taken.
Selfies with assertions needs to be provided sequentially in the order captured.
Parallel processing is not allowed.
Eye-gaze liveness can be evaluated only once the required number of selfies with relevant assertions was added.
The minimum number of selfies for eye-gaze liveness is configurable via a [property](#property-iface-egl-min-valid-selfies-count).
#### Eye-Gaze Liveness Check with Challenge
Supported from \{project} version 1.39.0 and DOT iOS/Android SDKs version 8.0.0, the Eye-gaze liveness check with challenge is available. This feature is an extension of the [Eye-gaze Liveness Check](#Eye-gaze Liveness Check), where the object movement instructions are generated on the server with additional validation upon the data retrieval.
Follow these steps to implement the eye-gaze liveness with challenge:
1. initiate the process by getting the object movement instructions using endpoint `PUT /liveness/records/challenge`, which will return a list of Eye-gaze liveness corners that need to be captured
1. follow the instructions explained in the DOT mobile components
1. upload the binary file created by the DOT components via `POST /liveness/records` request
Keep in mind that subsequent call to the `PUT /liveness/records/challenge` endpoint for the same customer will result in same list of Eye-gaze liveness assertions that need to be captured.
In case you have already created a list of Eye-gaze liveness assertions, but something went wrong, and you want to generate a new list of Eye-gaze liveness assertions for the same customer, you first need to call `PUT /livenesss` endpoint which basically means that you are starting a new liveness check for that customer and only then call `PUT /liveness/records/challenge` endpoint.
:::danger
This feature introduces some restrictions to the Eye-gaze liveness. You cannot combine the Eye-gaze liveness with challenge and the standard Eye-gaze liveness.
Once you call the `PUT /liveness/records/challenge` endpoint it is expected that the images required for the Eye-gaze liveness will be uploaded via `POST /liveness/records` endpoint.
Calling `POST /liveness/selfies` with assertion set to `EYE_GAZE_TOP_LEFT`, `EYE_GAZE_TOP_RIGHT`, `EYE_GAZE_BOTTOM_LEFT` or `EYE_GAZE_BOTTOM_RIGHT` will result in error.
Similarly, once you call the `POST /liveness/selfies` endpoint with the assertion set to `EYE_GAZE_TOP_LEFT, EYE_GAZE_TOP_RIGHT, EYE_GAZE_BOTTOM_LEFT` or `EYE_GAZE_BOTTOM_RIGHT`, the \{project} will assume the standard [Eye-gaze Liveness Check](#Eye-gaze Liveness Check) is being performed. Any subsequent call to the `PUT /liveness/records/challenge` endpoint will result in an error.
:::
#### Smile Liveness Check
Smile liveness check is the process of determining whether the presented faces belong to a real person by requiring the user to change his/her expression.
Follow these steps to implement the smile liveness check:
1. ask the customer to maintain a neutral expression and then smile
1. capture photos of the customer with both expressions, and add them to the liveness with a corresponding assertion
Selfies with assertions need to be provided sequentially.
Parallel processing is not allowed.
Smile liveness can be evaluated only once selfies with both `SMILE` and `NEUTRAL` assertions have been added. As a part of the evaluation process passive liveness is calculated on both photos.
You can fine tune the passive liveness threshold for smile liveness with a [property.](#property-iface-smile-liveness-passive-liveness-threshold)
:::note
If the passive liveness threshold property is not provided, the smile liveness score is returned as a continuous value ranging from 0.0 to 1.0. Otherwise, if the threshold property is provided, the score is returned as a binary value, either 0.0 or 1.0.
:::
#### MagnifEye Liveness Check
MagnifEye liveness check is the process of determining whether the presented faces belong to a real person by navigating the user to capture a detailed image of the eye.
It is a semi-passive method inspired by our extensive know-how in the domain of facial and iris recognition.
The core of the technology is built upon Innovatrics Passive Liveness Detection, while also taking into account the uniqueness of the human eye.
Follow these steps to implement the magnifeye liveness check:
1. follow the instructions explained in the DOT web/mobile components
1. upload the binary file created by the DOT components via [Create Liveness Record request](#create-liveness-record)
To evaluate magnifeye liveness, the type of liveness needs to be specified as `MAGNIFEYE_LIVENESS`.
Liveness can be evaluated once the liveness record has been successfully created.
#### Deepfake Liveness Check
The deepfake liveness check is a process designed to determine whether the provided faces are real or generated deepfakes.
It acts as a second layer of defense mechanism against advanced injection attacks, including synthetic media created using AI-based techniques.
Deepfake liveness detection is a passive process that does not require the user to perform any specific actions.
It can be performed on various liveness resources independently, as it is not tied to a particular resource type or capture method.
To evaluate deepfake liveness, the type of liveness must be set to `DEEPFAKE` using the `POST /liveness/evaluation/extended` endpoint.
The results will include an aggregated evaluation score from the interval \<0.0,1.0>.
The evaluation scores are grouped by the liveness resource on which it was evaluated on.
Values towards 1.0 indicate higher confidence that the detected faces are real and not artificially generated.
#### Multi-Range Liveness Check
Supported from \{project} version 1.59.0, DOT iOS/Android SDKs version 8.16.0 and Web components version 7.6.0, the Multi-Range liveness check with challenge provides an enhanced method of verifying that the presented face belongs to a real person.
The process begins with a server-generated challenge that defines the required user action. The user must follow the instructions during the capture process, enabling the system to validate both the authenticity of the face and the correct execution of the challenge.
Multi-Range liveness with challenge is recommended for use cases that require a higher level of security and can be applied as an additional step after performing passive liveness.
Follow these steps to implement the Multi-Range liveness check with challenge:
1. Initiate the process by generating the challenge using the `PUT /liveness/records/challenge` endpoint with `MULTI_RANGE_LIVENESS` in the request body.
1. This will return the active liveness challenge that needs to be followed during the liveness check.
1. Follow the instructions explained in the mobile and web components to capture the required images according to the challenge.
1. Upload the binary file created by the client components via the `POST /liveness/records` request.
1. Evaluate the Multi-Range liveness check via `POST /liveness/evaluation` endpoint, ensuring the type of liveness is set to `MULTI_RANGE_LIVENESS`.
### Customer Document Operations
The Onboarding API provides services to recognize and process customer's photo identity documents.
(Only identity documents containing a photo of the holder are usable for remote identity verification.)
The process starts with [creating an identity document](#create-document).
At this point, information can be provided about the document type and/or edition.
Parts of the document to be processed can also be specified
The second step is to [upload pictures of the document pages](#add-document-page).
The system will try to detect and classify the document on the picture.
Once at least one page has been successfully recognized, it is possible to:
- [Get normalized images of recognized pages](#get-document-page-image)
- [Check the quality of images for recognized pages](#check-document-page-quality)
- [Get image fields found on document pages](#get-document-image-fields)
- [Inspect the genuineness of a provided document](#inspect-document)
- [Compare biometric data from the document portrait with the selfie](#inspect-customer)
- Get any extracted information from the document via the [Get Customer](#get-customer-data) request
#### Customer Document Chip Operations
The Onboarding API provides services to recognize and process customer's identity documents with a chip.
The process starts with [creating an identity document](#create-document).
As a next step, even thought it is optional, it is advised to provide a document chip active authentication challenge with [creating a document chip challenge](#add-document-chip-challenge).
Then the document chip data can be uploaded with [uploading document chip data](#add-document-chip-data).
Here the \{project} will parse and authenticate the document chip data provided.
Once the document chip data has been successfully uploaded, it is possible to:
- [Get the raw document chip data](#get-document-chip-raw-data)
- [Get the document chip portrait](#get-document-chip-portrait)
- [Inspect the authenticity of a provided document chip](#document-chip-authentication-check)
- [Compare biometric data from the document chip portrait with the selfie](#inspect-customer)
- Get any extracted information from the document chip via the [Get Customer](#get-customer-data) request
:::warning
For the document chip authentication to work, you need to provide CSCA Master List with the document issuer certificates of each country whose documents need to be validated. The Master List cannot be provided by Innovatrics. A certificate list for demo purposes can be downloaded from https://download.pkd.icao.int/[https://download.pkd.icao.int/]. There is a new property `innovatrics.dot.dis.emrtd.master-list.filepath` that needs to be set to the path of the downloaded CSCA MasterList. MasterList file needs to be in pem format.
:::
#### Supported Identity Documents
The \{project} can support identity documents of the following types:
- Passports
- Identity cards
- Driving licenses
- Foreigner permanent residence cards
- and other cards of similar format that include the holder’s photo
Support for document recognition may be in two levels:
- [Level 1](#level-1-support)
- [Level 2](#level-2-support)
##### Level 1 support
Level 1 support includes all documents compliant with ICAO machine-readable travel document specification.
The \{project} can process the document portrait and parse data from the machine-readable zone of documents with this level of support.
##### Level 2 support
For Level 2 support, the \{project} needs to be trained to support each individual document type and its edition.
Once the document is supported, the \{project} can process any data available on it.
The list of documents with Level 2 support can be found via the [get metadata](#get-metadata-for-documents-with-the-Level-2-support) endpoint.
In the case that an ID document type required does not have Level 2 support,
contact Innovatrics to request support for such document type in a future version of the \{project}.
##### Get Metadata for documents with Level 2 support
To get the full list of documents with Level 2 support, make a `GET /metadata` request.
The response contains a list of documents supported by the current version of the \{project} and the metadata for each document.
The metadata for an individual document contains a list of its pages.
For each page, there is a list of text fields that the \{project} was trained to OCR.
For each text field, there is information if the field's value is being returned as found on the document or if it is being normalized and returned in a standard format.
If present on the document, there is also the original label for each text field.
If a document page has the `classificationAdviceRequired` attribute set to `true`, a [create document](#create-document) request must contain a precise [classification advice](#classification-advice), comprising the exact document type, edition, and country of the given document.
#### Document Classification
The amount of data that the \{project} can extract from an identity document depends on how precisely it can classify this document.
There are 3 levels of classification:
- [Full classification](#full-classification)
- [Partial classification](#partial-classification)
- [Document not recognized](#document-not-recognized)
The \{project} tries to classify the document up to the level that allows the processing of all [requested document sources](#document-sources):
1. It will try to fully classify the document if the processing of visual zone or barcodes was requested.
1. Otherwise, it will only try to recognize the travel document type of the document.
1. If the document was not at least partially classified, it will be processed as an unknown document.
The classification of a document can be affected by [classification advice](#classification-advice)
that can be optionally provided in the [create document](#create-document) request payload.
It can be also affected by optional advice on the type of page in the [add document page](#add-document-page) request payload.
:::note
If the document page has `classificationAdviceRequired` attribute set to `true`, [classification advice](#classification-advice) is required and must be provided in the [create document](#create-document) request payload.
:::
If the classification advice is missing or invalid, the document will be classified as `UNKNOWN`.
##### Full classification
A full classification means the \{project} knows the type of the document, its issuing country,
the exact edition, and the type of travel document if the document is compliant with
travel document specifications.
Only documents that have [Level 2 support](#level-2-support) can be fully classified.
Any [document source](#document-sources) on a fully classified document can be processed.
That means the \{project} can:
- ocr textual data from the visual zone
- parse data from the machine-readable zone
- decode data from barcodes
- extract biometric information from the document portrait
- check input for tampering by inspecting the color profile of the image
- identify image fields: signature, fingerprint, ghost portrait and document portrait
##### Partial classification
A partial classification means the \{project} knows the type of the travel document.
With a partially classified document, only the **machine-readable zone** and the **document portrait**
[sources](#document-sources) can be processed. That means the \{project} can:
- parse data from the machine-readable zone
- extract biometric information from the document portrait
Partial classification is possible for any document with [Level 1 support](#level-1-support).
A document can be partially classified only after a page containing a machine-readable zone is provided.
That means:
- TD1 document can be partially classified after a back page is provided.
If the front page was provided first, it will stay unrecognized till the back page is added.
- TD2 and TD3 documents can be partially classified after a front page is provided
##### Document not recognized
If the \{project} was unable to recognize the document's exact edition nor its travel document type, then the document will be processed as an **unknown** document.
With an unknown document, the \{project} can only process the **document portrait**
[source](#document-sources). If a portrait is present on the provided page, the \{project} can:
- extract biometric information from the document portrait
The system only keeps the last provided page for an unknown document.
If there are multiple images provided and the document is still unknown, all previous pages are replaced with the last one.
##### Classification of an additional page
Once the document is at least partially classified, any page added later has to match the existing classification.
- That means if the document is fully classified, then it will only accept pages from the same document edition.
- If the document is partially classified, then it will accept pages from documents with the same travel document type.
- If the document is not recognized, it will accept pages of any type.
The level of classification of a document can be increased with an additional page.
For example, the exact edition of a document that is only partially classified as a travel document of TD1 type can subsequently be specified by recognizing it from an additional page.
The recognized edition has to be compliant with the already recognized type of travel document.
The classification level will move from partial classification to full classification.
If the document was classified incorrectly, the whole document needs to be deleted and the process started again.
Classification can be improved by providing [classification advice](#classification-advice)
and/or by providing images of better quality.
#### Create Document
To create an identity document for a customer, make a `PUT /document` request on the customer resource.
Improve the performance of the document processing by providing [classification advice](#classification-advice)and/or specifying data [sources](#document-sources) on the document to be processed.
The response will contain a link to the newly created customer document resource.
There can be at most one document for a customer.
The existing document can be replaced by creating a new document for the customer.
##### Classification Advice
If it’s known upfront what type of document will be uploaded, performance of the classification can be improved by providing **classification advice**.
Classification advice can influence how the document will be recognized.
Potential candidates can be restricted by specifying allowed countries, document types, editions, and/or travel document types.
If no advice is provided, the system will perform the classification considering all supported document types.
##### Document Sources
The performance of document processing can be improved by specifying what parts of the document need to be processed.
Provide a list of document sources that need to be processed.
If the list of sources is not provided in the request, or if it is empty, then the \{project} will try to process all of them.
| visual zone | document page needs to be [fully recognized](#ful-recognition) |
| --- | --- |
| machine-readable zone | |
| [the type of machine-readable travel document needs to be recognized](#partial-recognition) | |
| document portrait | |
| document portrait needs to be present on provided page | |
| barcode | |
| document page needs to be [fully recognized](#ful-recognition) | |
#### Add Document Page
To add a page to the identity document for a customer, make a `PUT /pages` request on the customer’s document resource.
There are alternative ways of uploading the image of a document page described in [Multiple options for image uploads](#multiple-options-for-image-uploads).
Improve the performance of the page’s processing by specifying whether it is a front or a back page in the classification advice.
:::danger
The optional classification advice in the add document page request can specify only the **type of page**.
:::
To provide advice on the **type of document**, use the [classification advice](#classification-advice) in the create document request.
A successful response will contain info about the classified document type and the recognized type of page.
It will also contain the position of the detected document in the input image,
the confidence, and a link to the newly created document page resource.
The response may contain a list of warnings.
If the binary data was uploaded, successful response might include [a video recording](#video-recording-for-identity-proofing) of the document during the capture.
An unsuccessful response will contain an error code.
When a page for a document is provided, the \{project} will try to recognize the type of page and the type of document.
This process is called classification and is described in chapter [document classification](#document-classification).
##### Image requirements
Ideally, the photo of identity document should be created with Innovatrics’ auto-capture components, whether in mobile libraries or browser-based.
These components ensure the quality requirements mentioned below:
- The supported image formats are JPEG and PNG, or binary data created by Innovatrics web components or mobile SDKs
- The document image must be large enough — when the document card is normalized, the text height must be at least 32 px (or the document card width in the image must be approximately 1000 px)
- The document card edges must be clearly visible and be placed at least 10 px inside the image area
- The image must be sharp enough for the human eye to recognize the text
- The image should **not** contain objects or background with visible edges. (example below) This can confuse the process of detecting card on image
.Examples of invalid and valid images

#### Add Document Chip Challenge
To provide a document chip active authentication challenge, the `PUT /document/challenge` request must be made on the document resource. The \{project} will generate random 8 byte challenge encoded as base64 string. This challenge will then be used for active authentication of the document chip data.
If you would call this endpoint again for the same document resource, the same challenge will be returned.
If you would call this endpoint after the document chip data was uploaded, an error with message:
`Cannot create challenge after document chip data has been uploaded.` will be returned.
#### Add Document Chip Data
To provide a document chip data, the `PUT /document/chip/data` request must be made on the document resource. The data must be provided as a binary generated by iOS/Android SDKs components. The data will be parsed and authenticated by the \{project}. The result of the authentication can be checked by calling the `POST /document/inspect` and `POST /inspect` endpoints.
#### Check Document Page Quality
To check the quality of a provided image for a document page, a `Get /quality` request has to be made on the document page resource.
The response contains details about the brightness, sharpness, and the presence of hotspots on the original image.
The response also contains a list of found issues and a list of warnings.
| Quality check result | Input image |
| --- | --- |
| OK a |  |
| WARNING: `DOCUMENT_CLOSE_TO_IMAGE_BORDER` | |
| ISSUE: `BRIGHTNESS_LOW` | |
| ISSUE: `BRIGHTNESS_HIGH` | |
| ISSUE: `SHARPNESS_LOW` | |
| ISSUE: `HOTSPOTS_SCORE_HIGH` | |
| ISSUE: `DOCUMENT_OUT_OF_IMAGE` | |
| ISSUE: `DOCUMENT_SMALL` | |
#### Get Document Page Image
To get the normalized image for a document page you have to make a `GET /` request on the document page resource.
An image can be requested to be returned in a specific size by providing optional query parameters width and/or height.
The Response contains a base64 encoded image with a document page in the JPG format.
The compression quality of returned images can be configured via the [property](#property-jpg-compression-quality).
.Normalized document page

#### Get Document Image Fields
The Customer Onboarding API provides methods to get image fields from recognized document pages.
Supported image fields are:
- [Document Portrait](#get-document-portrait)
- [Document Chip Portrait](#get-document-chip-portrait)
- [Ghost Portrait](#get-document-ghost-portrait)
- [Signature](#get-document-signature)
- [Fingerprint](#get-document-fingerprint)
If the customers' document does not contain a requested image field or if the page with the field was not provided or it was not recognized, the service will return a not found error with 404 error code.
The successful response contains a base64 encoded image with a document page in the JPG format.
The compression quality of returned images can be configured via the [property](#property-jpg-compression-quality).
Any image field can be requested to be returned in a specific size by providing optional query parameters width and/or height.
##### Get Document Portrait
To get an image with a document portrait, a `GET /portrait` request has to be made on the document resource.
The successful Response contains a base64 encoded image with a document portrait in the JPG format.
.Document portrait

The document portrait is available if it was present on a previously uploaded document page, even if the page was not recognized.
##### Get Document Chip Portrait
If the retrieval of the portrait from the document chip was successful, you can get the image of the document chip portrait by submitting the `GET /chip/portrait` request on the document resource.
The successful Response contains a base64 encoded image with a document portrait in the JPG format.
##### Get Document Ghost Portrait
To get an image with a ghost portrait, a `GET /ghost-portrait` request has to be made on the document resource.
The successful Response contains a base64 encoded cropped ghost portrait image in the JPG format.
The ghost portrait is only available if the [visual zone source](#document-sources) processing was requested
when the [document resource was created](#create-document).
The ghost portrait has to be present on a previously uploaded and recognized document page as well.
##### Get Document Signature
To get an image with a signature, a `GET /signature` request has to be made on the document resource.
The successful Response contains a base64 encoded cropped signature image in the JPG format.
.Document signature

The signature image is only available if the [visual zone source](#document-sources) processing was requested
when the [document resource was created](#create-document).
The signature has to be present on a previously uploaded and recognized document page as well.
##### Get Document Fingerprint
To get an image with a fingerprint, a `GET /fingerprint` request has to be made on the document resource.
The successful Response contains a base64 encoded cropped fingerprint image in the JPG format.
The fingerprint image is only available if the [visual zone source](#document-sources) processing was requested
when the [document resource was created](#create-document).
The fingerprint has to be present on a previously uploaded and recognized document page as well.
##### Get Document Chip Raw Data
To get the raw document chip data as received from the mobile component you can send the `GET /document/chip` request on the document resource. As a response list of Data Group encoded as base64 strings will be returned.
#### Inspect Document
The \{project} API provides an endpoint to check consistency of data of the submitted document. This can be useful for authenticity and data manipulation checks.
To perform this inspection, a request has to be made on the `POST /document/inspect` endpoint.
Based on the requested sources and provided data, the response contains results of the following checks:
- [Expiration check](#expiration-check)
- [MRZ Validity check](#mrz-validity-check)
- [Portrait inspection](#portrait-inspection)
- [Visual Zone inspection](#visual-zone-inspection)
- [Color profile change detection](#color-profile-change-detection)
- [Screenshot detection](#screenshot-detection)
- [Print copy detection](#print-copy-detection)
- [Document Chip Authentication check](#document-chip-authentication-check)
For a detailed overview of the response itself, please refer to the OpenAPI specification of this endpoint.
:::note
For a more technical response regarding various comparisons, the `POST /document/inspect/disclose` endpoint can be called.
:::
##### Expiration check
If the document contains an expiration date, the system will check if the document is expired or not.
##### MRZ Validity check
If the MRZ was processed, the system checks if it conforms to the ICAO specification.
##### Portrait inspection
If the document portrait was processed, the estimated age and gender are compared with corresponding values from other sources. The consistency of estimated age is evaluated only if the date of issue of the document is present.
In addition to these checks, a ***face not covered*** check verifies whether the document portrait image is not obstructed (e.g., by a finger) during capture. However, the detection accuracy of this check depends on the quality of the document printing. Some document types and editions might not be suitable for applying this validation, with a false rejection rate of around 4% across all document types. Please evaluate the documents used in your project before enabling this check.
##### Visual Zone inspection
The result of the the inspection includes a list of fields that are inconsistent, a list of fields with low OCR confidence, and a median of all OCR confidences for the available fields.
The threshold for low OCR is configurable via a [property](#property-ocr-text-field-threshold).
##### Color profile change detection
The color profile change detection checks if the colors on the detected document corresponds to the trained model for the classified document edition.
This check is available only for documents with [Level 2 support](#Level 2 support).
The document also needs to be [fully classified](#full-classification).
| color profile change detected | Input image |
| --- | --- |
| `true` | |
| `false` | |
##### Screenshot detection
The screenshot detection checks if the provided image is a genuine photo of a document or if it was taken from a screen of another device.
| looks like a screenshot | Input image |
| --- | --- |
| `true` | |
| `false` | |
##### Print copy detection
The print copy detection checks if the provided image is a genuine photo of a document or if it is a printed copy of an original document.
| looks like a print copy | Input image |
| --- | --- |
| `true` | |
| `false` | |
##### Document Chip Authentication check
If the document chip data was uploaded, the system will check the authenticity of the document chip data. The `POST /document/inspect` then contains following checks:
###### Data Authentication
For data authentication, the \{project} may return following values:
- `AUTHENTICATED` - the data is authentic
- `INVALID_SOD_FILE` - the SOD is missing or invalid
- `INVALID_COM_FILE` - the COM is missing or invalid
- `DENIED` - the data is not authentic
- `AUTHORITY_CERTIFICATES_NOT_PROVIDED` - the authority certificates are missing
Only `AUTHENTICATED` value indicates that the data authentication passed.
###### Chip Authentication
For chip authentication, the \{project} may return following values:
- `AUTHENTICATED` - the chip data is authentic
- `DENIED` - the chip data is not authentic
- `MISSING_CHALLENGE` - when the chip authentication used active authentication and the challenge was not provided
- `MISSING_SIGNATURE` - when the document chip data sent is missing the signature
Only `AUTHENTICATED` value indicates that the data authentication passed.
###### Chip Authentication Type
Type of the chip authentication used. The possible values are `CHIP_AUTHENTICATION`, `PACE_CHIP_AUTHENTICATION_MAPPING` or `ACTIVE_AUTHENTICATION`.
Only `ACTIVE_AUTHENTICATION` needs the challenge to perform chip authentication.
###### Access Control Protocol Type
Access Control Protocol used establishing connection with the document chip. The possible values are `BAC`, `PACE`.
### Inspect Customer
To check the consistency of gathered biometric data about the customer, a `POST /inspect` request has to be made on the customer resource.
The response contains any biometric data extracted from the customer's selfie and a comparison of this data with other available customer data.
The response provides a comprehensive overview of customer biometric data consistency in one single place, thus providing an opportunity to detect inconsistencies and to assess credibility of provided customer selfies and selected data from the document.
\{project} evaluates consistency of customer's selfie with liveness selfies, document portrait, and/or text data read from identity document.
:::note
For a more technical response (including the calculated matching score) regarding various comparisons, the `POST /inspect/disclose` endpoint can be called.
:::
Based on the provided sources, the response provides the following information:
- [Biometric face aspects estimations](#Biometric face aspects estimations)
- [Selfie similarities with other faces](#face-similarities)
- [Age differences](#Age differences)
- [Gender consistencies](#Gender consistencies)
- [Face mask detection](#Face mask detection)
- [Video injection detection](#Video injection detection)
#### Biometric face aspects estimations
Age and gender are estimated from the customer’s selfie.
#### Face similarities
Customer selfie face is checked for similarity with other customer faces provided - identity document portrait face, portrait retrieved from the document chip and faces on liveness selfies.
Faces are considered similar when the respective face similarity threshold is reached.
Face similarity threshold for selfie comparison with liveness selfies is configurable via [property](#property-liveness-selfie-similarity-threshold).
Face similarity threshold for selfie comparison with document portrait is configurable via [property](#property-document-portrait-similarity-threshold).
Face similarity threshold for selfie comparison with portrait from the document chip is configurable via [property](#property-chip-portrait-similarity-threshold).
#### Age differences
Comparison of age estimated from customer selfie with age from document portrait and age calculated from document's text fields.
The age comparison with document portrait is performed only if the date of issue of the document is present.
#### Gender consistencies
Indication whether the gender evaluated from the customer’s selfie face matches the gender from other sources.
#### Face mask detection
Reports whether a mask was detected on the customer’s selfie.
The person on the selfie is considered wearing a face mask, when the face mask detection score reaches a threshold configurable via [property](#property-face-mask-threshold).
#### Video injection detection
Reports whether the injection detection was evaluated and eventually detected.
### Get Customer Data
To get all gathered data about a customer, a `GET /` request has to be made on the customer resource.
The response contains data extracted from the provided sources selfie, document pages and document chip.
Attributes in the response contain values per source from which the value was extracted.
Values may be extracted from: visual zone, mrz, document chip, selfie, document portrait, barcodes.
In case the provided document contains multiple instances of the same text field type within the visual zone, duplicated values of this field type will be returned as `visualZoneDuplicates`.
Barcode items contain the base64 encoded text, which represents the data extracted from the barcode, and the barcode format (e.g.: qr_code). If a barcode is present on the document but is not returned,
the barcode is either not supported, could have failed checksum validation or could not be parsed properly (e.g.: blurry photo of the document was submitted).
:::note
Only fully trained documents (Level 2) are supported for the barcode extraction
:::
:::note
In case of multiple barcodes of the same format on the same page, knowledge of the document is required to identify the data that the barcode represents
:::
If a document was provided, the response contains links to resources of every present document page and image.
Use them to get images of [normalized pages](#get-document-page-image) and/or [image fields](#get-document-image-fields)
### Video Recording for Identity Proofing
The Customer Onboarding API supports returning video recordings obtained from binary data produced by the Innovatrics Web components or Mobile SDKs.
When binary data containing a video recording is uploaded, the system processes the data and returns the video in the response.
Video recording can be obtained when following operations are called to upload binary data:
- [Add Selfie](#add-selfie)
- [Create Liveness Record request](#create-liveness-record)
- [Add document page](#add-document-page)
A successful response will include the processed video data in MP4 format as a Base64-encoded string within the `additionalData.video` object.
If no video is present in the uploaded binary data, the `additionalData.video` object will be omitted.
Video retrieval is disabled by default.
To enable this functionality, set the [video processing property](#property-request-video-processing-enabled) to true.
### Trust Evaluation
Trust Evaluation is a process that determines whether the identity of the customer can be trusted, based on data submitted during onboarding (document, selfie, liveness data).
The various aspects of the data that contribute to the verification of trust are called **Trust Factors**.
Trust Evaluation is a combination of the evaluation of all configured Trust Factors.
#### Trust Factors
A Trust Factor is a specific aspect of the customer's identity that can be evaluated to determine its trustworthiness.
Each Trust Factor is configured by **Trust Factor Definition**, which specifies how the result of that Trust Factor is calculated.
Some Trust Factors are primary, meaning they produce their own evaluation result.
Other Trust Factors are supplementary; they do not produce a direct result, but they are required by primary Trust Factors to complete their evaluation.
The \{project} supports two types of Trust Factors:
- **Score Trust Factor** - the result is a numerical score
- **Boolean Trust Factor** - the result is outcome of logical condition (`true` or `false`)
The outcome of the Trust Factor Evaluation can be one of the following:
- `ACCEPT` - the evaluated Trust Factor indicates that the corresponding aspect of identity can be trusted
- `REVIEW` - the evaluated Trust Factor falls near a threshold and requires manual review
- `REJECT` - the evaluated Trust Factor indicates that the corresponding aspect of identity cannot be trusted
#### Trust Factor Definitions
To retrieve the available Trust Factor Definitions, make a request to `GET /trust-evaluation/trust-factor-definitions`.
This endpoint provides the list of available Trust Factors Definitions, each with a unique name and type.
The response is independent of any specific customer and can be cached by the client application.
##### Server-side configuration
The available Trust Factor Definitions can be restricted server-side by providing a custom JSON file during service startup, to prevent their evaluation by the client application.
The file path is specified using the `innovatrics.dot.dis.internal.customer.trust-evaluation.definitions-filepath` property.
If this property is defined, the \{project} loads Trust Factor Definitions from the specified file instead of using the default set.
When the property is not defined, service starts with the preconfigured Trust Factor Definitions.
The format of the file must match the output of the `GET /trust-evaluation/trust-factor-definitions`.
If the file cannot be loaded (for example, due to an incorrect path, missing file, or permission error), the service will fail to start and log the error.
:::note
A restart of the service is required for any changes to take effect.
:::
#### Evaluate Customer Trust
To evaluate the trustworthiness of a customer, make a `PUT /trust-evaluation/evaluate` request on the customer resource.
The request must include a list of Trust Factor Definitions to be evaluated for the customer.
If the Trust Factor Definition is not included in the request it will not be evaluated and will not contribute to the overall result.
Each Trust Factor Definition must contain:
- `name` - the unique name of the Trust Factor Definition
- `type` - the type of the Trust Factor Definition (`SCORE` or `BOOLEAN`)
- `scoreConfiguration` - configuration for Score Trust Factors (required if type is `SCORE`)
- `booleanConfiguration` - configuration for Boolean Trust Factors (required if type is `BOOLEAN`)
##### Score Trust Factor Configuration
The following score configurations are supported:
- `rejectLow` - reject if the score of the Trust Factor is lower than this value
- `rejectHigh` - reject if the score of the Trust Factor is higher than this value
- `reviewLow` - mark for review if the score of the Trust Factor is lower than this value
- `reviewHigh` - mark for review if the score of the Trust Factor is higher than this value
At least one of the above parameters must be provided, otherwise the service will respond with `HTTP 400 BAD REQUEST`.
The values must be in the range specified for the Trust Factor, which are documented in the Customer Portal.
Please contact your Innovatrics representative to get access to the Customer Portal.
##### Boolean Trust Factor Configuration
Following boolean configurations are supported:
- `REJECT_IF_FALSE` - reject if the result of the Trust Factor is `false`
- `REJECT_IF_TRUE` - reject if the result of the Trust Factor is `true`
- `REVIEW_IF_FALSE` - mark for review if the result of the Trust Factor is `false`
- `REVIEW_IF_TRUE` - mark for review if the result of the Trust Factor is `true`
Only one of the above parameters can be provided.
If the value is missing, the service will respond with `HTTP 400 BAD REQUEST`.
##### Trust Evaluation Result
The response contains the following information:
- **[Overall result](#overall-trust-evaluation-result)** - the overall result of the Trust Evaluation
- **[Partial results](#partial-trust-evaluation-results)** - a list of partial results for each evaluated Trust Factor
- **[Warnings](#trust-evaluation-warnings)** - a list of warnings that occurred during the evaluation
- **[Errors](#trust-evaluation-errros)** - a list of errors that occurred during the evaluation
- **[Links](#trust-evaluation-links)** - a list of links to related customer resources
If an error or warning occurred during the evaluation of a Trust Factor, the corresponding partial result will not be included in the response and neither will it contribute to the overall result.
Other Trust Factors will still be evaluated.
###### Overall Result
The response contains the overall result of the Trust Evaluation.
Possible values are `ACCEPT`, `REVIEW`, or `REJECT`.
The overall result is determined by the combination of all evaluated Trust Factors:
- The result is `ACCEPT` only if all Trust Factors are evaluated as `ACCEPT`.
- The result is `REJECT` if any Trust Factor is `REJECT`.
- The result is `REVIEW` if one or more Trust Factors are `REVIEW` and none are `REJECT`.
###### Partial Results
The response also contains a list of partial results for each evaluated Trust Factor, including its name and outcome.
Each partial result may also include additional data specific to the Trust Factor, such as the calculated score for `SCORE` Trust Factors and the result of the condition for `BOOLEAN` Trust Factors.
Only the primary Trust Factors are included in the partial results.
Supplementary Trust Factors are not included, as they do not produce a direct result and are only evaluated internally.
Partial results can be enabled or disabled globally using the `innovatrics.dot.dis.internal.customer.trust-evaluation.partial-results` property.
By default, this property is set to `true`, which means that partial results are included in the response.
If the property is set to `false`, the response will contain only the overall Trust Evaluation result.
##### Trust Evaluation Warnings
The response may also include a list of warnings that occurred during the evaluation process.
The list will contain the warning code and the name of the Trust Factor that caused the warning.
The possible warning codes are:
- `UNKNOWN_TRUST_FACTOR_DEFINITION` - the specified Trust Factor Definition is not recognized or not available for evaluation
- `DISABLED_TRUST_FACTOR_DEFINITION` - the specified Trust Factor Definition is disabled by \{project} and cannot be evaluated
- `MISSING_TRUST_FACTOR_DATA` - the data required to evaluate the specified Trust Factor is missing or incomplete
##### Trust Evaluation Errors
If an error occurs during evaluation, the response includes a list of errors with the error code and the name of the Trust Factor that caused this error.
The possible error codes are:
- `INVALID_TRUST_FACTOR_DEFINITION` - the specified Trust Factor Definition has invalid type
##### Trust Evaluation Links
The response includes links to related customer resources, such as the customer resource itself, and other relevant customer's data.
The response will contain only links to resources that are available for the customer.
## Face biometrics
The Face API provides a service to [detect face](#detect-face) in an image. Once detected, the face will be persisted for a configurable amount of time (see the config section).
Use the face resource to execute additional actions while the record is persisted.
It also offers a method to [evaluate the quality](#check-face-quality) of a detected face and the face image. Use this method to verify if the detected face matches standards for a specific use case, and if a result of an additional action can be trusted.
There are additional actions that can be performed with a detected face while it is being held in cache:
- [estimate age](#age-and-gender)
- [recognize gender](#age-and-gender)
- [detect eye glasses](#glasses)
- [detect face mask](#mask)
- [verify face](#match-face-against-reference)
- [create template for verification](#create-face-template)
- [create ICAO crop of a facial region](#face-crop)
### Detect Face
To detect a face, make a `POST /faces` request.
If a customer selfie was already uploaded via [Add Selfie](#add-selfie) request from the [Customer Onboarding API](#customer-onboarding) a link to this selfie can be provided instead.
In this case, specifying custom detection properties in the request is not permitted.
The successful response will contain the position of the detected face in the input image, the confidence, and a link to the newly created face resource. The response may also contain a list of warnings.
The unsuccessful response will contain the error code.
The face position is represented by the face rectangle.
The detection confidence contains a score from the interval \<0.0,1.0>.
Values near 1.0 indicates a high confidence a human face was detected.
Some additional actions may be performed only on faces detected with a confidence above a certain threshold.
Specific limits can be found in the [quality section](#check-face-quality).
#### Image requirements
- The supported image formats are JPEG and PNG
#### Detection mode
Optionally, the detection mode can be specified: `FREE` or `STRICT`. The Strict model is used by default.
- `STRICT` mode will return an error if multiple faces are detected.
- `FREE` mode will return the largest face and a warning if multiple faces are detected.
The performance of the detection in the FREE mode is affected by [the max detection count property](#property-iface-face-detection-max-detection-count).
- If the max detection count is lower than the actual number of faces on the image, then it is not guaranteed that the biggest face will be detected and returned.
- If the max detection count is much higher than the number of faces on the single image inputs, then the detection runs slower than needed.
#### Face size ratio
The Face size ratio is a ratio between the face size and the shorter side of an image.
The service detects only faces with a face size ratio within a certain range that is configurable via [min](#property-iface-fsr-min) and [max](#property-iface-fsr-max) properties.
Optionally, override the configuration by specifying a custom face size ratio in the request.
##### Min face size ratio restrictions
The size of detectable faces depends on the input image and the configured [face detection speed accuracy mode](#face-detection-speed-accuracy-mode).
The allowed min face size ratio is restricted based on the size of the input image.
If the requested min face ratio is too small for the input image, the detection request will end up with an error: `FACE_SIZE_MEMORY_LIMIT`.
| Face detection mode | Min valid face size ratio calculation |
| --- | --- |
| fast | |
| 12 / "ShorterSide" | |
| balanced, + | |
**ShorterSide** and **LongerSide** values are in pixels.
Big input images will be **shrunk** before processing so the longer side is at most **3000px**.
If the image needs to be shrunk, use the resized lengths of longer and shorter sides to calculate the min valid face size ratio.
**FD_MAX_IMAGE_SIZE** is configurable via [parameter](#property-iface-face-detection-max-image-size).
#### Face detection speed accuracy mode
The face detection speed accuracy mode represents a trade-off between face and facial features detection speed and accuracy.
By default the face detection runs in the accurate mode.
To increase the speed of the detection, change the detection mode via [the face detection speed accuracy mode property](#property-iface-face-detection-speed-accuracy-mode).
Supported modes are:
- `fast` - some faces that are partially occluded faces or faces with sunglasses may be missed. Also faces printed on ID cards may not be detected. However, the speed performance of the face detection is much better as when other modes are used. It is compatible with DOT Mobile Kits.
- `balanced` - the performance of the face detection is somewhere in between accurate and fast modes.
- `accurate` - partially occluded, blurry, profile faces or faces with sunglasses are detected. The speed of this face detection on CPU is the slowest compared to other modes.
### Check Face Quality
To find out if a face is suitable for additional processing, check its quality.
To get info about quality, make a `GET /quality` request on the detected face.
The response contains information about face expression, head pose and quality attributes of the image.
Each attribute contains an actual score and a flag indicating if the score is reliable.
For each use case, check if preconditions for each relevant attribute are met and if their scores are from the requested range.
#### ICAO conditions
| | |
| --- | --- |
| face detection confidence | >= 0.53 |
| yaw angle | \\<-10.0; 10.0> |
| pitch angle | \\<-10.0; 10.0> |
| roll angle | \\<-10.0; 10.0> |
| sharpness | \<0.5; 1.0> |
| brightness | \<0.25; 0.75> |
| contrast | \<0.25; 0.75> |
| unique intensity levels | \<0.5; 1.0> |
| shadow | \<0.49; 1.0> |
| nose shadow | \<0.496; 1.0> |
| specularity | \<0.495; 1.0> |
| heavy frame | \<0.0; 0.515> |
| mouth | \<0.5; 1.0> |
| background uniformity | \<0.3; 1.0> |
| right eye | \<0.5; 1.0> |
| left eye | \<0.5; 1.0> |
| red right eye | \<0.0; 0.5> |
| red left eye | \<0.0; 0.5> |
| eye gaze | \<0.48; 1.0> |
#### Liveness preconditions
| | |
| --- | --- |
| face detection confidence | >= 0.55 |
| face size | >= 60px |
| yaw angle | \\<-20.0; 20.0> |
| pitch angle | \\<-20.0; 20.0> |
| brightness | \<0.11; 0.75> |
| contrast | \<0.25; 0.8> |
| unique intensity levels | \<0.525; 1.0> |
#### Mask detection preconditions
| | |
| --- | --- |
| face detection confidence | >= 0.53 |
| eye distance | \<12; 100 000> |
#### Glasses detection preconditions
| | |
| --- | --- |
| face detection confidence | >= 0.53 |
| yaw angle | \\<-40.0; 40.0> |
| pitch angle | \\<-40.0; 40.0> |
#### Age & Gender preconditions
| | |
| --- | --- |
| face detection confidence | >= 0.06 |
| face size | >= 30px |
| yaw angle | \\<-20.0; 20.0> |
| pitch angle | \\<-15.0; 15.0> |
### Face Features
Face API provides operations to get features of the detected face.
#### Age and Gender
To get age and gender, a`GET /aspects` request should be made on the detected face.
The response contains an estimated age and a gender score from the interval \<0.0,1.0>.
Values near 0.0 indicates 'male', values near 1.0 indicates 'female'.
The speed and accuracy of this estimation can be configured via the [face attribute speed and accuracy mode](#property-iface-face-attribute-age-gender-speed-accuracy-mode) property.
#### Mask
To check for the presence of a face mask, make a `GET /face-mask` request on the detected face.
The response contains a score from the interval \<0.0,1.0>. Values near 1.0 indicate the presence of a mask.
The mask detection result is reliable only if the original image matches [mask detection preconditions](#mask-detection-preconditions).
:::warning
The mask detection only works when the [face detection speed accuracy mode](#face-detection-speed-accuracy-mode) is set to `balanced` or `accurate`.
:::
#### Glasses
To check for the presence of glasses mask, make a `GET /glasses` request on the detected face.
The response contains a score from the interval \<0.0,1.0>. Values near 1.0 indicate the presence of glasses. The response contains additional scores for the presence of tinted glasses and glasses with a heavy frame.
The glasses detection result is reliable only if the original image matches [glasses detection preconditions](#glasses-detection-preconditions-).
### Face Crop
To get a face crop image, make a `GET /crop` request on the detected face.
The Response contains a base64 encoded image with a cropped face in the JPG format.
The compression quality of returned images can be configured via the [property](#property-jpg-compression-quality).
The Service allows customizing width and height of the returned image via corresponding
optional parameters.

#### Configure Crop Method
Two cropping methods defined in ISO/IEC 19794-5 standard are supported: `FULL FRONTAL` and `TOKEN FRONTAL`.
By default the `FULL FRONTAL` is being used. It can be changed via [the crop method property](#property-iface-crop-method).
#### Crop without Background
To get a face crop with removed background, make a `GET /crop/remove-background` request on the detected face.
The Response contains a base64 encoded image in the PNG format.
The Service allows customizing the width and height of the returned image via corresponding optional parameters.
#### Configure Segmentation
The segmentation can be fine-tuned by [the segmentation threshold parameter](#property-iface-background-removal-segmentation-threshold).
The segmentation threshold is in the range \\<-10000, 10000>. It's quantile-normalized and `0` represents equal error rate (EER).
Higher segmentation threshold means that result image will contain more foreground. Lower segmentation threshold means that result image will contain more background.
#### Configure Returned Image Type
The type of returned image is determined based on [the Segmentation Image Type property](#property-iface-background-removal-segmentation-image-type).
Supported types:
- `mask` - The segmentation mask only (single-channel)
- `masked` - The three-channel image with applied segmentation. The masked areas are filled with the color defined by the [background color property](#background-color).
- `masked_alpha`. - The four-channel image with applied segmentation. The masked areas are marked as transparent in the alpha channel.
| original | cropped | mask | masked | masked_alpha |
| --- | --- | --- | --- | --- |
#### Configure Background Color
When the image type is set to `masked`, [the background color](#property-iface-background-removal-background-color) can be defined. Valid value is hexadecimal code string e.g. `RRGGBB`.
| background color: white FFFFFF | background color: red FF0000 |
| --- | --- |
#### Configure Segmentation Matting
To soften mask edges after segmentation, enable the global matting via [the Segmentation Matting Type property](#property-iface-background-removal-segmentation-matting-type).
Fine tune softening mask edges by two thresholds: [the Segmentation Matting Possible Threshold](#property-iface-background-removal-segmentation-matting-possible-threshold) and [the Segmentation Matting Sure Threshold](#property-iface-background-removal-segmentation-matting-sure-threshold).
- `\\<-10000, POSSIBLE_THRESHOLD>` - The background for sure, the matting doesn't influence this range.
- `\<POSSIBLE_THRESHOLD, SURE_THRESHOLD>` - The unsure range, the matting decides what is the foreground and what is the background
- `\<SURE_THRESHOLD, 10000>` - The foreground for sure, the matting doesn't influence this range.
| segmentation matting type: global | segmentation matting type: off |
| --- | --- |
#### Crop Coordinates
To get coordinates of a face crop within the original input image, make a `GET /crop/coordinates` request on the detected face.
The response contains coordinates of 4 corner points and the information whether the crop is fully present within the input image.
.Illustration of crop coordinates

### Create Face Template
To create a face template, make a `GET /template` request on the detected face.
The returned template can be used as a reference in the [face verification](#match-face-against-reference).
#### Template extraction mode
The extraction mode represents a trade-off between face template creation speed and face template quality.
By default, the face template extraction runs in the accurate mode.
To increase the speed of extraction, change the extraction mode via [the extraction speed accuracy mode property](#property-iface-face-template-extraction-speed-accuracy-mode).
Supported modes are:
- `fast` - produces face templates suitable for verification of fairly good accuracy are created when fast mode is used. The performance of face template creation is very fast. It is compatible with DOT Mobile Kits.
- `balanced` - produces face templates suitable for verification/identification of high accuracy. The performance of the face template creation is somewhere in between accurate and fast modes.
- `accurate` - produces face templates suitable for verification/identification of very high accuracy. However the performance of the face template creation is not as good as when balanced or fast mode is used.
### Match Face Against Reference
To verify the similarity between two faces or to match a face to a template, make a `POST /similarity` request on the detected face.
Provide a template or a face to be used as a reference.
The provision of both is not permitted.
#### Face as a reference
Any face can be used as a reference while it is persisted in the cache.
It is not possible to use a face after it has expired.
Find the face identifier in the face resource url.
#### Reference template
To match a face with a face template, provide the base64 encoded template.
The template has to be compatible with the server's configuration and supported by server's version of the IFace.
If the provided template is not supported by the server's version of the IFace, the error response with a code `UNSUPPORTED_VERSION_TEMPLATE` will be returned.
If the provided template was created with a different extraction speed accuracy mode, the error response with a code `INCOMPATIBLE_TEMPLATE` will be returned.
If the provided template is corrupted, the error response with a code `CORRUPTED_TEMPLATE` will be returned.
## Palm biometrics
The Palm API provides a service to [detect palm](#detect-palm) from an image.
Once detected, the palm will be persisted for a configurable amount of time.
Use the palm resource to execute additional actions while the record is persisted.
One key feature of the API is the ability to [match palm against another](#match-palm-against-reference) to verify their similarity.
There are additional actions that can be performed with a detected palm while it is being held in cache:
- [Create palm template](#create-palm-template)
- [Inspect palm](#inspect-palm)
### Detect Palm
To detect a palm, make a `POST /palms` request.
A palm image can be provided either as a `Base64` encoded string or as binary data created by Innovatrics web components or mobile SDKs
The successful response will contain the position of the detected palm in the input image, the confidence, and a link to the newly created palm resource.
The unsuccessful response will contain the error code.
The palm position is represented by the palm rectangle.
The detection confidence contains a score from the interval \<0.0,1.0>.
Values near 1.0 indicates a high confidence a palm was detected.
### Create Palm Template
To create a palm template, make a `GET /template` request on the palm resource.
The returned template can be used as a reference in the [palm similarity verification](#match-palm-against-reference).
### Match Palm Against Reference
To verify the similarity between two palms or to match a palm to a template, make a `POST /similarity` request on the palm resource.
Provide a template or a palm to be used as a reference.
The provision of both is not permitted.
#### Palm as a reference
To match a palm against another palm, provide the palm resource link in the `POST /similarity` request.
Any palm can be used as a reference while it is persisted in the cache.
It is not possible to use a palm after it has expired.
#### Reference template
To match a palm with a palm template, provide the base64 encoded template.
The template has to be compatible with the server's version of the palm template.
If the provided template is not compatible with the server, the error response with a code `PALM_TEMPLATE_VERSION_MISMATCH` will be returned.
If the provided template is corrupted or contains invalid template, the error response with a code `PALM_TEMPLATE_INVALID_DATA` will be returned.
### Inspect palm
To check additional data and verify the palm authenticity, a `POST /inspect` request has to be made on the palm resource.
The response contains data extracted from the provided palm and provides the following information:
- Video injection detection
#### Video injection detection
Reports whether the injection detection was evaluated and eventually detected.
## Request session management
The \{project} supports the creation of resources (customer or face) as part of a session.
This adds a higher level of resource protection and ensures that the incoming data were created at the time of the onboarding.
The recommended flow process should consist of the following steps:
1. Create session
1. Create resource (customer or face) linked to the session
1. Perform actions on the resource
1. Delete session
### Create session
To create a session a `POST /sessions` request must be made, specifying the session's active period in the `timeout` attribute.
The response will contain a `Base64` encoded session token.
### Create resource
To create a resource linked to the session, the session token from the response must be provided in the `x-inn-session-token` header.
Any subsequent request accessing this resource must contain the same session token in the header that was provided during the creation.
### Delete session
To delete a session a `DELETE /sessions` request must be made, containing the session token in the `x-inn-session-token` header.
This will delete the requested session as well as any resources linked to this session.
## Request limiting
Starting with version 1.48.0, \{project} introduces request limiting, allowing users to control and manage the rate of incoming requests.
By default, this function is disabled and can be configured in application configuration file via `innovatrics.dot.dis.server.request-rate-limit.enabled` property.
If the request rate limit is exceeded and the wait time surpasses maximal configured wait duration, the server returns an `HTTP 429 TOO MANY REQUESTS` response.
|===
h|Property h| Description
2+| **innovatrics.dot.dis.server.request-rate-limit**
.^a|* **enabled**[[request-limiting-enabled]]
a|Enable request rate limiting.
Possible values: `false` and `true`
Default value: `false`
2+| **resilience4j.bulkhead.instances.http-request**
.^a|* **max-concurrent-calls**[[request-limiting-max-concurrent-calls]]
a|Sets the maximum number of concurrent calls allowed.
Default value: `500`
.^a|* **max-wait-duration**[[request-limiting-max-wait-duration]]
a|Defines the maximum time (in milliseconds) a thread can be blocked when attempting to enter a saturated bulkhead.
Default value: `1000`
|===
## Application configuration
\{project} is configurable via YAML file under the `config` folder:
1. config/application.yml
1. innovatrics.dot.dis.emrtd.master-list.filepath
.\{project} configuration properties
|===
h|Property h| Description
2+| **innovatrics.dot.dis**
.^a|* **jpg-compression-quality**[[property-jpg-compression-quality]]
a| The compression quality of images returned in JPG format.
Default value: 0.9
.^a|* **libraries.filepath**[[property-libraries-filepath]]
a| The location of the native libraries required by \{project}.
Default value: `libs`
2+| **innovatrics.dot.dis.proxy**
.^a|* **host**[[property-proxy-host]]
a| The hostname of your proxy server.
Example: `squid.example.com`
.^a|* **port**[[property-proxy-port]]
a| Available port of your proxy server.
Example: `8088`
2+| **innovatrics.dot.dis.emrtd.master-list**
.^a|* **filepath**[[property-proxy-host]]
a| The file path to the eMRTD master list certificates in pem format.
2+| **innovatrics.dot.dis.iface**
.^a|* **license.filepath**[[property-iface-license-filepath]]
a|Innovatrics IFace license file path.
Default value: `../license/iengine.lic`
.^a|* **solvers.filepath**[[property-iface-solvers-filepath]]
a|Innovatrics IFace solvers file path.
Default value: `../solvers`
.^a|* **crop-method**[[property-iface-crop-method]]
a|Face cropping method according to ISO/IEC 19794-5 standard.
Supported methods: `FULL_FRONTAL` and `TOKEN_FRONTAL`
.^a|* **face-attribute.age-gender-speed-accuracy-mode**[[property-iface-face-attribute-age-gender-speed-accuracy-mode]]
a| Age gender speed accuracy mode.
Supported modes: `fast`, `balanced` and `accurate`.
.^a|* **face-template.extraction-speed-accuracy-mode**[[property-iface-face-template-extraction-speed-accuracy-mode]]
a| The face template extraction speed accuracy mode.
Supported modes: `fast`, `balanced` and `accurate`.
2+| **innovatrics.dot.dis.iface.face-detection**
.^a|* **face-size-ratio.min**[[property-iface-fsr-min]]
a|The minimal face size ratio of faces detected to the shorter side of an image.
The application will recognize a face in the image only if the face size ratio >= than this value.
Default value: 0.05
.^a|* **face-size-ratio.max**[[property-iface-fsr-max]]
a|The maximal face size ratio of faces detected to the shorter side of an image.
The application will recognize a face in the image only if the face size ratio \\<= than this value.
Default value: 0.35
.^a|* **confidence-threshold**[[property-iface-face-detection-confidence-threshold]]
a| The face detection confidence threshold. Faces with a confidence score lower that this value will be ignored.
The supported interval is [0, 10000].
.^a|* **speed-accuracy-mode**[[property-iface-face-detection-speed-accuracy-mode]]
a| The face detection speed accuracy mode.
Supported modes: `fast`, `balanced` and `accurate`.
.^a|* **max-detection-count**[[property-iface-face-detection-max-detection-count]]
a| The max number of faces to detect in a single image when the mode is `FREE`.
Default value: 2
Min value: 2
See more in [Detection mode](#Detection mode).
.^a|* **max-image-size**[[property-iface-face-detection-max-image-size]]
a| The parameter defines maximal image size of image entering to internal solver in `balanced` and `accurate` detection mode.
It affects the memory requirements. When set to a higher number, the face detection consumes more memory.
The value of this param affects the limit for minFaceSize.
If minFaceSize needs to be set to a smaller value to detect smaller faces, then this parameter must be set to a higher value.
See more in [min face size ratio restrictions](#min-face-size-ratio-restrictions).
Default value: 1200
2+| **innovatrics.dot.dis.iface.background-removal**
.^a|* **segmentation-image-type**[[property-iface-background-removal-segmentation-image-type]]
a| The parameter determines type of returned image. Valid values are `mask`, `masked`, `masked_alpha`.
See more in [configuration of returned type for cropped image](#configure-returned-image-type).
.^a|* **segmentation-matting-type**[[property-iface-background-removal-segmentation-matting-type]]
a| The parameter defining type of matting used after head shoulder segmentation. Valid values are `off`, `global`.
See more in [configuration of segmentation matting](#configure-segmentation-matting).
.^a|* **segmentation-threshold**[[property-iface-background-removal-segmentation-threshold]]
a| The parameter defining threshold for segmentation mask.
The parameter should be in range \\<-10000, 10000>.
See more in [configuration of segmentation matting](#configure-segmentation-matting).
.^a|* **segmentation-matting-possible-threshold**[[property-iface-background-removal-segmentation-matting-possible-threshold]]
a| The parameter defining threshold for a possible foreground for generating trimap for matting.
The parameter should be in range \\<-10000, 10000>.
See more in [configuration of segmentation matting](#configure-segmentation-matting).
.^a|* **segmentation-matting-sure-threshold**[[property-iface-background-removal-segmentation-matting-sure-threshold]]
a| The parameter defining threshold for a sure foreground for generating trimap for matting.
The parameter should be in range \\<-10000, 10000>.
See more in [configuration of segmentation matting](#configure-segmentation-matting).
.^a|* **background-color**[[property-iface-background-removal-background-color]]
a| The parameter defining color which is used to fill in parts of cropped image that fall outside the original source image boundaries.
Valid value is hexadecimal code string e.g. `RRGGBB`.
See more in [Background removal configuration](#configure-background-color).
2+| **innovatrics.dot.dis.customer.request-video-processing**
.^a|* **enabled**[[property-request-video-processing-enabled]]
a| Indicates whether video processing is enabled for requests that support video recording retrieval.
Default value: `false`.
Possible values: `false` and `true`.
2+| **innovatrics.dot.dis.customer.eye-gaze-liveness**
.^a|* **min-valid-selfies-count**[[property-iface-egl-min-valid-selfies-count]]
a|The minimal selfie count required for eye gaze liveness.
Acceptable values: `4, 5, 6, 7`
2+| **innovatrics.dot.dis.customer.passive-liveness**
.^a|* **mode**[[property-iface-passive-liveness-mode]]
a|The evaluation mode used by the passive liveness check.
Possible values: `UNIVERSAL` *(default)*, `STANDARD`
2+| **innovatrics.dot.dis.customer.smile-liveness**
.^a|* **passive-liveness-threshold**[[property-iface-smile-liveness-passive-liveness-threshold]]
a|The passive liveness threshold used by the smile liveness check.
The supported interval is [0, 1].
See more in [smile liveness check.](#smile-liveness-check)
2+| **innovatrics.dot.dis.customer.selfie**
.^a|* **face-size-ratio.min**[[property-iface-selfie-fsr-min]]
a|The minimal face size ratio of faces detected in customer's selfies.
The application will recognize a face in the image only if the face size ratio >= than this value.
Default value: 0.1
.^a|* **face-size-ratio.max**[[property-iface-selfie-fsr-max]]
a|The maximal face size ratio of faces detected in customer's selfies.
The application will recognize a face in the image only if the face size ratio \\<= than this value.
Default value: 0.4
2+| **innovatrics.dot.dis.customer.document.portrait**
.^a|* **cropped-portrait-face-size-ratio.min**[[property-iface-documentportrait-fsr-min]]
a|The minimal face size ratio of faces detected in customer's document portrait of classified documents.
The application will recognize a face in the image only if the face size ratio >= than this value.
Default value: 0.14
.^a|* **cropped-portrait-face-size-ratio.max**[[property-iface-documentportrait-fsr-max]]
a|The maximal face size ratio of faces detected in customer's document portrait of classified documents.
The application will recognize a face in the image only if the face size ratio \\<= than this value.
Default value: 0.4
.^a|* **non-cropped-portrait-face-size-ratio.min**[[property-iface-documentportrait-fsr-min]]
a|The minimal face size ratio of faces detected in pages of unknown documents.
The application will recognize a face in the image only if the face size ratio >= than this value.
Default value: 0.05
.^a|* **non-cropped-portrait-face-size-ratio.max**[[property-iface-documentportrait-fsr-max]]
a|The maximal face size ratio of faces detected in pages of unknown documents.
The application will recognize a face in the image only if the face size ratio \\<= than this value.
Default value: 0.25
2+| **innovatrics.dot.dis.customer.document.inspection**
.^a|* **ocr-text-field-threshold**[[property-ocr-text-field-threshold]]
a| The ocr text field confidence threshold.
Text fields with a ocr confidence lower than this value will be listed in the inspection of the visual zone.
Default value: 0.92
.^a|* **color-profile-change-detection-threshold**[[property-color-profile-change-detection-threshold]]
a| The color profile change detection threshold.
Document pages with a score lower than this value will be evaluated as tampered.
The supported interval is [0.0, 1.0].
Default value: 0.4
.^a|* **presentation-attack-threshold**[[property-presentation-attack-threshold]]
a| The presentation attack detection threshold.
Document pages with a score lower than this value will be evaluated as spoofs.
The threshold is applied to screenshot and print copy detection.
The supported interval is [0.0, 1.0].
Default value: 0.5
.^a|* **tampered-text-detection-threshold**[[property-tampered-text-detection-threshold]]
a| The tampered text detection threshold.
Document pages with a score lower than this value will be evaluated as tampered.
Default value: 0.5
2+| **innovatrics.dot.dis.customer.inspection**
.^a|* **face-mask-threshold**[[property-face-mask-threshold]]
a| The face mask detection threshold.
If the mask detection score on a customer selfie is above this value, then the mask is considered to be present
The supported interval is [0.0, 1.0].
Default value: 0.4975
.^a|* **selfie-similarity-with-document-portrait-threshold**[[property-document-portrait-similarity-threshold]]
a| Customer selfie similarity with document portrait threshold.
Customer selfie and face detected on document portrait are evaluated as similar if their similarity confidence is above this value.
The supported interval is [0.0, 1.0].
Default value: 0.33
.^a|* **selfie-similarity-with-chip-portrait-threshold**[[property-chip-portrait-similarity-threshold]]
a| Customer selfie similarity with document chip portrait threshold.
Customer selfie and face retrieved from the document chip are evaluated as similar if their similarity confidence is above this value.
The supported interval is [0.0, 1.0].
Default value: 0.33
.^a|* **selfie-similarity-with-liveness-selfies-threshold**[[property-liveness-selfie-similarity-threshold]]
a| Customer selfie similarity with liveness selfies threshold.
Customer selfie and selfies added to liveness are evaluated as similar if their similarity confidence is above this value.
If there are multiple liveness selfies, then the average confidence is used for the evaluation.
The supported interval is [0.0, 1.0].
Default value: 0.55
|===
\<\<\<
## Appendix
### Supported documents
https://developers.innovatrics.com/digital-onboarding/docs/functionalities/document/supported-documents/[List of supported documents]
\<!-- include: \{gradle-rootdir}/CHANGELOG.md not found -->
[[Dockerfile-example]]
### \{project} Dockerfile example
1. ARG UID=1000
ARG GID=1000
ARG ROCKY_ROOTFS=/mnt/rootfs
FROM rockylinux:9 as rocky-micro-build
ARG UID
ARG GID
ARG ROCKY_ROOTFS
ARG ADDITIONAL_LIBS
RUN mkdir -p $\{ROCKY_ROOTFS}
RUN printf \
'[Adoptium] \n\
name=Adoptium \n\
baseurl=https://packages.adoptium.net/artifactory/rpm/rhel/$releasever/$basearch \n\
enabled=1 \n\
gpgcheck=1 \n\
gpgkey=https://packages.adoptium.net/artifactory/api/gpg/key/public' >> /etc/yum.repos.d/adoptium.repo
RUN set -ex && \
yum install epel-release --setopt install_weak_deps=false --nodocs -y
# Install common libraries
RUN yum install --installroot $\{ROCKY_ROOTFS} \
libusbx \
libusb \
coreutils-single \
glibc-langpack-en \
temurin-17-jre \
jemalloc \
libgomp \
--setopt install_weak_deps=false --nodocs --releasever 9 -y && \
yum --installroot $\{ROCKY_ROOTFS} clean all
# Install additional libraries (e.g. CURL, etc.)
RUN if [ -n "$ADDITIONAL_LIBS" ]; then \
yum install --installroot $\{ROCKY_ROOTFS} \
$\{ADDITIONAL_LIBS} \
--setopt install_weak_deps=false --nodocs --releasever 9 -y && \
yum --installroot $\{ROCKY_ROOTFS} clean all; \
fi
RUN rm -rf $\{ROCKY_ROOTFS}/var/cache/* $\{ROCKY_ROOTFS}/var/log/dnf* $\{ROCKY_ROOTFS}/var/log/yum.* $\{ROCKY_ROOTFS}/usr/share/zoneinfo
# Add a user to run the application
RUN set -eux && \
groupadd --gid=$\{GID} dot-dis && \
adduser --gid=$\{GID} --uid=$\{UID} dot-dis && \
passwd -l dot-dis
# copy additional files to /mnt/rootfs
RUN set -eux && \
cp -r /etc/yum.repos.d/ $\{ROCKY_ROOTFS}/etc/yum.repos.d/ && \
cp /etc/group $\{ROCKY_ROOTFS}/etc/group && \
cp /etc/passwd $\{ROCKY_ROOTFS}/etc/passwd && \
cp /etc/shadow $\{ROCKY_ROOTFS}/etc/shadow
FROM scratch
ARG UID
ARG GID
ARG ROCKY_ROOTFS
COPY --from=rocky-micro-build /mnt/rootfs/ /
WORKDIR /srv/dot-digital-identity-service
RUN chown $\{UID}:$\{GID} /srv/dot-digital-identity-service
# Set the locale
ENV LANG en_US.UTF-8
ENV LANGUAGE en_US:en
ENV LC_ALL en_US.UTF-8
# Add entrypoint script
COPY --chown=$\{UID}:$\{GID} --chmod=u+x entrypoint.sh /usr/local/bin/
# Add libs
ARG INNOONNXRUNTIME_LIB
COPY --chown=$\{UID}:$\{GID} --chmod=755 $\{INNOONNXRUNTIME_LIB} ./libs/
ARG IFACE_LIB
COPY --chown=$\{UID}:$\{GID} --chmod=755 $\{IFACE_LIB} ./libs/
COPY --chown=$\{UID}:$\{GID} --chmod=755 solvers/* ./libs/solvers/
ARG SAM_OCR_LIB
COPY --chown=$\{UID}:$\{GID} --chmod=755 $\{SAM_OCR_LIB} ./libs/
# Config libs
RUN ldconfig "$(realpath libs)"
# Add application
ARG JAR_FILE
COPY --chown=$\{UID}:$\{GID} $\{JAR_FILE} ./app.jar
USER $\{UID}
# Configure jemalloc
ENV LD_PRELOAD="/usr/lib64/libjemalloc.so.2"
# configure environment
ENV CONFIG_DIR=/srv/dot-digital-identity-service/config
ENV LOGS_DIR=/srv/dot-digital-identity-service/logs
ARG JAVA_OPTS
ENV JAVA_OPTS=""
EXPOSE 8080
CMD ["entrypoint.sh"]
1. [[Entrypoint.sh-script]]
### Entrypoint.sh script example
1. #!/bin/sh
set -eux
java $JAVA_OPTS \
-Dspring.config.additional-location=file:$CONFIG_DIR/application.yml \
-Dlogging.config=file:$CONFIG_DIR/logback-spring.xml \
-jar app.jar
....