Features
The face recognition process includes the detection of the face, detection of facial landmarks, face template extraction and 1:1 matching (verification) or 1:N matching (identification).
Face Detection
Face detection is a process of finding multiple faces in the input image.
Note: SFE Toolkit 4 uses a unified detection API (sfeDetect()) that works for all detection modalities (face, iris, palm, object, tattoo, person). The function automatically determines the detection type based on the solver provided. This unified API replaces the previous modality-specific detection functions.
SmartFace Embedded can detect faces of various sizes, orientations, facial hair types or ethnicities. The face can be partly occluded by glasses, sunglasses or a hat. IFace SDK can operate with many different lighting conditions and image qualities.
Face size is defined as the maximum value of the distance between inter eyes centers and distance between the center of the mouth and the center point between the eyes (nose root):
face_size = max(distance(left_eye_center, right_eye_center), distance(mouth_center, eyes_center))
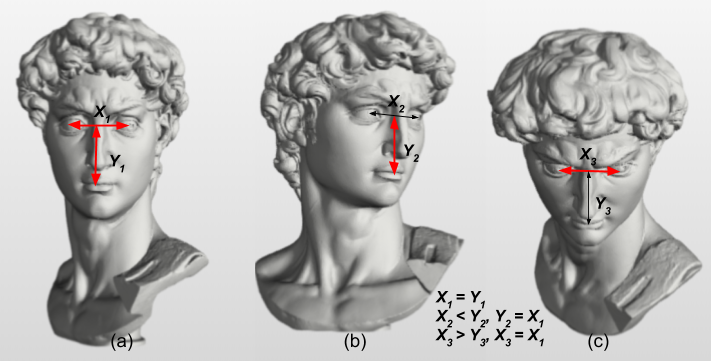
Face size: visualizations of various distances of inter eyes centers distances (X=distance(left_eye_center,right_eye_center)) and distances between the center of mouth and center point between eyes (Y=distance(mouth_center, eyes_center)). Face size is the maximum of these two distances. It can be seen from images (a), (b) and (c) that the face size (red arrow) defined in this way is invariant to the pose of the head (yaw, pitch, roll).
The face size has to be specified in absolute (pixel distance). In SFE Toolkit the minimum and maximum face size comes as input for [sfeFaceDetectInputSize] function. This function returns the recommended dimension of the image to be downscaled before face detection.
The face area is closely related to the face size. It is an area around a face defined by a bounding rectangle with width = 4 x face_size, height = width / 0.75 (according to ISO/IEC 19794-5 standard, section 9.2). The Point which is the geometric center between eyes is positioned in the face area in position X_Pos, Y_Pos, where Y_Pos = 0.6f * width, and X_Pos relies on the head yaw rotation. The main reason for this is to have the whole head in the face area no matter what the head rotation is.
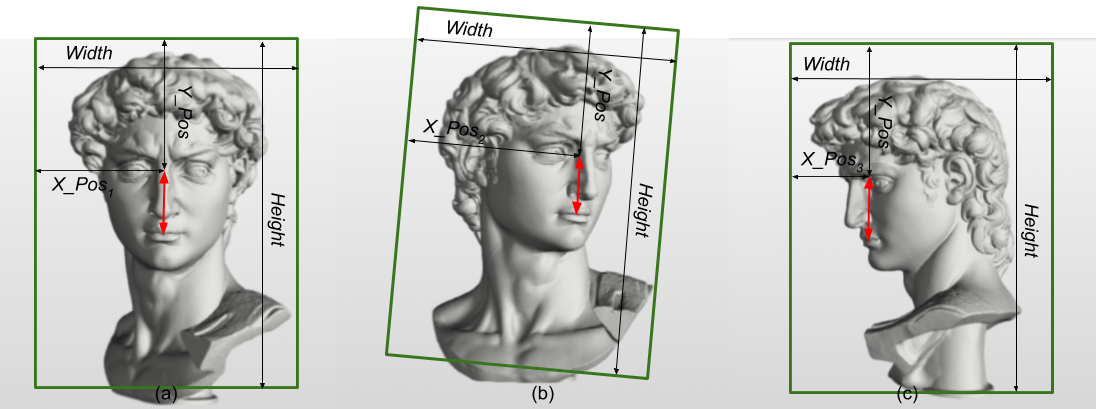
Face area: visualizations of face areas (green boxes) for the face in various positions. The face size is defined by a distance shown as the red arrow. There are different positions of the face area according to the face yaw rotation shown in (a),(b) and (c). Positions of the eyes' centers in the face areas are the same in the Y direction (Y_Pos) but change in the X direction (X_Pos1, X_Pos2, X_Pos3). Width and Height are the same in all three cases.
Face area size relative to image area size can specify the sizes of faces that should be detected.
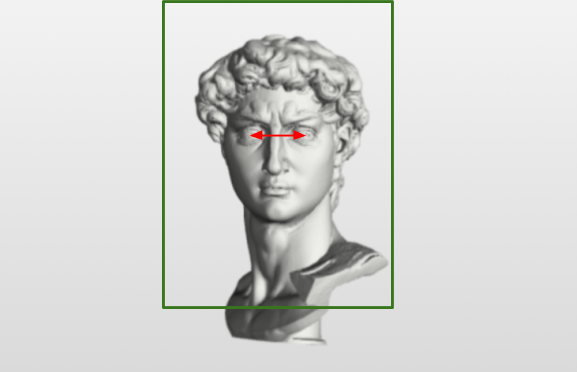
If image above has resolution of 730x470 pixels (image_area_size = 730 * 470 = 343100) and face_size is 70 pixels (face_area_width = 70 * 4 = 280, face_area_height = face_area_width / 0.75 = 373, face_area_size = 104440), then relative image size is relative_image_size = 104440 / 343100 = 0.304 (30.4%). The face area is marked with a green box and the face size with a red arrow.
Sometimes, when faces are close to image boundaries, their face areas can get out of the image boundaries. Some applications may want to find these faces (and filter them out). Due to this reason, the SFE Toolkit provides functionality to return the face area visible in the image.
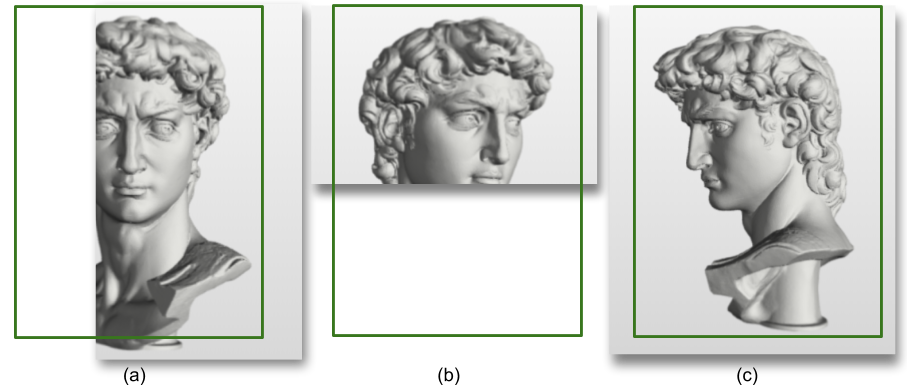
Example of face area visible in the image. Relative values: (a) 0.30, (b) 0.5, (c) 1.
In SFE Toolkit C API use function [sfeFaceArea] which returns actual face size, face area and face area relative to the image. Find more information in the Face Area section
SmartFace Embedded can detect faces of various rotations.
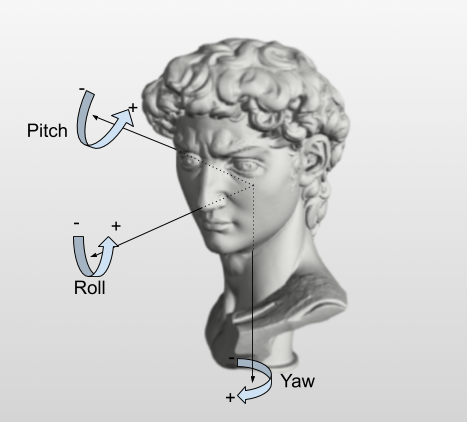
Possible face rotations (defined as in DIN9300).
Find more information in the Headpose Angles section
SmartFace Embedded has different face detection modes. Using different modes can adjust the trade-off between speed and accuracy of face detection. Face detection accuracy has two meanings:
- a ratio between false accepted faces and false rejected faces
- the precision of facial feature point detection.
Face detection returns an array of bounding boxes of detected faces with detection confidence. Face detection confidence is a value in the range <0.0, 1.0> and it refers to the confidence score of the face related to face detection. The higher the value of the attribute the better quality of the face. The decision thresholds are around 0.06, but it depends on the face image quality/camera angle etc. Detected faces are ordered using face detection confidence. Face detection confidence defines the order of faces. They are ordered in descending order, so the face with the highest confidence is the first (index 0) in the array.
In SFE Toolkit C API use function [sfeDetect] with a face detection solver. The unified sfeDetect() function automatically determines the detection modality based on the solver type.
Example:
  SFEDetection detected_face = {};
  { // STAGE 3: Detect face in the image
    size_t detection_count = 1;
    // Detect face in the image
    error = sfeDetect(detector_solver, resized_image, detection_threshold,
                          &detected_face, &detection_count);
    utils::checkError(error);

    if (detection_count == 0) {
      std::cout << "No face detected in the probe image." << std::endl;
      return 0;
    } else {
      std::cout << "Found " << detection_count
                << " face(s) in the probe image. Using the face with highest "
                   "confidence."
                << std::endl;
    }
  }
Use the following function in SFE Toolkit bindings:
- In Python use
sfe_core.detect - In Kotlin use
com.innovatrics.smartface.embedded.toolkit.core.detect - In Swift use
SFEToolkitCore.detect - In .NET use
Innovatrics.SFEToolkit.Core.Detect
Recommended input image dimensions
Before face detection, the image size can be adjusted to fit the required face size detection range. This process improves accuracy. The input combination of required maximal and minimal face sizes is validated against the model constraints. If valid, the recommended width and height of the image are calculated. The original image can be resized by using a specific function from sfe_toolkit.
In SFE Toolkit C API use function [sfeFaceDetectInputSize]
Example:
    // Solvers without width and height in name can accept dynamic input
    // image size. For best results we recommend to scale the input image to
    // a resolution recommended by the sfeFaceDetectInputSize function

    // Use sfeFaceDetectInputSize to get recommended input image dimensions
    // for given min_face_size/max_face_size
    SFEDetectionInputSize input_size{};
    SFEError error = sfeFaceDetectInputSize(
        image,
        SFEFaceDetectionAccuracyType::SFE_FACE_DETECT_ACCURACY_TYPE_ACCURATE,
        face_size_min, face_size_max, &input_size);
    utils::checkError(error);
    recommended_width = input_size.width;
    recommended_height = input_size.height;
Use the following function in SFE Toolkit bindings:
- In Python use
sfe_face.detect_input_size - In Kotlin use
com.innovatrics.smartface.embedded.toolkit.face.detectInputSize - In Swift use
SFEToolkitFace.detectInputSize - In .NET use
Innovatrics.SFEToolkit.Face.DetectInputSize
Dynamic model input shape
Face detection ONNX models used in the SFE Toolkit support dynamic input shape. It means you can choose any image resolution to pass into face detection. Please note the bigger the input image is the longer the face detection takes.
Based on the resolution of the input image and the required face size to be detected, we can recommend the size of the image for face detection. See more in this section
Static model input shape
Some NN conversion tools and NN inference engines do not support dynamic model input shapes, for example, Rockchip, and Ambarella. In this case, we provide multiple face detection models with the input shape set according to the customer's need, for example, Full HD (1920x1080), HD (1280x720), 640x360, etc.
Face Landmarks Extraction
Facial landmarks extraction is a process of detecting 23 landmarks (feature points) in a detected face. These points include the position of the eyes, eyebrows, nose, mouth, chin and edges of the face. Each detected landmark consists of the landmark type, x and y coordinates relative to the input image and confidence. All detected landmarks and their IDs can be seen In the picture below.
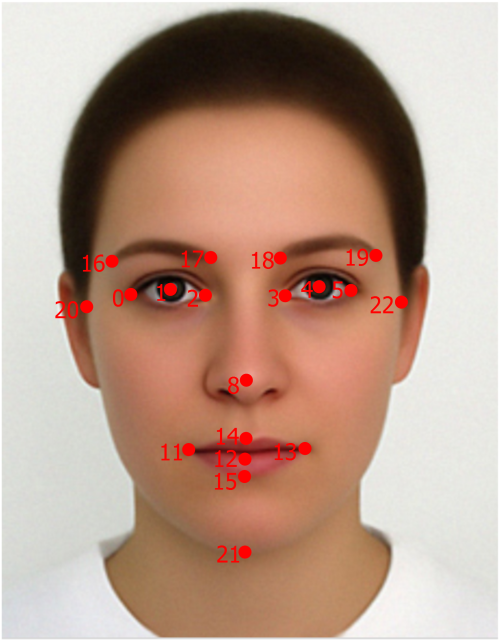
Facial landmarks and their IDs detected by SmartFace Embedded.
In SFE Toolkit C API use function [sfeFaceLandmarks] to extract the landmarks from the detected face.
Example:
  std::vector<SFEFaceLandmarks> landmarks(SFE_FACE_LANDMARK_COUNT);
  { // STAGE 4: Get face landmarks

    // Use landmarks detection solver to get relevant landmarks for
    // the detected face
    error = sfeFaceLandmarks(landmarks_solver, image, &detected_face,
                             landmarks.data());
    utils::checkError(error);
  }
Use the following function in SFE Toolkit bindings:
- In Python use
sfe_face.landmarks - In Kotlin use
com.innovatrics.smartface.embedded.toolkit.face.landmarks - In Swift use
SFEToolkitFace.landmarks - In .NET use
Innovatrics.SFEToolkit.Face.Landmarks
A list of all facial landmarks is defined in enum [SFEFaceLandmarkType]. The position of the output facial landmark is always relative to the input image origin. The image origin is pixel[0,0] in the upper left corner. The position of the feature point is returned as a pair of x and y coordinates with float precision. [SFEFaceLandmarks] includes also the confidence of detected landmarks.
Landmarks are used for face mask status detection, normalization of the face before the face template extraction, face liveness detection and other operations.
Face Crop
SmartFace Embedded provides functionality to crop the detected face from the input image for example for template re-extraction and migration purposes. Face crop includes the crop image of the detected face, its bounding box and used face size extension.
Face size extension defines the size of the crop as an extension of the detection bounding box. The crop will be centered on the detection bounding box and the face size will be multiplied by this value. The API accepts a float; typical values are 0, 1, 2, 3, 4 and 5. You should use the correct value depending on the post-processing required on the server side, for example:
- Template extraction requires face_size_extension=2
- Passive liveness detection requires face_size_extension=5
- Passive liveness distant fast model does not require face_size_extension
You can also limit the size of the crop by setting the maximum face size. Maximum face size defines the maximal size of the face in the crop area. Once a face is detected and its crop area is calculated using face_size_extension, this value will be used to determine the scale of the crop. If the actual face size is larger than the input max_face_size, the cropped image will be downscaled accordingly.
In SFE Toolkit C API use function [sfeFaceCrop]
Example:
    SFEFaceCrop crop_data = {};
    DEFER(sfeImageFree(crop_data.crop_image));
    { // STAGE 5.2: Get face crop
      //  Defines the size of the crop as an extension of
      // the detection bounding box.
      float face_size_extension = 2.0f;
      SFEError error =
          sfeFaceCrop(image, landmarks[best_face_index].data(),
                      face_size_extension, (float)(face_size_max), &crop_data);
      utils::checkError(error);

      std::cout << "Face crop extension: " << crop_data.face_size_extension
                << ", width of cropped image: " << crop_data.crop_image.width
                << "px, height of cropped image: "
                << crop_data.crop_image.height << "px." << std::endl;
    }
Use the following function in SFE Toolkit bindings:
- In Python use
sfe_face.crop - In Kotlin use
com.innovatrics.smartface.embedded.toolkit.face.crop - In Swift use
SFEToolkitFace.crop - In .NET use
Innovatrics.SFEToolkit.Face.Crop
Face Mask Detection
Face mask detection determines the presence of the face mask on the given face. The presence of the mask is specified using mask confidence which is a value in the range <0.0, 1.0>. The recommended decision threshold is around 0.5.
In SFE Toolkit C API use function [sfeFaceMaskConfidence]
Example:
    error = sfeFaceMaskConfidence(landmarks.data(), &mask_confidence);
    utils::checkError(error);
Use the following function in SFE Toolkit bindings:
- In Python use
sfe_face.mask_confidence - In Kotlin use
com.innovatrics.smartface.embedded.toolkit.face.maskConfidence - In Swift use
SFEToolkitFace.maskConfidence - In .NET use
Innovatrics.SFEToolkit.Face.GetFaceMaskConfidence
Face Template Extraction
SmartFace Embedded can be also used for 1:1 (verification) and 1:N (identification) face recognition.
To perform 1:1 or 1:N matching it is necessary to extract a face template. A face template is a feature vector describing the face. The size of the face template is only 522 B so the memory requirements for identification are low and the matching is very fast. SmartFace Embedded supports multiple template extraction modes. Using different modes can adjust the trade-off between face template creation speed and face template quality. Face templates of higher quality give better results when used for 1:1 or 1:N face matching. Templates created with different template extraction modes are generally not compatible; exceptions are the V2 group (fast, balanced, accurate, accurate server), which can be matched with each other (see the compatibility matrix below). Retrieved template versions can be compared.
- fast - Face templates suitable for verification of fairly good accuracy are created when the fast mode is used. The performance of face template creation is very fast. Suitable for mobile/embedded devices.
- balanced - Face templates suitable for verification/identification of high accuracy are created when the balanced mode is used. The performance of the face template creation is somewhere in between accurate and fast modes. The balanced model is also capable of template extraction from faces with the face mask present.
- accurate - Face templates suitable for verification/identification of very high accuracy are created when the accurate mode is used. However, the performance of the face template creation is not as good as when balanced or fast mode is used.
You can decide which algorithm to use by choosing the appropriate face template extraction solver.
- face_extraction_fast
- face_extraction_balanced
- face_extraction_accurate
Please see the supported features table to understand which model is supported on your HW.
In SFE Toolkit C API use function [sfeFaceTemplateExtract] To use the correct template extraction mode, load the appropriate solver:
- face_extraction_fast
- face_extraction_balanced
- face_extraction_accurate
Example:
    { // STAGE 1.4: Extract probe face template
      // Use template extraction solver to create new face
      // template
      error = sfeFaceTemplateExtract(template_solver, image, &detected_face,
                                     landmarks.data(), &probe_face_template);
      utils::checkError(error);
    }
Use the following function in SFE Toolkit bindings:
- In Python use
sfe_face.extract - In Kotlin use
com.innovatrics.smartface.embedded.toolkit.face.extract - In Swift use
SFEToolkitFace.extract - In .NET use
Innovatrics.SFEToolkit.Face.TemplateExtract
The face template includes the template version and can be obtained using C API.
- Template version is used during matching. Within the V2 group (fast, balanced, accurate, accurate server), templates from different extraction models can be matched; for other versions, the same minor version is required. When using multiple SmartFace Embedded Toolkits on multiple platforms or in conjunction with the SmartFace platform, see the compatibility matrix below for which template versions can be matched.
Face verification template compatibility
The face template has its system of version numbers. Major number change defines radical changes in the internal structure of the template document. Minor number change defines a change in extraction algorithm or minor data change of template. Except within the V2 group (see table below), templates of different minor versions are not compatible for matching.
Face template version compatibility (matching)
| Group | Minor versions | Cross-version matching |
|---|---|---|
| Legacy | 33, 36, 37, 38, 39, 40, 41 | No (exact version only) |
| V2 (SFE) | 52, 53, 54, 55 | Yes (all four together) |
| Server/NIST | 44, 45, 50, 51 | No (exact version only) |
Same minor version always matches. For the V2 group (Fast, Balanced, Accurate, AccurateServer), any pair among these four is compatible; when the two templates have different but compatible minor versions, the match score is the average of the probe and reference normalized scores (inno-gallery behaviour). Legacy and Server/NIST versions match only with the exact same minor version.
In SFE Toolkit C API use function [sfeFaceTemplateVersion]
Use the following function in SFE Toolkit bindings:
- In Python use
sfe_face.template_version - In Kotlin use
com.innovatrics.smartface.embedded.toolkit.face.templateVersion - In Swift use
SFEToolkitFace.templateVersion - In .NET use
Innovatrics.SFEToolkit.Face.Template.GetVersion
Face Template Import/Export
Face templates can be exported to bytes for sharing between Innovatrics components or for storage. Import accepts multiple formats (auto-detected) and returns an SFEFaceTemplate.
Export format: iface-template protobuf only (single face embedding, modality Face, model version and quality in metadata). A buffer of 1024 bytes is sufficient for export.
Import formats (auto-detected):
- Raw ICF: exactly 522 bytes, starts with
ICF\0— same as internal template layout. - iface-template protobuf: exactly one embedding; modality must be Face; nonzero model version (high byte = major, low byte = minor); embedding 512 elements as quantized (char) or float (float is normalized then quantized the same as iface).
Unsupported format or invalid data returns an error.
Supported template versions (for import and matching):
- Legacy (IFace SDK): 33, 36, 37, 38, 39, 40, 41 (LegacyAccurate, LegacyFast, LegacyVisa, LegacyMask, LegacyBalanced, LegacyAccurateMask, LegacyWild).
- V2 extraction (SFE): 52 (Fast), 53 (Balanced), 54 (Accurate), 55 (AccurateServer).
- Server/NIST (iface/inno-gallery): 44 (Visa), 45 (Wild), 50 (Nist), 51 (NistP1).
Matching rules between versions are described in the compatibility matrix above.
In SFE Toolkit C API use functions [sfeFaceTemplateExport] and [sfeFaceTemplateImport]
Example:
    { // STAGE 1.6: (optional) Export and re-import template
      std::vector<uint8_t> buf(1024);
      size_t size = buf.size();
      error = sfeFaceTemplateExport(&probe_face_template, buf.data(), &size);
      if (error && size > buf.size()) {
        buf.resize(size);
        size = buf.size();
        error = sfeFaceTemplateExport(&probe_face_template, buf.data(), &size);
      }
      utils::checkError(error);

      SFEFaceTemplate imported_template = {};
      error = sfeFaceTemplateImport(buf.data(), size, &imported_template);
      utils::checkError(error);

      float roundtrip_score = 0.f;
      error = sfeFaceTemplateMatch(&probe_face_template, &imported_template,
                                  &roundtrip_score);
      utils::checkError(error);
      std::cout << "Export/import round-trip match score: " << roundtrip_score
                << std::endl;
    }
Face Template Verification
Verification is a comparison of two extracted face templates and it returns a matching score which refers to the probability that the two templates are extracted from the face of the same person. When the matching score is higher than a certain score threshold then the face images belong to the same person with high probability. The matching score range is <0.0, 1.0>. Its values can be interpreted as follows:
- Low values of the score, i.e. range <0, 0.6>, are normalized using FAR values and this formula:
score_L=-10*log(FAR)/100. It means that score 0.3 is related to FAR=1:1000=10^-3, and score 0.5 is related to FAR=1:100000=10^-5 (evaluated on our large testing non-matching pairs dataset). - High values of the score, i.e. range <0.8, 1.0>, are normalized using FRR values and this formula:
score_H=100/3*(FRR + 2)/100. It means that a score of 0.8 is related to FRR=0.4, and a score of 0.9 is related to FRR=0.7 (evaluated on our large testing matching pairs dataset). - Scores values in the range (0.6, 0.8) are weighted averages of score_L and score_H. This normalization helps the users to select the score threshold according to their needs. If it is too low e.g. threshold = 0.3, then the chance of falsely accepted non-matching faces is quite high (FAR=10^-3). When it is too high e.g. threshold = 0.9, then the chance of false rejected matching faces is quite high (FRR=0.7).
In SFE Toolkit C API use function [sfeFaceTemplateMatch]
Example:
  { // STAGE 4: (optional) 1:1 matching with top candidate to showcase 1:1
    // matching
    utils::printFormatted("1:1 MATCHING WITH TOP CANDIDATE");

    if (identification_results.size() == 0) {
      std::cout << "No candidates found above identification threshold "
                << identification_threshold << std::endl;
      return 0;
    }

    auto best_candidate_template = gallery_face_templates[best_candidate_index];

    float match_confidence;
    error = sfeFaceTemplateMatch(&probe_face_template, &best_candidate_template,
                                 &match_confidence);
    utils::checkError(error);

    std::cout << "Matching score of probe template with template index #"
              << best_candidate_index << ", score: " << match_confidence
              << std::endl;
  }
Use the following function in SFE Toolkit bindings:
- In Python use
sfe_face.template_match - In Kotlin use
com.innovatrics.smartface.embedded.toolkit.face.templateMatch - In Swift use
SFEToolkitFace.templateMatch - In .NET use
Innovatrics.SFEToolkit.Face.TemplateMatch
Face Template Identification
Identification is the process of finding the best matching candidates for the probe template in the template gallery (database). The maximum number of best candidates to be returned by the identification function can be configured. It depends on the use case. Identification returns only candidates whose matching score with the probe template is higher or equal to the matching score threshold. For the matching score threshold recommendation please refer to the section Face Template Verification
The identification is pure CPU-based and it can be configured how many CPU cores will be used for identification to optimize the performance within your application and also the CPU utilization.
In SFE Toolkit C API use function [sfeFaceTemplateIdentify]
Example:
  size_t candidate_count = 1;
  std::vector<SFETemplateIdentificationCandidate> identification_results(
      candidate_count);
  { // STAGE 3: Identify the probe template
    utils::printFormatted("1:N IDENTIFICATION");

    error = sfePalmTemplateIdentify(
        &probe_palm_template, palm_template_gallery.data(),
        palm_template_gallery.size(), identification_threshold,
        identification_results.data(), &candidate_count, 4);
    utils::checkError(error);

    if (candidate_count == 0) {
      std::cout << "No candidates found above identification threshold "
                << identification_threshold << std::endl;
      return 0;
    }

    std::cout << "Found " << identification_results.size()
              << " candidates above identification threshold "
              << identification_threshold << std::endl;
    for (auto &result : identification_results)
      std::cout << "Template index: #" << result.index
                << ", score: " << result.score << std::endl;
  }
Use the following function in SFE Toolkit bindings:
- In Python use
sfe_face.template_identify - In Kotlin use
com.innovatrics.smartface.embedded.toolkit.face.templateIdentify - In Swift use
SFEToolkitFace.templateIdentify - In .NET use
Innovatrics.SFEToolkit.Face.templateIdentify
SFE Toolkit also supports the identification of Entities. Entity ID is used to group multiple face templates of the same person. The result of identification is a list of Entity IDs ordered by best matching score of face templates associated with the same Entity ID.
In SFE Toolkit C API use function [sfeFaceEntityIdentify]
Example:
  size_t candidate_count = 1;
  std::vector<SFETemplateIdentificationCandidate> identification_results(
      candidate_count);
  { // STAGE 3: Identify the probe template
    utils::printFormatted("1:N IDENTIFICATION");

    error = sfePalmTemplateIdentify(
        &probe_palm_template, palm_template_gallery.data(),
        palm_template_gallery.size(), identification_threshold,
        identification_results.data(), &candidate_count, 4);
    utils::checkError(error);

    if (candidate_count == 0) {
      std::cout << "No candidates found above identification threshold "
                << identification_threshold << std::endl;
      return 0;
    }

    std::cout << "Found " << identification_results.size()
              << " candidates above identification threshold "
              << identification_threshold << std::endl;
    for (auto &result : identification_results)
      std::cout << "Template index: #" << result.index
                << ", score: " << result.score << std::endl;
  }
Use the following function in SFE Toolkit bindings:
- In Python use
sfe_face.entity_identify - In Kotlin use
com.innovatrics.smartface.embedded.toolkit.face.entityIdentify - In Swift use
SFEToolkitFace.entityIdentify - In .NET use
Innovatrics.SFEToolkit.Face.entityIdentify
Face Identification Accuracy
Face identification accuracy varies depending on the template extraction solver used. The extraction solvers available per platform are listed in the Supported platforms and features table (typically fast, balanced, accurate).
Solver selection for identification
Choose the solver based on your security requirements and performance constraints:
- Accurate: Very low FAR, suitable for most security-sensitive applications
- Balanced: Low FAR, good for real-time identification with moderate security requirements
- Fast: Higher FAR, suitable for mobile/embedded devices where performance is prioritized over security
When matching against legacy templates (e.g. LegacyAccurateMask), use the same compatibility rules as in the Face template version compatibility table.
Face Liveness Detection
Face recognition systems are vulnerable to spoof attacks made by non-real faces. It is an easy way to spoof face recognition systems by facial pictures such as portrait photographs, masks and videos which are easily available from social media. A secure system needs a liveness evaluation strategy to guard against such spoofing.
Face liveness detection is a process of recognizing spoof attacks and non-real faces. It can recognize a real face against a photograph, masks and videos. The passive liveness score is defined over the interval <0,1>.
SmartFace Embedded currently supports two modes of passive liveness detection:
- DISTANT FAST - Passive liveness check for access control use-case (walkthrough), where the distance between the face and the camera is bigger and the size of the face (eye distance) is smaller.
- NEARBY FAST - Passive liveness check for digital onboarding use-case (selfie), where the distance between the face and the camera is smaller and the size of the face (eye distance) is bigger.
The specific threshold to evaluate the retrieved liveness score should be set according to your security needs. You should evaluate certain face attributes to achieve reliable accuracy.
Recommended threshold for passive liveness modes
| Distant Fast | Threshold | FAR [%] | FRR [%] |
|---|---|---|---|
| 1:100 FAR (APCER) | 0.83 | 1 | 1.95 |
| EER | 0.81 | 1.36 | 1.36 |
| 1:100 FRR (BPCER) | 0.80 | 1.60 | 1 |
| Nearby Fast | Threshold | FAR [%] | FRR [%] |
|---|---|---|---|
| 1:100 FAR (APCER) | 0.87 | 1 | 3.17 |
| EER | 0.83 | 1.73 | 1.73 |
| 1:100 FRR (BPCER) | 0.80 | 2.67 | 1 |
Recommended face attributes
| Face Attribute | Distant Fast | Nearby Fast |
|---|---|---|
| Face confidence | [0.1; 1.0] | [0.1; 1.0] |
| Face size | [30; 60] | [60; inf] |
| Face relative area in the image | [0.9; inf] | - |
| Yaw angle | [-30; 30] | [-30; 30] |
| Pitch angle | [-30; 30] | [-30; 30] |
In SFE Toolkit C API use function [sfeFaceLivenessPassive] To use the correct liveness detection mode, load the appropriate solver:
- face_liveness_passive_distant_fast
- face_liveness_passive_nearby_fast
Example:
  SFEFaceLiveness liveness = {};
  { // STAGE 5: Liveness check
    utils::printFormatted("LIVENESS CHECK");
    error = sfeFaceLivenessPassive(liveness_solver, image, landmarks.data(),
                                   &liveness);
    utils::checkError(error);
  }
Use the following function in SFE Toolkit bindings:
- In Python use
sfe_face.liveness_passive - In Kotlin use
com.innovatrics.smartface.embedded.toolkit.face.livenessPassive - In Swift use
SFEToolkitFace.livenessPassive - In .NET use
Innovatrics.SFEToolkit.Face.LivenessPassive
Face Attributes
SmartFace Embedded supports various functions to evaluate face attributes.
Headpose angles
Face head pose attributes contain angle rotations of the head, specifically yaw, pitch and roll.
- The
rollis a face attribute representing the angular rotation of the head towards the camera reference frame around the Z-axis. - The
yawis a face attribute representing the angular rotation of the head towards the camera reference frame around the Y-axis. - The
pitchis a face attribute representing the angular rotation of the head towards the camera reference frame around the X-axis.
In SFE Toolkit C API use function [sfeFaceHeadpose]
Example:
    error = sfeFaceHeadPose(image, landmarks.data(), &head_pose);
    utils::checkError(error);
Use the following function in SFE Toolkit bindings:
- In Python use
sfe_face.head_pose - In Kotlin use
com.innovatrics.smartface.embedded.toolkit.face.headPose - In Swift use
SFEToolkitFace.headPose - In .NET use
Innovatrics.SFEToolkit.Face.GetFaceHeadPose
Face Area
The face area is closely related to the face size. It is an area around a face defined by a bounding rectangle with width = 4 x face_size, height = width / 0.75 (according to ISO/IEC 19794-5 standard, section 9.2). The Point which is the geometric center between eyes is positioned in the face area in position X_Pos, Y_Pos, where Y_Pos = 0.6f * width, and X_Pos relies on the head yaw rotation. The main reason for this is to have the whole head in the face area no matter what the head rotation is.
face relative areais the whole face area (including area exceeding image borders) relative to the image area.face relative area in the imageis the face area within the image borders relative to the image area.
In SFE Toolkit C API use function [sfeFaceArea]
Example:
    error = sfeFaceArea(image, landmarks.data(), &face_area);
    utils::checkError(error);
Use the following function in SFE Toolkit bindings:
- In Python use
sfe_face.area - In Kotlin use
com.innovatrics.smartface.embedded.toolkit.face.area - In Swift use
SFEToolkitFace.area - In .NET use
Innovatrics.SFEToolkit.Face.GetFaceArea
Image quality attributes
The image face quality attributes that can be calculated are sharpness, brightness, contrast and unique intensity levels. All attributes are normalized and their value can be from range <0, 1>.
- The
sharpnessis a face attribute for evaluating whether an area of the face image is not blurred. The decision threshold for sharpness is 0.5, values near 0 indicate 'very blurred', and values near 1 indicate 'very sharp'. - The
brightnessis a face attribute for evaluating whether an area of the face is correctly exposed. Values near 0 indicate 'too dark', values near 1 indicate 'too light', and values around 0.5 indicate OK. The decision thresholds are around 0.25 and 0.75. - The
contrastis a face attribute for evaluating whether an area of the face is contrast enough. Values near 0 indicate 'very low contrast', values near 1 indicate 'very high contrast', and values around 0.5 indicate OK. The decision thresholds are around 0.25 and 0.75. - The
unique intensity levelsrepresent a face attribute for evaluating whether an area of the face has an appropriate number of unique intensity levels. Values near 0 indicate 'very few unique intensity levels', and values near 1 indicate 'enough unique intensity levels'. The decision threshold is around 0.5.
In SFE Toolkit C API use function [sfeFaceQualityAttributes]
Example:
    error =
        sfeFaceQualityAttributes(image, landmarks.data(), &quality_attributes);
    utils::checkError(error);
Use the following function in SFE Toolkit bindings:
- In Python use
sfe_face.quality_attributes - In Kotlin use
com.innovatrics.smartface.embedded.toolkit.face.qualityAttributes - In Swift use
SFEToolkitFace.qualityAttributes - In .NET use
Innovatrics.SFEToolkit.Face.QualityAttributes
Face Demographic Attributes
SmartFace Embedded can estimate face demographic attributes such as age and gender from a detected face.
- Age: Estimated age in years.
- Gender: Normalized gender score in range < -1, 1 >. Values near -1 indicate 'male', values near 1 indicate 'female', and values around 0 indicate uncertainty.
In SFE Toolkit C API use function [sfeFaceDemographicAttributes].
Example:
  SFEFaceDemographicAttributes attributes{};
  { // STAGE 5: Demographic attributes
    utils::printFormatted("FACE DEMOGRAPHIC ATTRIBUTES");
    error = sfeFaceDemographicAttributes(demographic_solver, image,
                                         landmarks.data(), &attributes);
    utils::checkError(error);
  }
Use the following function in SFE Toolkit bindings:
- In Python use
sfe_face.demographic_attributes - In Kotlin use
com.innovatrics.smartface.embedded.toolkit.face.demographicAttributes - In Swift use
SFEToolkitFace.demographicAttributes - In .NET use
Innovatrics.SFEToolkit.Face.DemographicAttributes
Iris detection
Iris detection is a process of detecting the iris and pupil in the input eye image.
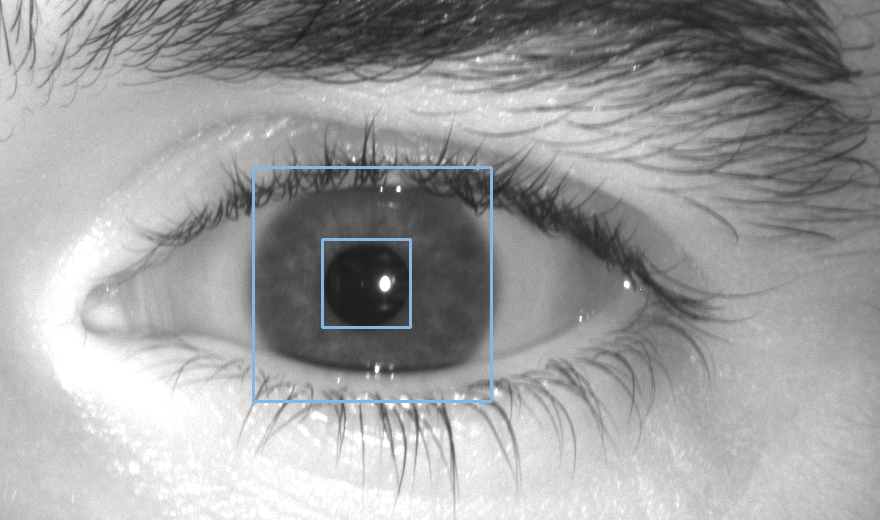
Iris detection results annotated in the input image.
Iris detection returns detected iris as a structure containing the iris bounding box, pupil bounding box, detection confidence and iris keypoints. Iris detection confidence is a value in the range <0.0, 1.0> and it refers to the confidence score of the iris related to iris detection. The iris detection confidence can be used to filter low-quality irises from further processing (template extraction and matching). The recommended threshold is 0.7.
In SFE Toolkit C API use function [sfeDetect] with an iris detection solver. The unified sfeDetect() function automatically determines the detection modality based on the solver type.
Example:
  SFEDetection detected_iris = {};
  size_t iris_count = 1;
  { // STAGE 2: Detect iris in the image

    // Detect iris in the image
    error = sfeDetect(detector_solver, image, 0.1f, &detected_iris, &iris_count);
    utils::checkError(error);

    if (iris_count == 0 || detected_iris.confidence < 0.5) {
      throw std::runtime_error("No iris detected in the probe image.");
    }

    std::cout << "Found iris in the image. Extracting template..." << std::endl;
  }
Use the following function in SFE Toolkit bindings:
- In Python use
sfe_iris.detect - In Kotlin use
com.innovatrics.smartface.embedded.toolkit.iris.detect - In Swift use
SFEToolkitIris.detect - In .NET iris functionality is not implemented yet
Iris Template Extraction
SmartFace Embedded can be also used for 1:1 (verification) and 1:N (identification) iris recognition.
To perform 1:1 or 1:N matching it is necessary to extract an iris template. The iris template is a feature vector describing the iris. The size of the iris template is only 522 B so the memory requirements for identification are low and the matching is very fast.
In SFE Toolkit C API use function [sfeIrisTemplateExtract]
Example:
  SFEIrisTemplate iris_template;
  { // STAGE 3 Extract probe iris template
    // Use template extraction solver to create new iris
    // template
    error = sfeIrisTemplateExtract(template_solver, image, &detected_iris,
                                   &iris_template);
    utils::checkError(error);
  }
Use the following function in SFE Toolkit bindings:
- In Python use
sfe_iris.extract - In Kotlin use
com.innovatrics.smartface.embedded.toolkit.iris.extract - In Swift use
SFEToolkitIris.extract - In .NET iris functionality is not implemented yet
The iris template includes the template version and quality. Both can be obtained using C API.
- Template version is used during matching to make sure the versions of the template being matched are the same.
- Template quality is a value in the range <0.0, 1.0> and it indicates the suitability of the template for matching. The higher template quality leads to better-matching results.
In SFE Toolkit C API use functions [sfeIrisTemplateVersion] and [sfeIrisTemplateQuality]
Example:
    SFEIrisTemplateVersion version = {};
    error = sfeIrisTemplateVersion(&probe_iris_template, &version);
    utils::checkError(error);

    std::cout << "Version of the probe template: " << version.version_major
              << '.' << version.version_minor << std::endl;
Use the following function in SFE Toolkit bindings:
- In Python use
sfe_iris.template_qualityandsfe_iris.template_version - In Kotlin use
com.innovatrics.smartface.embedded.toolkit.iris.templateQualityandcom.innovatrics.smartface.embedded.toolkit.iris.templateVersion - In Swift use
SFEToolkitIris.templateQualityandSFEToolkitIris.templateVersion - In .NET iris functionality is not implemented yet
Iris verification template compatibility
The iris template has its system of version numbers. Major number change defines radical changes in the internal structure of the template document. Minor number change defines a change in extraction algorithm or minor data change of template. Newer iris templates (extracted with a faster or more accurate algorithm) are not compatible with previous templates.
In SFE Toolkit C API use function [sfeIrisTemplateVersion]
Use the following function in SFE Toolkit bindings:
- In Python use
sfe_iris.template_version - In Kotlin use
com.innovatrics.smartface.embedded.toolkit.iris.templateVersion - In Swift use
SFEToolkitIris.templateVersion - In .NET iris functionality is not implemented yet
Iris Template Verification
Verification is a comparison of two extracted iris templates and it returns a matching score which refers to the probability that the two templates are extracted from the iris of the same eye. When the matching score is higher than a certain score threshold then the iris images belong to the same eye with high probability. The matching score range is <0.0, 1.0>. Its values can be interpreted as follows:
- Low values of the score, i.e. range <0, 0.6>, are normalized using FAR values and this formula:
score_L=-10*log(FAR)/100. It means that score 0.3 is related to FAR=1:1000=10^-3, and score 0.5 is related to FAR=1:100000=10^-5 (evaluated on our large testing non-matching pairs dataset). - High values of the score, i.e. range <0.8, 1.0>, are normalized using FRR values and this formula:
score_H=100/3*(FRR + 2)/100. It means that a score of 0.8 is related to FRR=0.4, and a score of 0.9 is related to FRR=0.7 (evaluated on our large testing matching pairs dataset). - Scores values in the range (0.6, 0.8) are weighted averages of score_L and score_H. This normalization helps the users to select the score threshold according to their needs. If it is too low e.g. threshold = 0.3, then the chance of falsely accepted non-matching irises is quite high (FAR=10^-3). When it is too high e.g. threshold = 0.9, then the chance of false rejected matching irises is quite high (FRR=0.7).
In SFE Toolkit C API use function [sfeIrisTemplateMatch]
Example:
  { // STAGE 4: 1:1 matching with top candidate to showcase 1:1 matching
    utils::printFormatted("1:1 MATCHING");

    if (identification_results.size() == 0) {
      std::cout << "No candidates found above identification threshold "
                << identification_threshold << std::endl;
      return 0;
    }

    // Since it's sorted vector by score, the best candidate is the first one
    auto match_palm_template =
        palm_template_gallery[identification_results[0].index];

    float match_confidence;
    error = sfePalmTemplateMatch(&probe_palm_template, &match_palm_template,
                                 &match_confidence);
    utils::checkError(error);

    std::cout
        << "Matching score of probe template with the best template, score: "
        << match_confidence << std::endl;
  }
Use the following function in SFE Toolkit bindings:
- In Python use
sfe_iris.template_match - In Kotlin use
com.innovatrics.smartface.embedded.toolkit.iris.templateMatch - In Swift use
SFEToolkitIris.templateMatch - In .NET iris functionality is not implemented yet
Iris Template Identification
Identification is the process of finding the best matching candidates for the probe template in the template gallery (database). The maximum number of best candidates to be returned by the identification function can be configured. It depends on the use case. Identification returns only candidates whose matching score with the probe template is higher or equal to the matching score threshold. For the matching score threshold recommendation please refer to the section Iris Template Verification
The identification is pure CPU-based and it can be configured how many CPU cores will be used for identification to optimize the performance within your application and also the CPU utilization.
In SFE Toolkit C API use function [sfeIrisTemplateIdentify]
Example:
  size_t candidate_count = 1;
  std::vector<SFETemplateIdentificationCandidate> identification_results(
      candidate_count);
  { // STAGE 3: Identify the probe template
    utils::printFormatted("1:N IDENTIFICATION");

    error = sfePalmTemplateIdentify(
        &probe_palm_template, palm_template_gallery.data(),
        palm_template_gallery.size(), identification_threshold,
        identification_results.data(), &candidate_count, 4);
    utils::checkError(error);

    if (candidate_count == 0) {
      std::cout << "No candidates found above identification threshold "
                << identification_threshold << std::endl;
      return 0;
    }

    std::cout << "Found " << identification_results.size()
              << " candidates above identification threshold "
              << identification_threshold << std::endl;
    for (auto &result : identification_results)
      std::cout << "Template index: #" << result.index
                << ", score: " << result.score << std::endl;
  }
Use the following function in SFE Toolkit bindings:
- In Python use
sfe_iris.template_identify - In Kotlin use
com.innovatrics.smartface.embedded.toolkit.iris.templateIdentify - In Swift use
SFEToolkitIris.templateIdentify - In .NET iris functionality is not implemented yet
SFE Toolkit also supports the identification of Entities. Entity ID is used to group multiple iris templates of the same eye. The result of identification is a list of Entity IDs ordered by best matching score of iris templates associated with the same Entity ID.
In SFE Toolkit C API use function [sfeIrisEntityIdentify]
See the (Face Template Identification) section for entity example and documentation.
Use the following function in SFE Toolkit bindings:
- In Python use
sfe_iris.entity_identify - In Kotlin use
com.innovatrics.smartface.embedded.toolkit.iris.entityIdentify - In Swift use
SFEToolkitIris.entityIdentify - In .NET iris functionality is not implemented yet
Palm detection
Palm detection is a process of detecting the palm in the hand image. The whole hand should be present in the input image for the palm to be detected correctly.
Palm detection returns detected palm as a structure containing the palm bounding box, palm keypoints, hand side (left/right), and hand orientation (palmar/dorsal).
In SFE Toolkit C API use function [sfeDetect] with a palm detection solver. The unified sfeDetect() function automatically determines the detection modality based on the solver type.
Example:
  SFEDetection detected_palm = {};
  { // STAGE 2: Detect palm in the image

    // Detect palm in the image
    float detection_threshold = 0.1f;
    size_t detected_count = 1;
    error = sfeDetect(detector_solver, image, detection_threshold,
                          &detected_palm, &detected_count);
    utils::checkError(error);

    if (detected_count > 0 && detected_palm.confidence < 0.5) {
      throw std::runtime_error("No palm detected in the probe image.");
    }

    std::cout << "Found palm in the image. Extracting template..." << std::endl;
  }
Palm Template Extraction
SmartFace Embedded can be also used for 1:1 (verification) and 1:N (identification) palm recognition.
To perform 1:1 or 1:N matching it is necessary to extract a palm template. The palm template is a binary representation of the palm. The size of the palm template is only 522B.
In SFE Toolkit C API use function [sfePalmTemplateExtract]
Example:
  SFEPalmTemplate palm_template;
  { // STAGE 4: Extract probe palm template
    // Use template extraction solver to create new palm template
    // Requires palm landmarks from previous step
    error = sfePalmTemplateExtract(extraction_solver, image, &landmarks,
                                   &palm_template);
    utils::checkError(error);
  }
Palm Template Verification
Verification is a comparison of two extracted palm templates and it returns a matching score which refers to the probability that the two templates are extracted from the same palm or hand. When the matching score is higher than a certain score threshold then the palm images belong to the same hand with high probability. The matching score range is <0.0, 1.0>.
In SFE Toolkit C API use function [sfePalmTemplateMatch]
Example:
  { // STAGE 4: 1:1 matching with top candidate to showcase 1:1 matching
    utils::printFormatted("1:1 MATCHING");

    if (identification_results.size() == 0) {
      std::cout << "No candidates found above identification threshold "
                << identification_threshold << std::endl;
      return 0;
    }

    // Since it's sorted vector by score, the best candidate is the first one
    auto match_palm_template =
        palm_template_gallery[identification_results[0].index];

    float match_confidence;
    error = sfePalmTemplateMatch(&probe_palm_template, &match_palm_template,
                                 &match_confidence);
    utils::checkError(error);

    std::cout
        << "Matching score of probe template with the best template, score: "
        << match_confidence << std::endl;
  }
Palm Template Identification
Identification is the process of finding the best matching candidates for the probe template in the template gallery (database). The maximum number of best candidates to be returned by the identification function can be configured. It depends on the use case. Identification returns only candidates whose matching score with the probe template is higher or equal to the matching score threshold.
The identification is pure CPU-based and it can be configured how many CPU cores will be used for identification to optimize the performance within your application and also the CPU utilization.
In SFE Toolkit C API use function [sfePalmTemplateIdentify]
Example:
  size_t candidate_count = 1;
  std::vector<SFETemplateIdentificationCandidate> identification_results(
      candidate_count);
  { // STAGE 3: Identify the probe template
    utils::printFormatted("1:N IDENTIFICATION");

    error = sfePalmTemplateIdentify(
        &probe_palm_template, palm_template_gallery.data(),
        palm_template_gallery.size(), identification_threshold,
        identification_results.data(), &candidate_count, 4);
    utils::checkError(error);

    if (candidate_count == 0) {
      std::cout << "No candidates found above identification threshold "
                << identification_threshold << std::endl;
      return 0;
    }

    std::cout << "Found " << identification_results.size()
              << " candidates above identification threshold "
              << identification_threshold << std::endl;
    for (auto &result : identification_results)
      std::cout << "Template index: #" << result.index
                << ", score: " << result.score << std::endl;
  }
Palm Liveness Detection
Palm recognition systems are vulnerable to spoof attacks made by non-real palms. It is an easy way to spoof palm recognition systems by palm images such as photographs, prints and videos which are easily available. A secure system needs a liveness evaluation strategy to guard against such spoofing.
Palm liveness detection is a process of recognizing spoof attacks and non-real palms. It can recognize a real palm against a photograph, prints and videos. The passive liveness score is defined over the interval <0,1>.
Recommended threshold for Palm passive liveness modes
| Palms | Threshold | FAR [%] | FRR [%] |
|---|---|---|---|
| 1:100 FAR (APCER) | 0.8543 | 1 | 3.67 |
| EER | 0.8189 | 1.88 | 1.88 |
| 1:100 FRR (BPCER) | 0.7952 | 3.93 | 1 |
In SFE Toolkit C API use function [sfePalmLivenessPassive] To use the correct liveness detection mode, load the appropriate solver:
- palm_liveness
Example:
  float liveness_score = 0.0f;
  { // STAGE 4: Liveness check
    utils::printFormatted("LIVENESS CHECK");
    error = sfePalmLivenessPassive(liveness_solver, image, &detected_palm,
                                   &liveness_score);
    utils::checkError(error);
  }
Use the following function in SFE Toolkit bindings:
- In Python use
sfe_palm.liveness_passive - In Kotlin use
com.innovatrics.smartface.embedded.toolkit.palm.livenessPassive - In Swift use
SFEToolkitPalm.livenessPassive - In .NET use
Innovatrics.SFEToolkit.Palm.LivenessPassive
Palm Attributes
Once a palm is detected, the SFE Toolkit can be used to calculate the following attributes:
-
Hand Position Prediction of the hand position.
Range <0, 1>. If it is nearer to 0 - it is left hand, if it is near to 1 it is right hand. You can set threshold to 0.5.
-
Hand Orientation Prediction of the hand orientation.\
Range <0, 1>. If it is nearer to 0 - it is palmar side of the hand, if it is near to 1 it is dorsal side of the hand. You can set threshold to 0.5.
-
Quality Indicates the quality of the palm image, used to decide whether it is suitable for further processing.
Range <0, 1>. The recommended threshold for further palm processing is 0.6.
In SFE Toolkit C API use function [sfePalmAttributes]
Example:
      utils::printFormatted("ATTRIBUTES");
      SFEPalmAttributes attributes = {};
      error = sfePalmAttributes(attributes_solver, image, &landmarks,
                                &attributes);
      utils::checkError(error);
Use the following function in SFE Toolkit bindings:
- In Python use
sfe_palm.attributes - In Kotlin use
com.innovatrics.smartface.embedded.toolkit.palm.attributes - In Swift use
SFEToolkitPalm.attributes - In .NET use
Innovatrics.SFEToolkit.Palm.Attributes
Person Detection
SmartFace Embedded supports person detection with oriented bounding boxes for more accurate detection results.
Oriented Person Detection
Person detection with oriented bounding boxes provides more precise detection results compared to standard rectangular bounding boxes. This is particularly useful for detecting persons using fisheye cameras.
In SFE Toolkit C API use function [sfeDetect] with a person detection solver. The unified sfeDetect() function automatically determines the detection modality based on the solver type.
Example:
Use the following function in SFE Toolkit bindings:
- In Python use
sfe_core.detectwith a person detection solver - In Kotlin use
com.innovatrics.smartface.embedded.toolkit.core.detectwith a person detection solver - In Swift use
SFEToolkitCore.detectwith a person detection solver - In .NET use
Innovatrics.SFEToolkit.Core.Detectwith a person detection solver
Person Attributes
SmartFace Embedded supports detection of 26 person attributes from a person image or crop. These attributes include clothing, accessories, and physical characteristics.
Supported Person Attributes
The system can detect the following 26 person attributes:
- Clothing: Hat, glasses, sunglasses, shirt, pants, shorts, skirt, dress, shoes, boots, sandals
- Accessories: Backpack, handbag, umbrella, scarf, tie
- Physical: Age group, gender, posture, body orientation
- Activities: Holding objects, walking, standing, sitting
Attribute Confidence and Thresholds
Each attribute returns a confidence score in the range <0,1>. Higher values indicate higher probability that the attribute is present in the image.
In SFE Toolkit C API use function [sfePersonAttributes]
Example:
Use the following function in SFE Toolkit bindings:
- In Python use
sfe_person.attributes - In Kotlin use
com.innovatrics.smartface.embedded.toolkit.person.attributes - In Swift use
SFEToolkitPerson.attributes - In .NET use
Innovatrics.SFEToolkit.Person.Attributes
Tattoo detection
Tattoo detection is a process of detecting the tattoo in the image.
Tattoo detection returns detected tattoos as a list of bounding box and confidence.
In SFE Toolkit C API use function [sfeDetect] with a tattoo detection solver. The unified sfeDetect() function automatically determines the detection modality based on the solver type.
Example:
    error = sfeSolverCreate(
        solver.value_or("").c_str(), SOLVER_PARAMETERS.data(), SOLVER_PARAMETERS.size(),
        &detection_solver);
    utils::checkError(error);

    // Run detection for up to 10 tattoos
    size_t detection_count = detections.size();
    float detection_threshold = 0.3;
    error = sfeDetect(detection_solver, image, detection_threshold,
                            detections.data(), &detection_count);
Tattoo extraction
Tattoo extraction is a process of creating the tattoo biometric representation based on detection and the image of tattoo.
Tattoo extraction returns tattoo biometric representation.
In SFE Toolkit C API use function [sfeTattooTemplateExtract]
Supported platforms and features
Face modality
| Solver | Face detect | Face landmarks | Face template extract | Face passive liveness | Demographic Attributes |
|---|---|---|---|---|---|
| ONNXRT | accurate | 0.25, 0.50 | fast, balanced, accurate | distant fast, nearby fast | fast, accurate |
| Rockchip RKNPU | accurate | 0.25 | accurate | distant fast | - |
| Rockchip RKNPU2 | accurate | 0.25 | accurate | - | - |
| Ambarella | accurate | 0.25 | balanced, accurate | distant fast | - |
| Hailo | accurate | 0.25 | accurate | - | - |
| NXP iMX8 | accurate | 0.25 , 0.50 | balanced, accurate | - | - |
Other features such as face verification, face identification and face quality attributes or not implemented using a solver and so these are supported on all mentioned platforms.
Iris modality
| Solver | Iris detect | Iris template extract |
|---|---|---|
| ONNXRT | yes | yes |
| Rockchip RKNPU2 | yes | yes |
Other features such as iris verification, iris identification, and iris template quality are not solver-specific and are supported on all mentioned platforms.
Palm modality
| Solver | Palm detect | Palm template extract | Palm liveness |
|---|---|---|---|
| ONNXRT | yes | yes | yes |
| Ambarella | yes | yes | - |
Tattoo modality
| Solver | Tattoo detect | Tattoo extract |
|---|---|---|
| ONNXRT | yes | yes |
Person modality
| Solver | Person detect | Person attributes |
|---|---|---|
| ONNXRT | yes | yes |
Face tracking
| Solver | Face track |
|---|---|
| ONNXRT | yes |
| Rockchip RKNPU | yes |
| Rockchip RKNPU2 | yes |
| Ambarella | yes |
Input image data
SFE Toolkit can detect and recognize features of faces and irises in images. The is formatted as a raw color (3 channels) image. The image data structure is an array of bytes (unsigned char) where each pixel is formed by 3 bytes, which means 3 color channels ordered in BGR order. The origin of the image is in the upper-left corner. The size of the image data array can be calculated as image height * image width * 3 bytes.
SFE Toolkit provides functionality [sfeImageDecode] for loading of most common image formats (JPEG, PNG, BMP, ... ) into an appropriate format suitable for SmartFace Embedded processing [SFEImage].
Example:
    // Load image data from file
    auto image_data = utils::readFile(image_probe);

    // Decode image from data
    error = sfeImageDecode(image_data.data(), image_data.size(), &image);
    utils::checkError(error);
Use the following function in SFE Toolkit bindings:
- In Python use
sfe_core.image_open - In Kotlin use
com.innovatrics.smartface.embedded.toolkit.core.imageOpen - In Swift use
SFEToolkitCore.imageOpen - In .NET use
Innovatrics.SFEToolkit.Core.Image