Installation
In this section, you will find instructions on how to install the SFE Stream Processor on various platforms:
- Hanwha AI camera
- Axis AI camera
- Axiomtek RSC101 (Hailo-8)
- NVIDIA Jetson platforms
- NXP iMX8M Plus
- SFE Stream Processor Client Apps
You can use the SFE Stream Processor Client applications to test the SFE Stream Processor is configured and running correctly.
Hanwha camera installation
Download the latest version of the SFE Stream Processor Hanwha camera plugin at our Customer Portal.
Install SFE Stream Processor on your camera
After you unpack the package you can upload and install the Hanwha Open Platform Application (sfe_stream_processor.cap) on your camera with Ambarella CV2 chip and Ambarella SDK v3.0.
- Access the camera at the camera’s IP address/URL and log in.
-
Go to Settings->Open platform->Open platform and click ... to choose
sfe_stream_processor.capfile from your file system. Click Install to upload and install the application.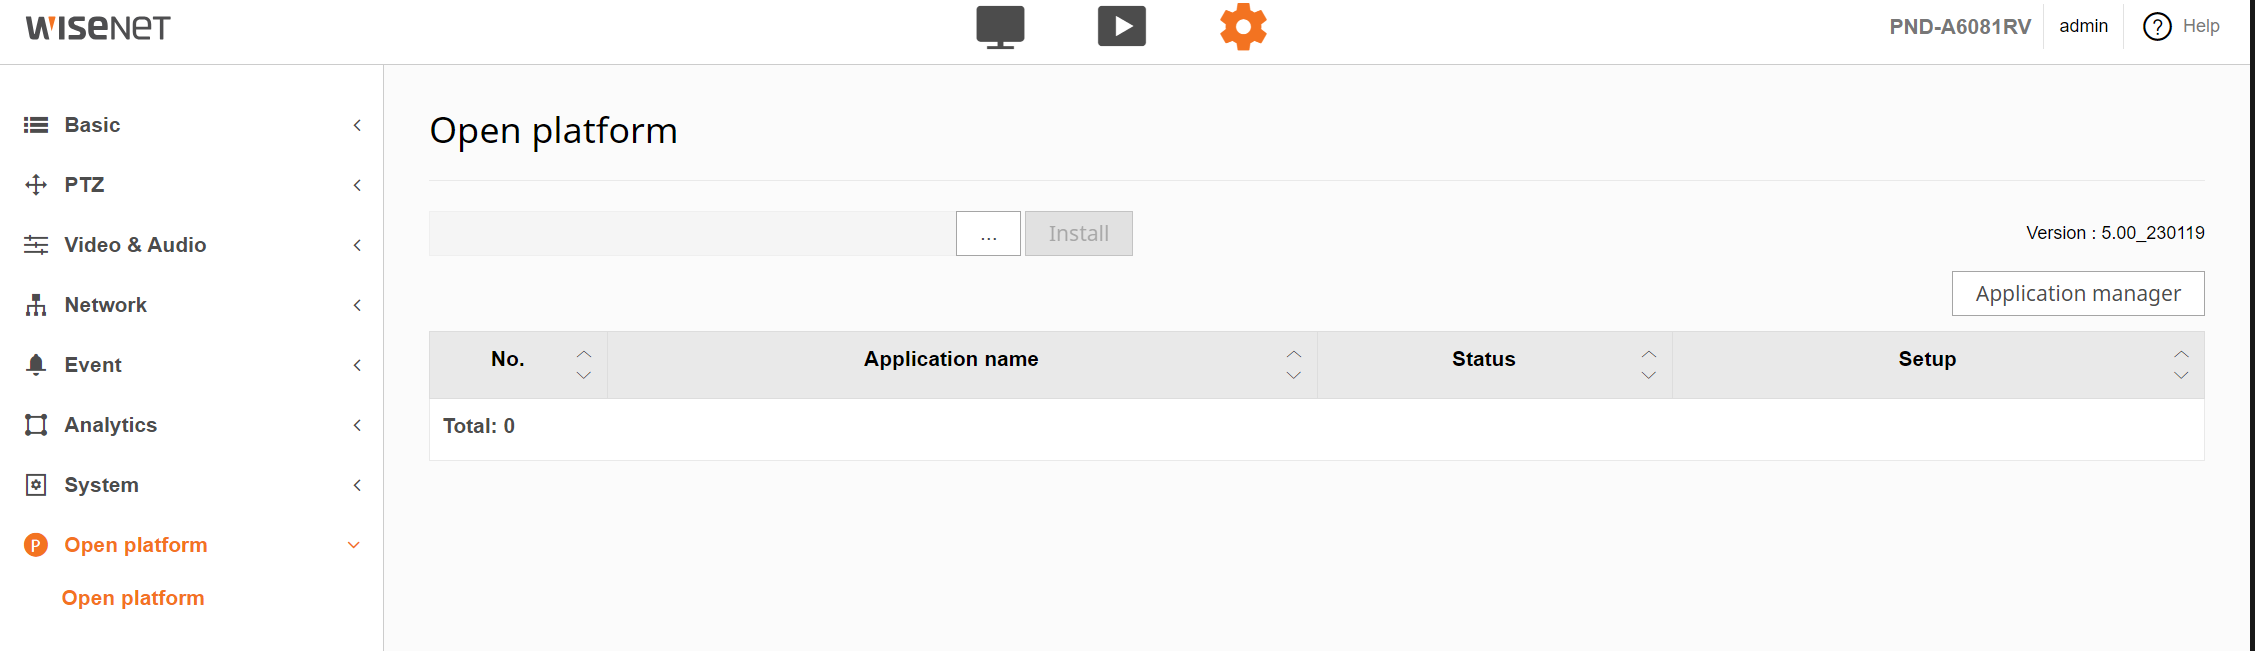
-
When the application is installed you will see the new application
sfe_stream_processorinstalled. To run the application click Start button. When the application is running the Status changes toRunning....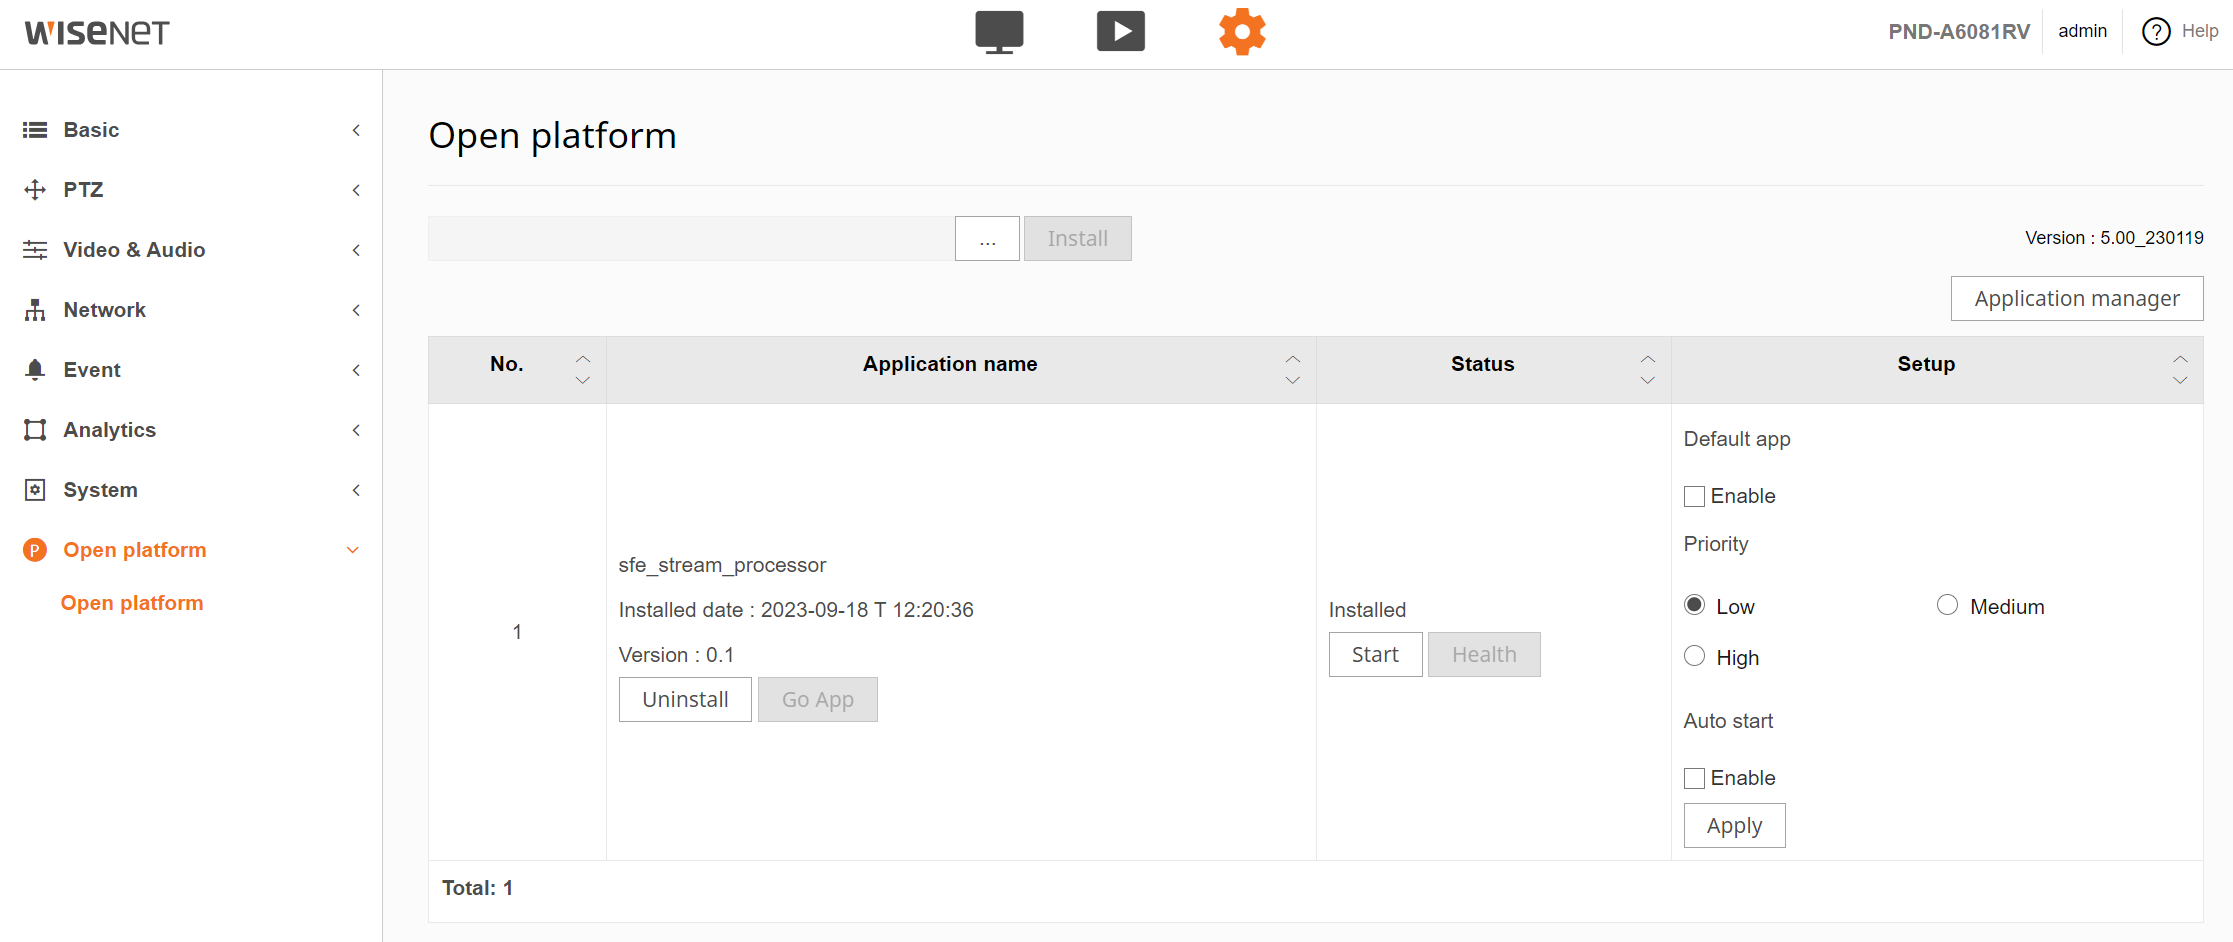
-
When the application is running you can also check the CPU and memory utilization as well as the run time of the application by clicking on the Health button.
-
To stop the application uncheck the checkbox. When the application is not running the Status changes to
Stopped. -
To uninstall the application click on Stop button and then on Uninstall button.
Get the HardwareID and install the license
To generate and deploy the license follow the Licensing instructions
Configure SFE Stream Processor
Refer to the SFE Stream Processor documentation for more information.
Video Processing Platform integration
To receive notifications from the SFE Stream Processor in Video Processing Platform Station you have to configure the SFE Stream Processor connection and create an Edge stream in Video Processing Platform Station Follow the instructions to configure Video Processing Platform.
Supported camera models
The SFE Stream Processor Hanwha camera application currently supports all Hanwha P series AI cameras with Ambarella CV2 chip, for example:
Axis camera installation
Download the latest version of the SFE Stream Processor Axis camera plugin at our Customer Portal.
Install SFE Stream Processor on your camera
- Extract the downloaded package.
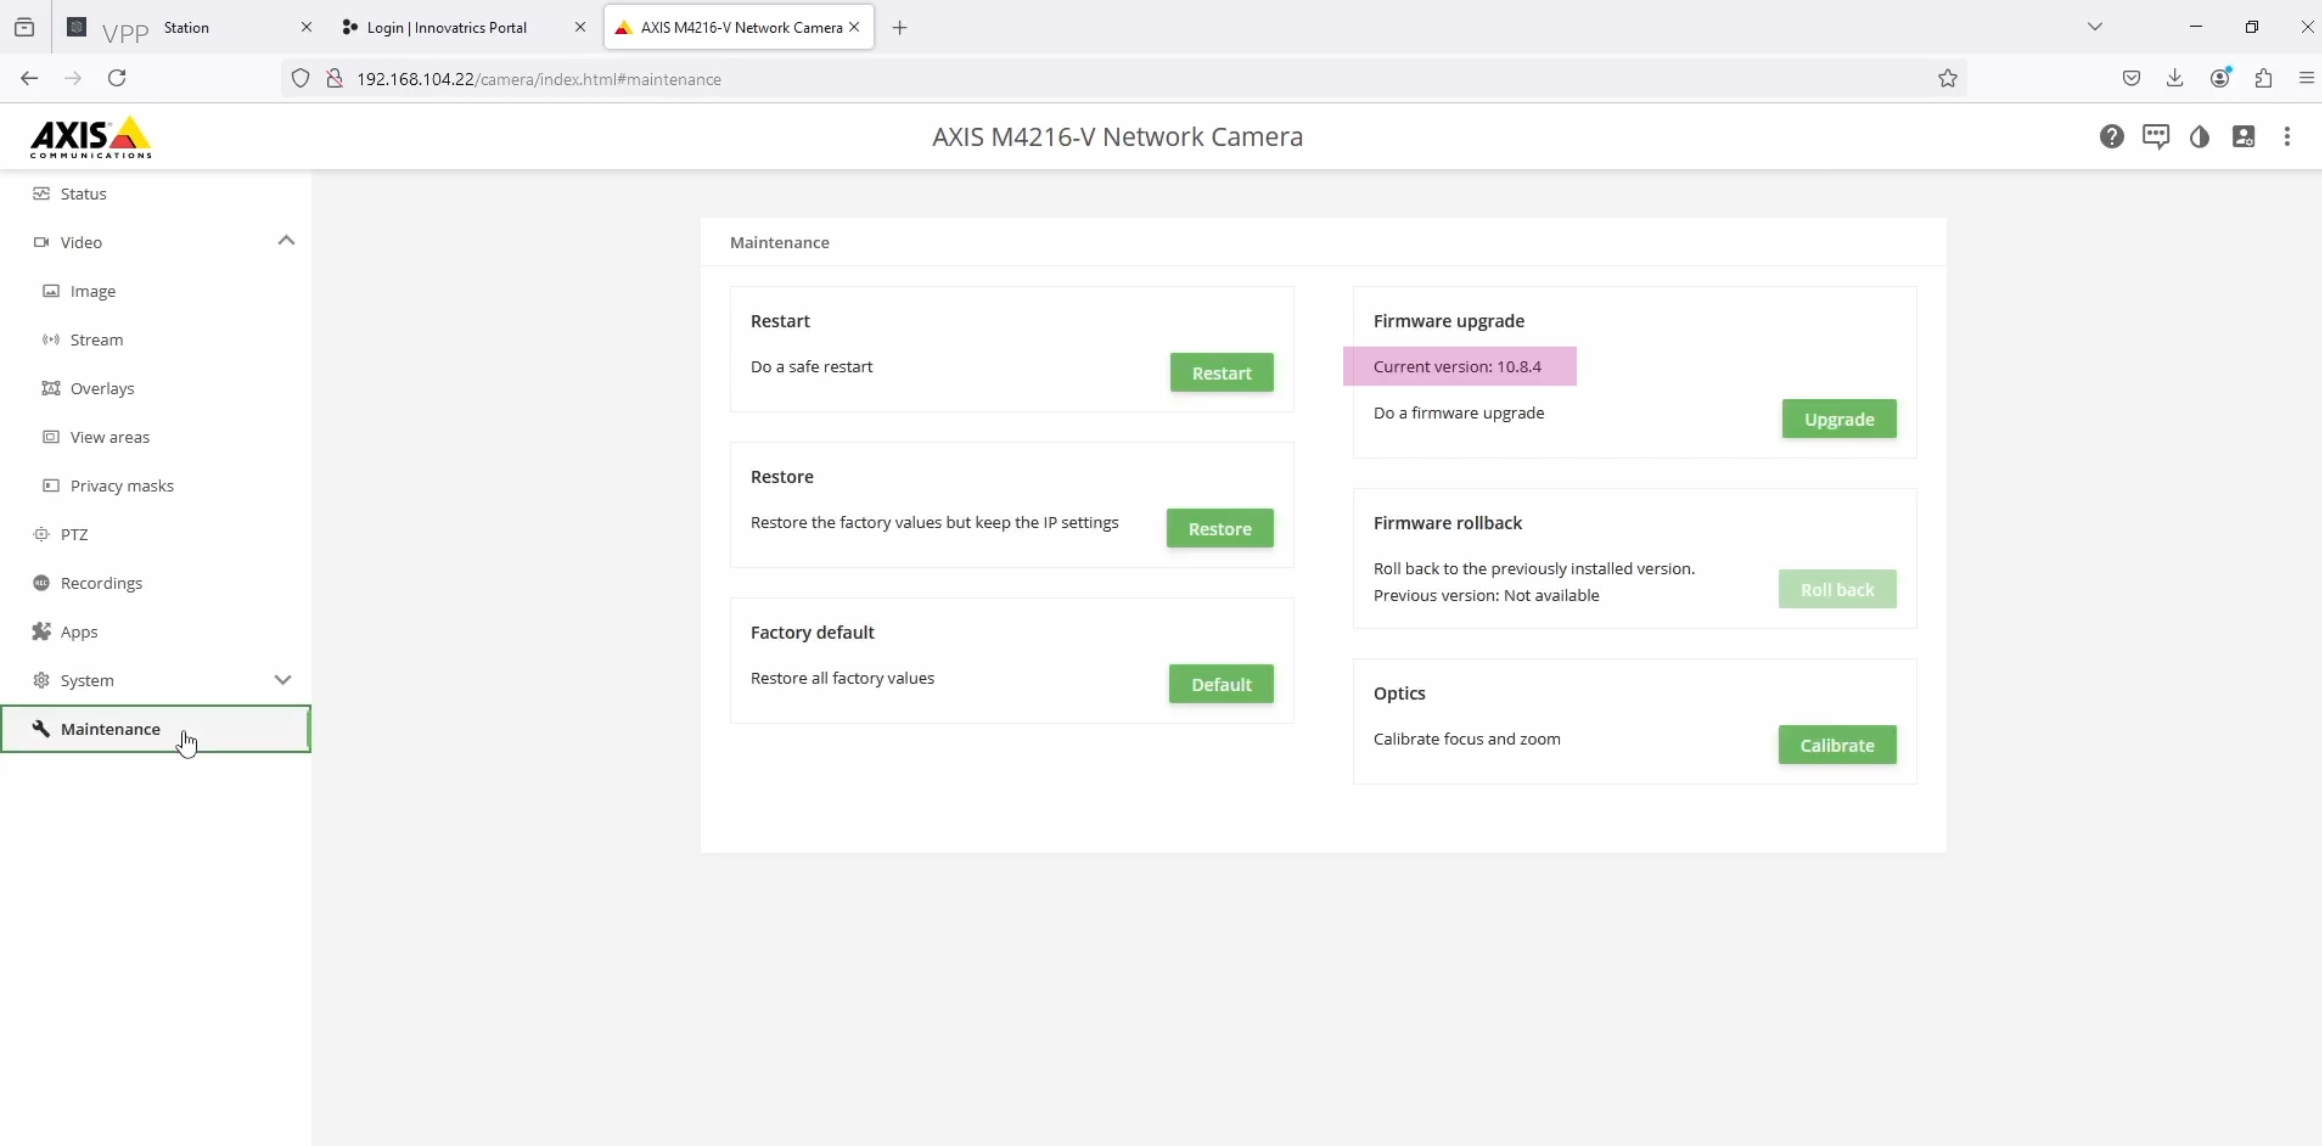
- Access the camera at the camera's IP address/URL and log in. Open the Maintenance section in the left menu.
-
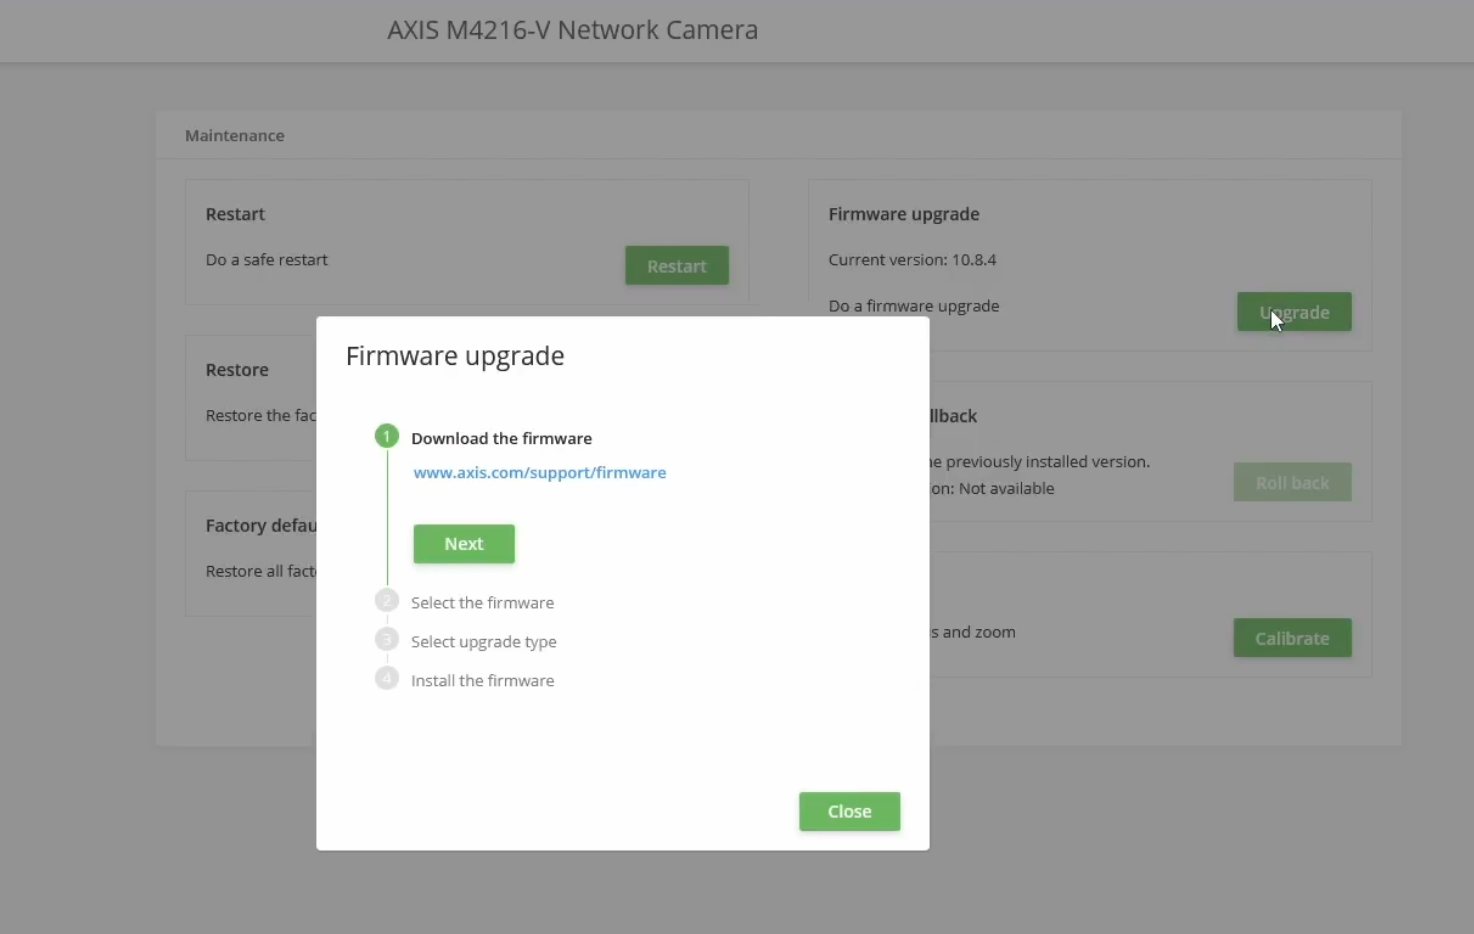
Check the current version under Firmware upgrade. Unless the version is 11.11.73 or higher, you need to update the firmware. Only major version 11 is supported — do not use version 12. If you already have a suitable version, skip this step.
- Copy the camera model name (for example
M4216-V) shown at the top of the screen. - Click Upgrade.
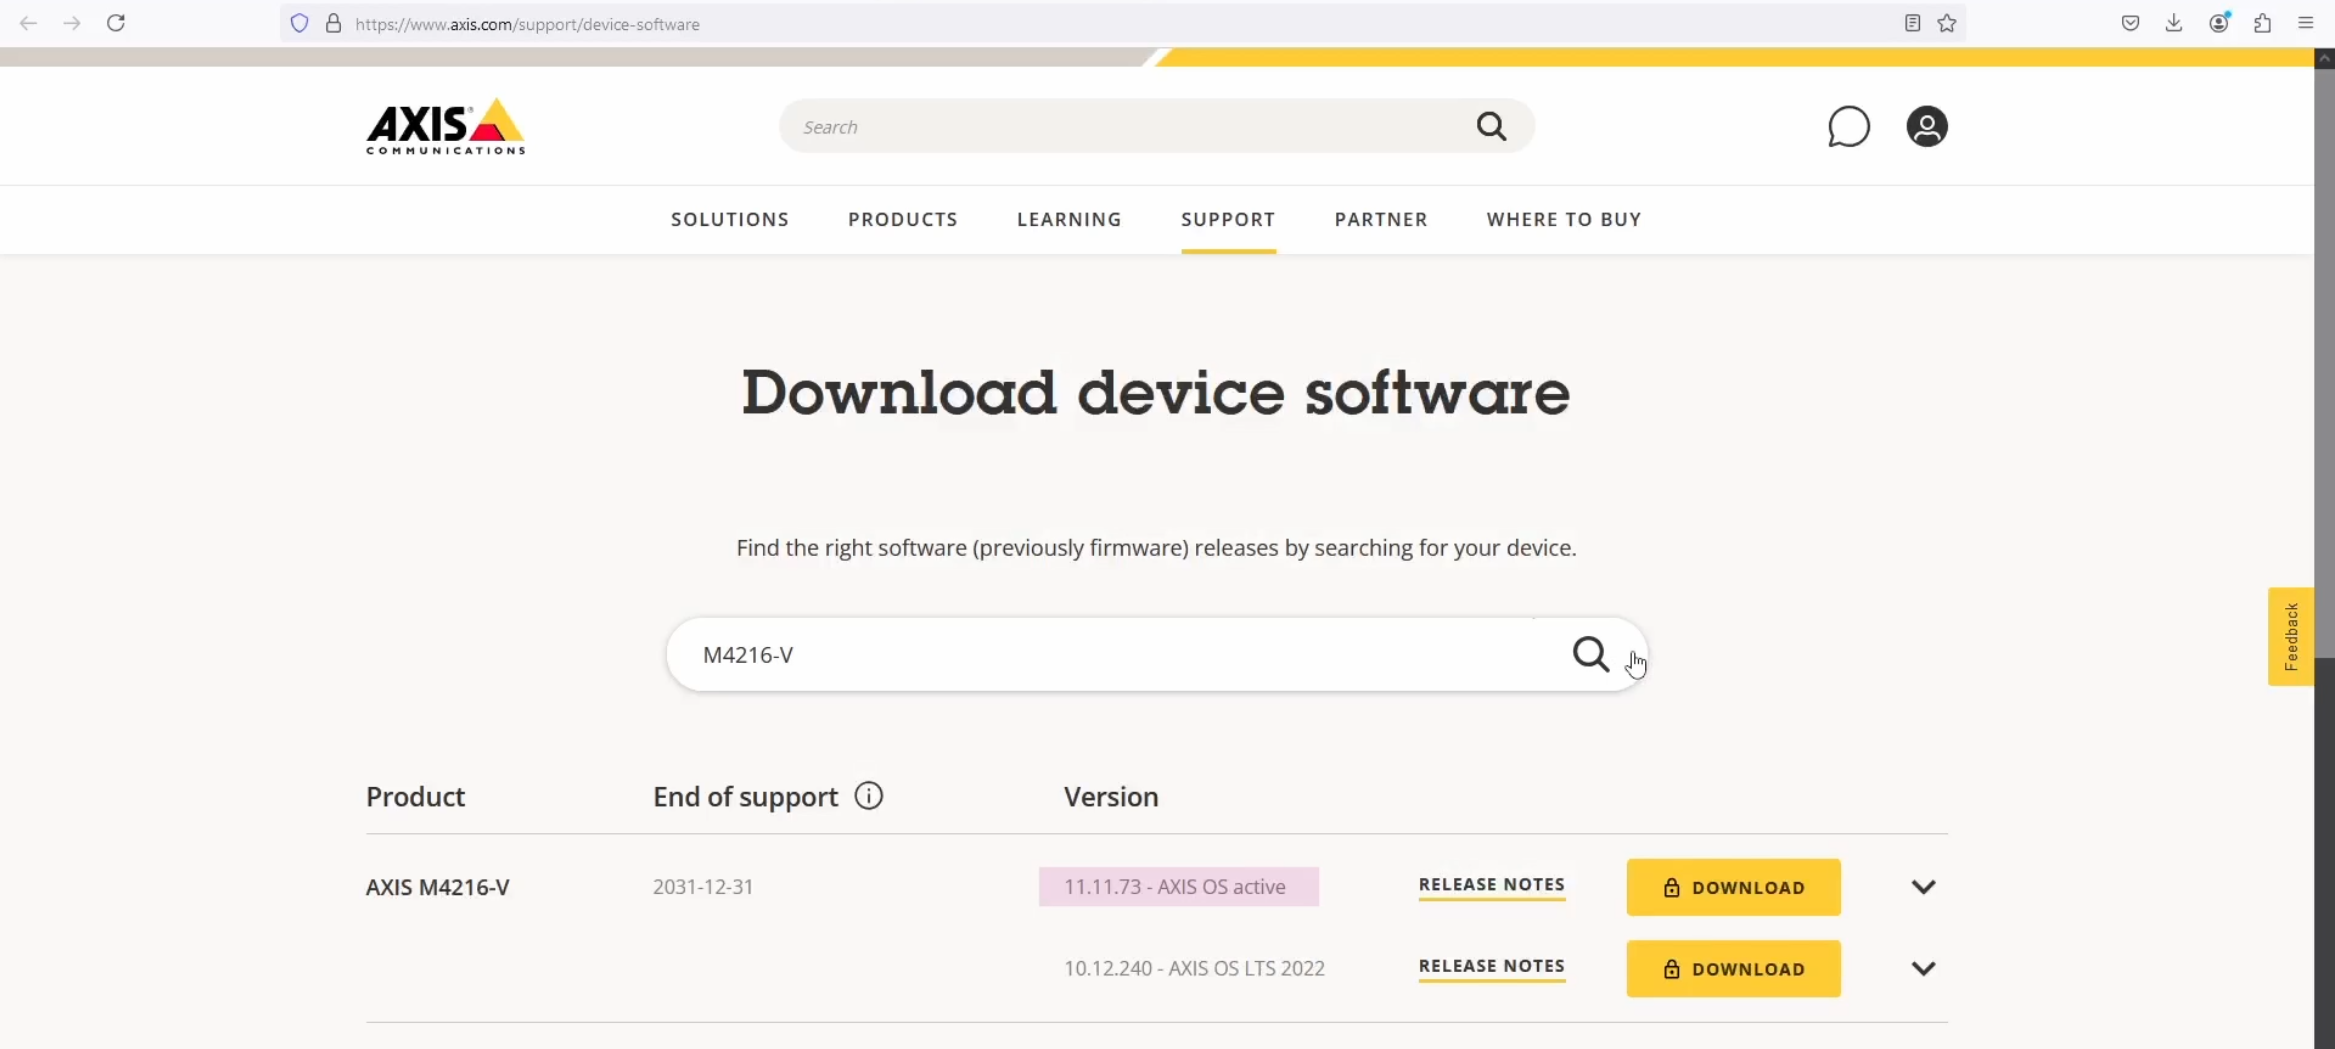
- Open the AXIS support website, search for firmware by camera model, and download the latest firmware.
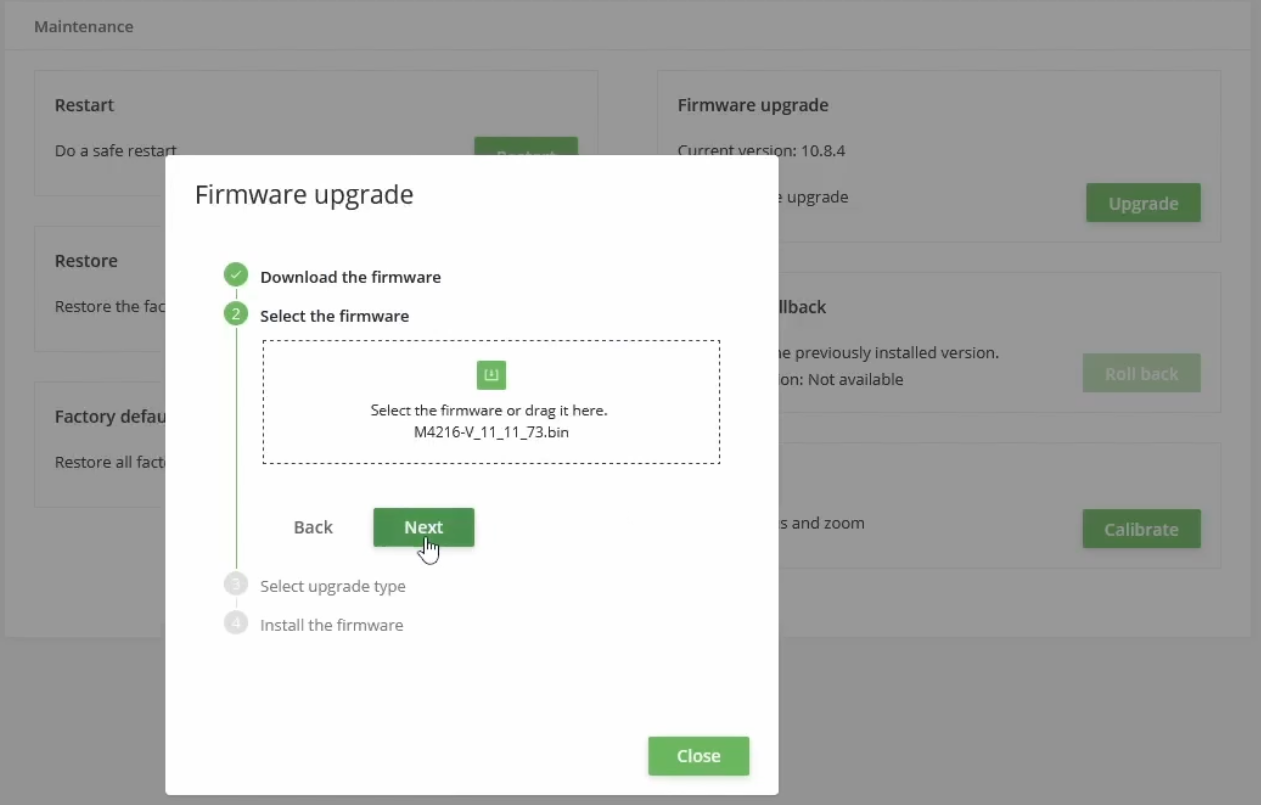
- In the camera upgrade dialog click Next and provide the firmware file (drag-and-drop is supported). Click Next, choose Standard upgrade, and click Next.
- Click Upgrade.
- Ensure the current version is now at least 11.11.73. If there is an issue, restoring the camera to factory defaults before reapplying this step usually resolves it.
- Copy the camera model name (for example
-
Go to the Apps section in the left menu.
-
Click the + Add app button.
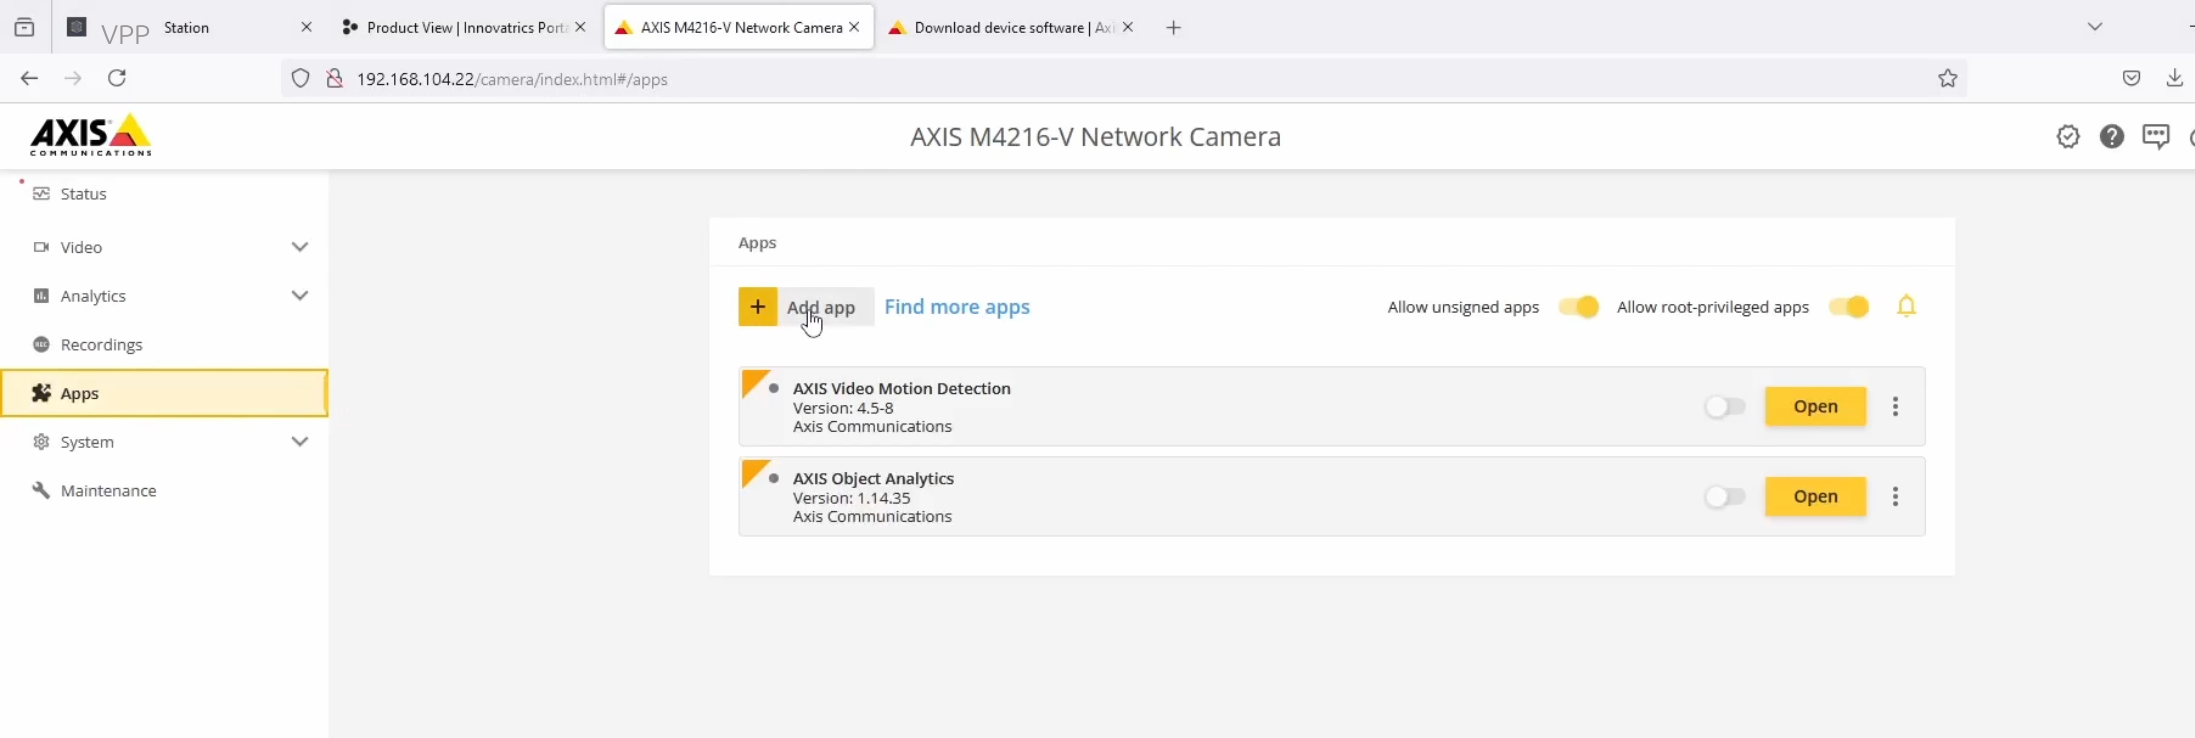
- Select or drag-and-drop the SFE Stream Processor Axis plugin (
.eapfile) and click Install. - Once installed, toggle the application to enable it, then click Open to open the SFE Stream Processor plugin.
Get the HardwareID and install the license
To generate and deploy the license follow the Licensing instructions.
Configure SFE Stream Processor
Refer to the SFE Stream Processor configuration for more information.
Video Processing Platform integration
To receive notifications from the SFE Stream Processor in Video Processing Platform Station you have to configure the SFE Stream Processor connection and create an Edge stream in Video Processing Platform Station.
Supported camera models
The SFE Stream Processor Axis camera plugin supports AXIS cameras with the Ambarella CV25 chip, for example:
Axiomtek (Hailo) installation
Installation instructions for SFE Stream Processor on Axiomtek RSC101 with Hailo-8 chip.
Download the latest version of the SFE Stream Processor Axiomtek package at our Customer Portal.
Login to RSC101
Use default username test and password 123456
Upgrade Ubuntu
First, you need to update Ubuntu to version 22.04, which is required by the latest version of Hailo drivers
Install HailoRT drivers
Install the following packages from the Hailo developer zone:
HailoRT – PCIe driver Ubuntu package (deb) V4.17.0HailoRT – Ubuntu package (deb) for amd64 V4.17.0For more information see this page
Before installing the drivers you need to install the correct version of Linux headers or Intel IoTG:
$ sudo apt install linux-headers-5.15.0-1026-intel-iotg
Install PCIe driver
$ sudo dpkg --install hailort-pcie-driver_4.17.0_all.deb
Install HailoRT libraries
$ sudo dpkg --install hailort_4.17.0_amd64.deb
PC restart is required after driver installation.
After boot, you can use the hailortcli tool to validate that the device is identified:
$ hailortcli scan
Install H.264 decoder for GStreamer
Install the gstreamer1.0-plugins-bad package
$ sudo apt install gstreamer1.0-plugins-bad
Install VA-API drivers
Install VA-API to enable hardware video acceleration capabilities
$ sudo apt-get -y update
$ sudo apt-get -y install va-driver-all vainfo
Verify installation:
$ sudo vainfo
Note: The command should output a list of supported profiles and entry points
(Optional) Install the Intel GPU utilization tool
$ sudo apt-get -y install intel-gpu-tools
and display intel GPU utilization (needs root privileges):
$ sudo intel_gpu_top
Install VA-API GStreamer support
$ sudo apt-get -y install gstreamer1.0-vaapi
Verify that you have access to VA-API elements
$ gst-inspect-1.0 | grep vaapi
you should see something like this:
vaapi: vaapidecodebin: VA-API Decode Bin
vaapi: vaapih264dec: VA-API H264 decoder
vaapi: vaapih264enc: VA-API H264 encoder
# ... more elements
Run your first GStreamer pipeline with VA-API acceleration
$ gst-launch-1.0 filesrc location=test.mp4 \
! qtdemux ! vaapidecodebin ! vaapipostproc ! xvimagesink
you should see that in intel_gpu_top, the Video line shows some activity
Get the HardwareID and install the license
To generate and deploy the license follow the Licensing instructions.
Verify the installation by running SFE Stream Processor and local MQTT broker
Run MQTT broker
$ bin/mqtt_broker
Use run.sh to run the SFE Stream Processor with the sample video file
$ ./run.sh
Use sfe_client_gui to consume and visualize MQTT messages and register new users in DB.
Run bin/sfe_client_gui. See sfe_client_gui_example.png for configuration.
Using multiple settings files to process multiple streams
With the sfe_stream_processor application, it is easy to run multiple streams by just duplicating settings.yaml file and changing parameters of the frame_input solver in settings.yaml.
Then, you can run the application similarly to this:
./bin/sfe_stream_processor settings.yaml settings2.yaml ... settingsN.yaml
A specific example:
settings_usb.yaml:
...
solvers:
  frame_input:
    solver: ./solver/gstreamer_input.cpu.solver
    parameters:
      - name: gst_pipeline
        value: "v4l2src ..."
      - name: gst_width
        value: 1280
      - name: gst_height
        value: 720
...
settings_rtsp.yaml:
...
solvers:
  frame_input:
    solver: ./solver/gstreamer_input.cpu.solver
    parameters:
      - name: gst_pipeline
        value: "rtspsrc ..."
      - name: gst_width
        value: 1280
      - name: gst_height
        value: 720
...
settings_video.yaml:
...
solvers:
  frame_input:
    solver: ./solver/gstreamer_input.cpu.solver
    parameters:
      - name: gst_pipeline
        value: "filesrc ..."
      - name: gst_width
        value: 1280
      - name: gst_height
        value: 720
...
running:
./bin/sfe_stream_processor setting/settings_usb.yaml setting/settings_rtsp.yaml setting/settings_video.yaml
Video Processing Platform integration
Update the Video Processing Platform to the latest version available at GitHub. The Linux Docker installation steps are documented here.
To receive notifications from SFE Stream Processor in Video Processing Platform Station you have to configure the SFE Stream Processor connection and create an Edge stream in Video Processing Platform Station Follow the instructions to configure Video Processing Platform.
Supported devices
The SFE Stream Processor supports all edge devices with Hailo-8 AI accelerator, for example:
NVIDIA Jetson installation
Installation instructions for SFE Stream Processor on Jetson devices (Xavier NX, AGX Xavier, Orin)
Download the latest version of the SFE Stream Processor Jetson package at our Customer Portal.
Get the HardwareID and install the license
To generate and deploy the license follow the Licensing instructions.
Verify the installation
Verify the installation by running SFE Stream Processor and local MQTT broker
Run MQTT broker
$ bin/mqtt_broker
Use run.sh to run the SFE Stream Processor with the sample video file
$ ./run.sh
Use sfe_client_gui to consume and visualize MQTT messages and register new users in DB.
Run bin/sfe_client_gui. See sfe_client_gui_example.png for configuration.
Using multiple settings files to process multiple streams
With the sfe_stream_processor application, it is easy to run multiple streams by just duplicating settings.yaml file and changing parameters of the frame_input solver in settings.yaml.
Then, you can run the application similarly to this:
./bin/sfe_stream_processor settings.yaml settings2.yaml ... settingsN.yaml
A specific example:
settings_usb.yaml:
...
solvers:
  frame_input:
    solver: ./solver/gstreamer_input.cpu.solver
    parameters:
      - name: gst_pipeline
        value: "v4l2src ..."
      - name: gst_width
        value: 1280
      - name: gst_height
        value: 720
...
settings_rtsp.yaml:
...
solvers:
  frame_input:
    solver: ./solver/gstreamer_input.cpu.solver
    parameters:
      - name: gst_pipeline
        value: "rtspsrc ..."
      - name: gst_width
        value: 1280
      - name: gst_height
        value: 720
...
settings_video.yaml:
...
solvers:
  frame_input:
    solver: ./solver/gstreamer_input.cpu.solver
    parameters:
      - name: gst_pipeline
        value: "filesrc ..."
      - name: gst_width
        value: 1280
      - name: gst_height
        value: 720
...
running:
./bin/sfe_stream_processor setting/settings_usb.yaml setting/settings_rtsp.yaml setting/settings_video.yaml
Video Processing Platform integration
Update the Video Processing Platform to the latest version available at GitHub. The Linux Docker installation steps are documented here.
To receive notifications from SFE Stream Processor in Video Processing Platform Station you have to configure the SFE Stream Processor connection and create an Edge stream in Video Processing Platform Station Follow the instructions to configure Video Processing Platform.
Supported devices
The SFE Stream Processor supports NVIDIA Jetson (Xavier, Orin) based devices, for example:
NXP iMX8MPlus installation
Installation instructions for SFE Stream Processor on NXP iMX8M Plus.
Download the latest version of the SFE Stream Processor NXP package at our Customer Portal.
Get the HardwareID and install the license
To generate and deploy the license follow the Licensing instructions.
Configure SFE Stream Processor
Refer to the SFE Stream Processor documentation for more information.
Camera input solver
Before running the SFE Stream Processor application you need to configure the camera_input solver properly to get images from your USB camera.
For more information see Camera input solver and GStreamer input solver parameters.
Run SFE Stream Processor
Use run.sh to run the SFE Stream Processor with the input from the configured USB camera.
$ ./run.sh
Video Processing Platform integration
Update the Video Processing Platform to the latest version available at GitHub. The Linux Docker installation steps are documented here.
To receive notifications from SFE Stream Processor in Video Processing Platform Station you have to configure the SFE Stream Processor connection and create an Edge stream in Video Processing Platform Station Follow the instructions to configure Video Processing Platform.
SFE Stream Processor Client Apps
This page describes how to use the SFE Client application to register users in DB and consume frame_data messages from sfe_stream_processor.
Download the latest version of the SFE Client GUI Application at our Customer Portal. It is available for the following platforms:
- Windows x86_64
- Linux x86_64
- Linux arm64
SFE Client GUI
-
Run sfe_client_gui executable.
-
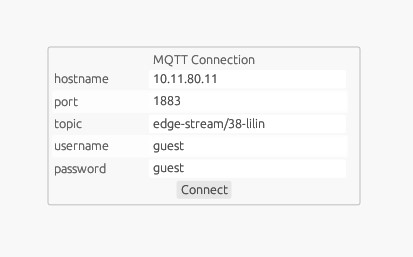
Configure MQTT connection.
-
Click Connect.
-
Click Register button under the cropped image of the detected face to register a new user in the database. If the identification is enabled on the camera the face will be matched against all faces in DB and if recognized, the given name will be displayed under the cropped image.